Author: Eddie Casas

  • What Is Crawl Depth in SEO? Why the 3-Click Rule Matters (and When It Doesn’t)

    What Is Crawl Depth in SEO? Why the 3-Click Rule Matters (and When It Doesn’t)

    Every SEO audit template repeats the same rule: keep every page within 3 clicks of the homepage. The rule is real. The way most guides apply it is not.

    Depth has a measurable cost: the deeper a page sits, the less often bots crawl it and the later it gets indexed. But “everything at 3 clicks” is not the fix. Flattening the right pages is. Here’s how to tell the difference.

    Table of contents

    What is crawl depth?

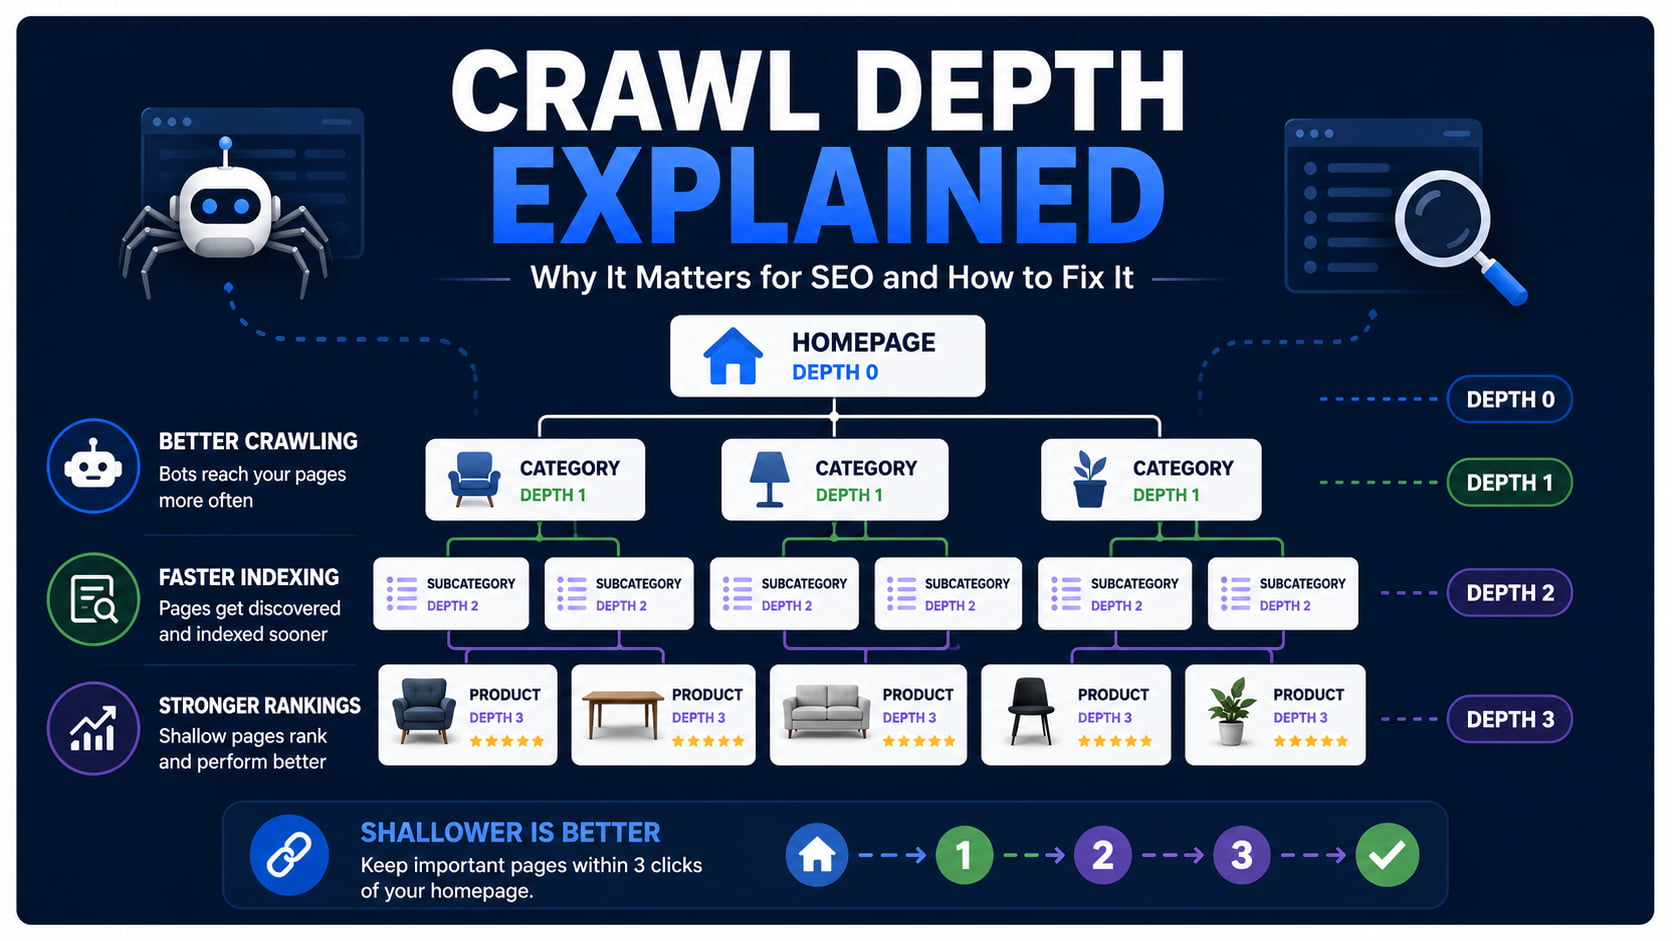
    Crawl depth is the number of clicks it takes a search engine bot to reach a page from your homepage. The homepage is depth 0, pages linked from it are depth 1, and so on. The deeper the page, the less often bots crawl it.

    Picture a typical client store. The homepage links to a category page (depth 1), the category links to a subcategory (depth 2), and the subcategory finally links to a product (depth 3). That product needed three hops of discovery before any bot could even know it exists. Add a color variant or a paginated product grid, and you’re at depth 4 before anyone has done anything wrong.
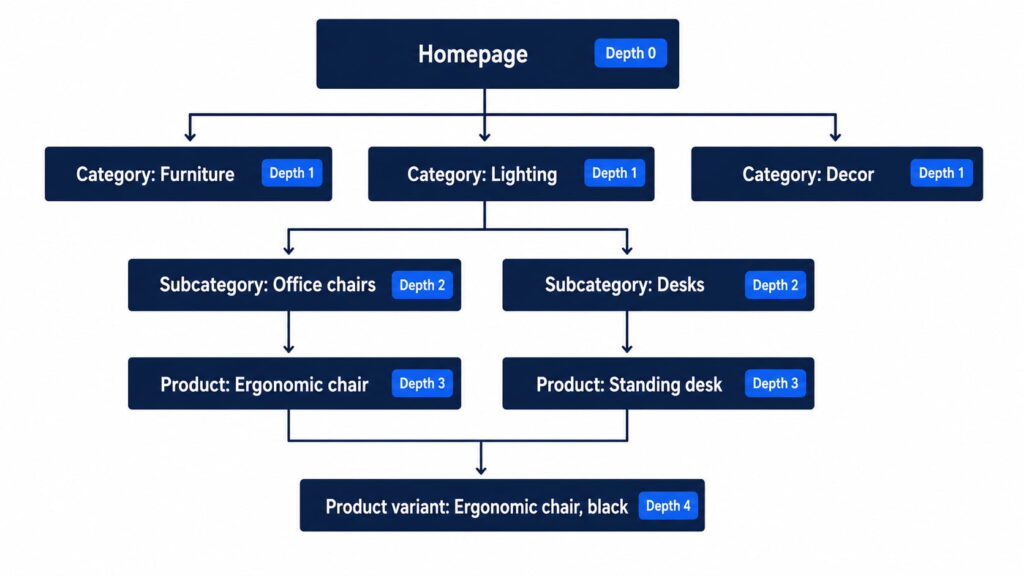
    Website crawl depth hierarchy diagram for an online store

    A typical store hierarchy puts products at depth 3 before a single filter or pagination link is added.

    Crawl depth vs click depth vs page depth

    You’ll see three terms used as if they were one. The difference is perspective, not math.

    TermPerspectiveWho uses it
    Click depthThe user: minimum clicks to reach a page from the homepageUX teams, most SEO tools
    Crawl depthThe bot: link hops a crawler follows from its entry pointLog-file tools, crawl documentation
    Page depthUmbrella term for eitherCasual usage in audits

    In practice, tools like Screaming Frog and Sitebulb measure click depth and label it “Crawl Depth” in their reports. Operationally, the distinction changes almost nothing: you flatten architecture the same way regardless. Knowing it exists mainly saves you from confusion when a report from your team or a client’s previous agency uses the terms differently.

    Why crawl depth matters for SEO

    Depth hits three things in a chain: crawl frequency, then indexing speed, then rankings and traffic. Each extra level weakens the first link, and the rest follow.

    It’s also a UX problem wearing an SEO costume. If a bot needs five clicks to find a page, so does a human. Buried pages don’t just get crawled less. They get visited less, linked less, and bought from less.

    How depth eats your crawl budget

    Googlebot enters through your homepage and sitemap, then discovers everything else by following links. Google describes its crawl capacity as crawl budget: a combination of how much it can crawl (rate limit) and how much it wants to (demand). Deep URLs are last in that queue. The budget often runs out before the crawler gets to them.

    Before you panic: Google’s own guidance says crawl budget concerns sites with 1 million+ pages that change weekly, or 10,000+ pages that change daily, or sites where much of the inventory sits in “Discovered – currently not indexed”. Most client stores are under those thresholds. Their real problem is discovery: pages so deep that Googlebot rarely reaches them at all.

    If budget itself is your bottleneck, that’s a separate job. We cover it in our guide to optimizing crawl budget.

    Deep pages get crawled less, indexed later, and ranked worse

    Botify’s log-file analyses show that Googlebot’s crawl rate drops mechanically with each level of depth (Botify). The pattern is consistent: depth 1–2 pages absorb most of the crawl activity, and everything below gets a fraction of it.

    Even the shallow layers don’t get full coverage. Across 413 million pages and 6 billion Googlebot requests, Botify measured crawl ratios between 31% and 73% of indexable pages crawled in a 30-day window, depending on site type. Deep pages compete for whatever is left of that.

    The consequence chain is predictable. Less crawl means Google takes weeks to see your content updates. Slow discovery means pages pile up in “Crawled – currently not indexed”.

    None of this makes depth a direct ranking factor. It doesn’t need to be: a page Google rarely visits and slowly indexes underperforms either way. The mechanics of that pipeline are worth understanding, and we break them down in crawling vs indexing.

    Crawl depth and AI crawlers: the %currentyear% wrinkle

    Here’s the part the classic guides skip. AI crawlers like GPTBot, ClaudeBot, and PerplexityBot discover content the same way Googlebot does: by following links. They just do it with far less capacity.

    The gap is not subtle. A Botify analysis of 7 billion+ log files found 18.2 billion Google crawl events against 887 million from OpenAI’s bots in the most recent measured month, roughly 4% of Google’s volume, even after OpenAI tripled its crawling since August 2025 (Botify × Chris Long, 2026). A crawler operating at 4% of Googlebot’s scale reaches far less of your deep inventory. Depth punishes you twice.

    The response is the same discipline, applied harder: keep the content you want cited in AI answers at shallow levels, and expose it through discovery files that skip the click chain entirely, like your XML sitemap and the emerging llms.txt convention. Once a bot arrives, structured data helps AI systems understand what the page actually is, which is where a schema plugin like Schemafy earns its place in the stack. If AI visibility is on your roadmap, start with generative engine optimization and the answer engine optimization tools that measure it.

    What is a good crawl depth?

    Keep your important pages within 3 clicks of the homepage. Google has never published an official depth limit; the 3-click threshold is practitioner consensus, built on the observation that crawl activity drops sharply with each level. Important pages means the ones that earn traffic or revenue, not every URL you own.

    That last sentence is the whole trick. “Important” is the load-bearing word, and it’s the one most audits ignore. A 3,000-URL store does not need 3,000 URLs at depth 3.

    When deep pages are actually fine

    Some pages can sit at depth 4+ without costing you anything: old blog archives, legal pages, seasonal content in the off-season, and product variants that carry a canonical tag pointing at the main product.

    The operational rule for a portfolio of client stores: rank each site’s URLs by traffic and conversion potential, then flatten only the top of that list. Money pages (services, top categories, best-selling products) belong at depth 1–3. The rest can stay deep, and nobody, bot or human, will miss them. Trying to flatten everything across 10+ stores burns hours you don’t have on pages that don’t pay.

    How to measure crawl depth on your site

    Crawl the site with a desktop crawler. In Screaming Frog, every URL gets a Crawl Depth value, and the Site Structure view shows the distribution of URLs per level. Sitebulb draws the same picture as a crawl map. One caveat so nobody asks: Schemafy is not a crawler; this step runs on the tools above.

    Then validate against reality in Google Search Console: Crawl Stats shows how Googlebot actually spends its visits, and the indexing report tells you whether deep pages are landing in “Discovered – currently not indexed”. If they are, depth is no longer a theory. It’s your diagnosis, and it usually travels with other fixable SEO issues.

    The practical move: export URLs per depth level, cross them with traffic or revenue data, and flag every money page sitting at level 4+. That crossed list is your work queue.
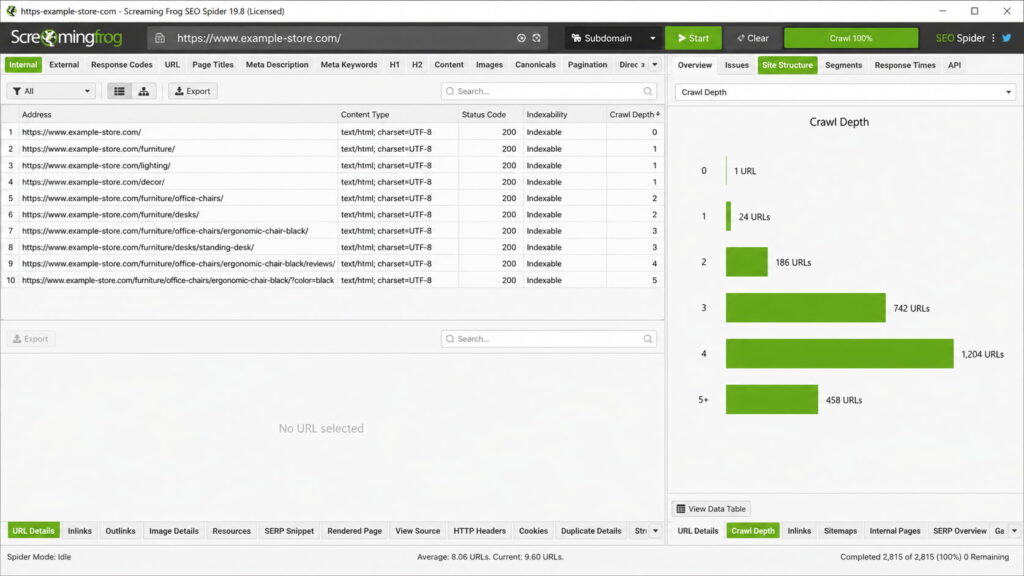
    Screaming Frog crawl depth report for an e-commerce website

    The depth distribution is the first export to pull: anything money-page-shaped at level 4+ is a discovery problem, not a content problem.

    How to reduce crawl depth: 7 fixes that flatten your architecture

    Flattening architecture is mostly linking work. Here are the seven fixes, in the order most stores should apply them:

    1. Link key pages from the homepage.
    2. Add hub or category pages that group related content.
    3. Fix internal links from your highest-authority pages.
    4. Add breadcrumbs across the site.
    5. Flatten long pagination chains.
    6. Fix orphan pages.
    7. Keep your XML sitemap fresh.

    Fixes 1 and 2 are pure discovery shortcuts: a homepage link makes any page depth 1, and a well-built hub pulls a whole cluster up a level. Fix 7 is the safety net: a fresh sitemap gives crawlers a second door, though it never replaces internal links. The three fixes that move depth the most get their own sections below.

    Fix internal linking from high-authority pages

    This is the fix with the most impact on the list. Identify the pages with the most authority (backlinks and traffic; on client stores that’s almost always the homepage plus two or three categories) and link from them to the deep pages you want lifted. The math is immediate: one link from a depth 1 page makes any target depth 2.

    The mechanisms are boring and effective: related-product and related-post modules, plus contextual links inside evergreen content that already ranks. Internal linking is step one of most site-wide improvements anyway, and it slots into the broader sequence in improving SEO on your website.

    Use breadcrumbs (and BreadcrumbList schema)

    Breadcrumbs do two jobs at once. Every page gets an upward link path (home → category → product), which gives crawlers alternative routes through the site and cuts effective depth across thousands of pages with one template change. And users get visible hierarchy, which matters on a 1,000-product store.

    Add BreadcrumbList schema and Google can show the breadcrumb trail in the search result instead of a raw URL. BreadcrumbList is one of the schema types a plugin like Schemafy generates and applies in WordPress, so this fix rarely requires touching code. Implement it once per theme, and it pays across every client store running that theme.

    Tame pagination, filters, and orphan pages

    These are the three classic depth generators.

    Long pagination first: page 14 of a blog archive sits at enormous depth by construction. Use “load more” patterns with crawlable links, or route discovery through category archives instead of endless page chains.

    Faceted filters are the WooCommerce special: color × size × price combinations can mint near-infinite URL chains. Contain them with noindex or robots rules based on which facets deserve to rank. There is no absolute recipe here; the right call depends on whether the facet has real search intent behind it.

    Orphan pages are the terminal case: no internal links pointing in means infinite depth for practical purposes. Detect them by crossing your crawl export against your sitemap. Anything in the sitemap that the crawler never found is orphaned.

    Final thoughts

    The 3-click rule survives because it’s half right. Depth genuinely suppresses crawling and indexing, and Botify’s data and Google’s own docs back that up. But the rule applies to your important pages, not your whole site. Flattening everything is effort spent on URLs nobody searches for; ranking pages by value and lifting only the top is the version of the rule that scales across a client portfolio.

    The next step takes one afternoon: crawl your highest-revenue store today, export URLs by depth, cross with traffic, and flatten whatever money pages you find at level 4+. Then repeat on store number two.

    [CTA_DOWNLOAD]

    Frequently asked questions

    What is crawl depth in SEO?

    Crawl depth is the number of clicks it takes a search engine bot to reach a page starting from your homepage. The homepage sits at depth 0, pages linked directly from it are depth 1, and so on. Deeper pages get crawled less often and indexed more slowly.

    What is a good crawl depth?

    Keep your important pages within 3 clicks of the homepage. Google has never published an official limit, but crawl frequency drops sharply with each level of depth. Pages that drive traffic or revenue belong at depth 1–3; archives and low-priority pages can sit deeper without much harm.

    Does crawl depth affect rankings?

    Not directly, but the chain is real: deep pages are crawled less often, indexed later, and refreshed more slowly, which suppresses their organic visibility. Log-file analyses of large sites by Botify show pages at depth 4 and beyond receive a fraction of the crawl activity that depth 1–2 pages get.

    What is the difference between crawl depth and click depth?

    Click depth counts the minimum clicks a user needs to reach a page from the homepage. Crawl depth is the same distance from a bot’s perspective as it follows links. In practice, most SEO tools measure click depth and label it crawl depth, so the terms overlap.

    How do I check the crawl depth of my website?

    Crawl your site with a tool like Screaming Frog or Sitebulb and check the crawl depth column or visualization. Then cross-check Google Search Console’s Crawl Stats and the “Discovered – currently not indexed” report to see whether deep pages are actually being missed by Googlebot.

    How do I reduce crawl depth?

    Link important pages from your homepage or top-level category pages, add breadcrumbs, fix orphan pages, and flatten long pagination. Internal links from your highest-authority pages do the most work: each new link path can pull a buried page several levels closer to the homepage.
  • What Is URL Rating (UR)? Ahrefs’ Page-Level Authority Metric, Explained

    What Is URL Rating (UR)? Ahrefs’ Page-Level Authority Metric, Explained

    URL Rating (UR) is the 0 to 100 score Ahrefs attaches to every page, and it gets misread more than any other metric in the tool. This guide covers what UR actually measures, the three calculation rules Ahrefs documents publicly, and the one lever that raises it for free: internal links.

    What is URL Rating?

    URL Rating (UR) is an Ahrefs metric that measures the strength of a single page’s backlink profile on a logarithmic scale from 0 to 100. It is a third-party metric, not a Google ranking factor, and it works on principles similar to Google’s PageRank (Ahrefs SEO Glossary).

    Two clarifications before anything else. Google does not use UR, or any Ahrefs metric, to rank pages. And UR is strictly page-level: it scores one URL, not the domain it lives on.

    That page-level focus is what makes it useful. When you need a fast read on how much link equity a competing URL has earned, through backlinks and other off-page SEO signals, UR is the quickest proxy available.

    How Ahrefs calculates UR

    Ahrefs doesn’t publish the exact UR formula. It does document the rules, and the calculation follows the same principles as PageRank: counting links between pages, weighting them differently, and applying a damping factor (Ahrefs’ SEO metrics glossary).

    Three of those rules change how you should act on the metric.

    Only dofollow links pass UR

    Ahrefs states it plainly: “Only ‘dofollow’ links pass UR” (Ahrefs). Links tagged nofollow, sponsored, or UGC transfer nothing.

    The practical implication: 100 nofollow mentions from press coverage won’t move your UR. Five dofollow links from strong pages will.

    That doesn’t make nofollow links worthless. They still send referral traffic and help discovery. They just don’t feed this metric.

    Internal links count too

    Ahrefs confirms that “both internal and external backlinks are taken into account when calculating URL Rating (although ‘weighted’ differently)” (Ahrefs).

    Half the articles ranking for this topic mention that in passing. Almost none draw the conclusion: internal links affect UR but do not affect DR, which makes them the only UR lever you control 100%, at zero cost.

    Link from your highest-UR page to the page you want to push, and that page’s UR benefits. No outreach, no budget, no waiting on a journalist. The step-by-step is in the how to increase section below.

    The scale is logarithmic

    Moving from UR 10 to 20 takes far less link equity than moving from 60 to 70. Each step up the scale gets progressively harder.

    The benchmarking consequence: never compare absolute deltas across different ranges. A competitor jumping from UR 55 to 60 gained far more equity than your page moving from 15 to 20, even though both moved 5 points.

    URL Rating vs Domain Rating: what’s the difference?

    Both metrics run on a 0 to 100 logarithmic scale. The difference is scope, and it changes what each one is for.

    AspectURL Rating (UR)Domain Rating (DR)
    ScopeOne page’s backlink profileThe whole domain’s backlink profile
    Internal linksCount toward URDon’t count toward DR
    Typical useSizing up a competing URL in the SERPVetting a domain for link building
    Speed of changeFaster: page-level links and internal linking move itSlower: needs new referring domains
    Can one exceed the other?A viral page’s UR can top its domain’s DRA DR 80 site can host UR 0 pages

    The table’s last row deserves emphasis because it trips people up in both directions. A DR 80 domain routinely publishes new pages that start at UR 0 to 5: domain authority is not inherited per page.

    The inverse also happens. A page that goes viral and attracts dozens of dofollow links of its own can carry a UR higher than its domain’s DR. Free tools and data studies do this constantly.

    In practice, SEOs use UR to evaluate specific competing URLs in a SERP and DR to qualify domains during link prospecting. Different questions, different metric.

    What is a good UR score?

    As a rough rule: UR 20+ is decent, and UR 40+ indicates a strong page-level backlink profile.

    Treat those numbers as loose calibration, not targets. The only benchmark that matters is the UR of the pages ranking in the top 5 for your keyword. If the top 5 sits at UR 8 to 15, a UR 25 page is heavily armed. If the top 5 sits at UR 60+, UR 40 is underpowered.

    No UR value guarantees a ranking. The metric is relative by design, the same argument Ahrefs makes about judging DR in its own documentation. Check your SERP first, then decide whether the page needs more equity.

    Does URL Rating affect Google rankings?

    No. UR is not a ranking factor. Google doesn’t consume Ahrefs metrics, and no third-party score sits in the algorithm.

    But the correlation is real and documented:

    “Our studies show that the URL Rating has a clear positive correlation with Google rankings.” (Ahrefs SEO Glossary)

    The explanation is unglamorous. UR approximates what PageRank measures, so pages with strong link equity tend to score high on both. Ahrefs is careful with the same nuance on its authority studies, noting its 218,713-domain correlation study “does not prove causation.” Even Google’s John Mueller, while denying “domain authority” as a factor, has acknowledged a sitewide score that “maps to similar things” (via Ahrefs).

    So read it this way: links are the cause, UR is the summary. Build the links, and both UR and your organic traffic tend to follow.

    How to check the UR of any page

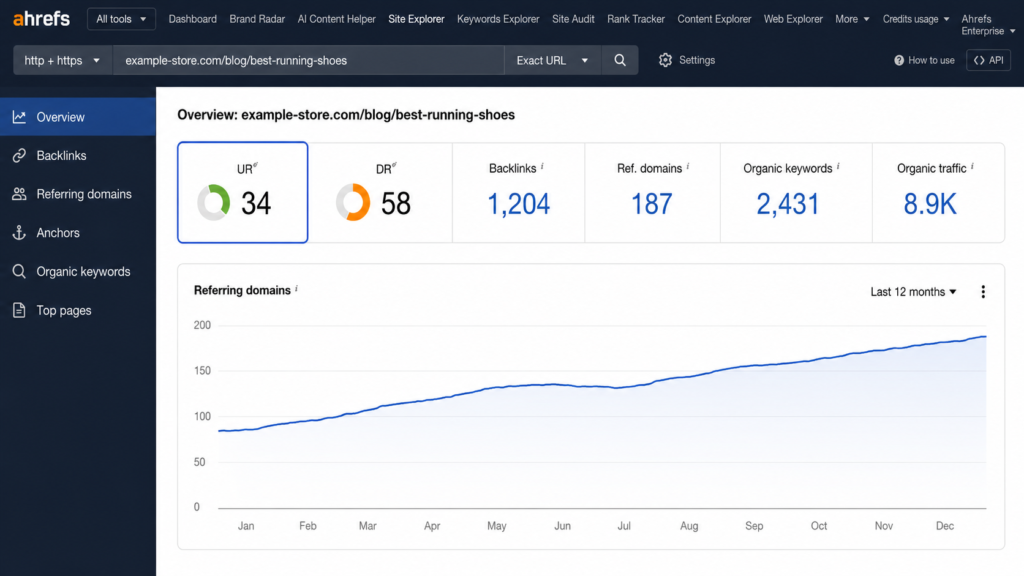
    If you pay for Ahrefs, paste any URL into Site Explorer and UR appears at the top of the Overview. For competitor spying, the SERP overview inside Keywords Explorer lists the UR of every top-ranking result for a keyword, which turns benchmarking the top 5 into a ten-second job.

    Without a subscription, the Ahrefs SEO Toolbar browser extension paired with a free Ahrefs account shows DR and UR for any page you visit. Note that Ahrefs’ free Website Authority Checker returns domain-level DR, not page-level UR.

    Ahrefs Site Explorer Overview dashboard with SEO metrics and referring domains chart.

    How to increase your URL Rating

    There are two levers: one free (internal links) and one that costs time or money (backlinks). Internal linking comes first here deliberately, because it’s the one you can pull this afternoon, ideally as part of a broader plan to improve SEO on your website.

    Strengthen your internal linking

    Since internal links pass UR, the most actionable fix is redistributing equity you already own:

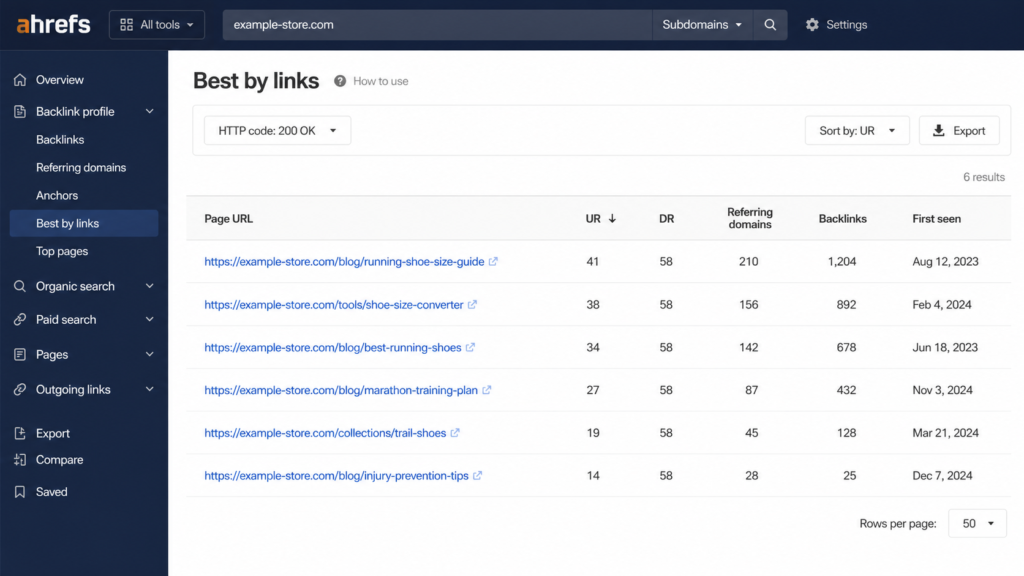
    1. Open the Best by links report in Ahrefs Site Explorer, sorted by UR, to find your strongest pages.
    2. Add contextual dofollow links from those pages to the page you want to push.
    3. Keep the target page within 3 clicks of the homepage.

    4. Re-check UR after the next Ahrefs crawl update.

    Pages buried 4+ clicks deep receive little internal equity and are slower to get discovered, a problem that overlaps with crawling and indexing issues. Contextual links from body copy beat footer or sidebar links, which is exactly the pattern the weighting rewards.

    Ahrefs Best by Links report showing the highest-linked pages for example-store.com.

    Caption: Best by links sorted by UR reveals which pages have equity to spare: the top three here are the donor pages for internal links.

    Earn quality backlinks to the page

    The paid-in-effort lever. The tactics that reliably earn dofollow links to a specific page are the unglamorous ones: linkable assets (original data, free tools, reference guides), digital PR, and broken link building.

    The evidence favors focusing here: across roughly 920 million pages studied, Ahrefs found the number of referring domains to a page is the strongest correlating backlink factor for rankings (Ahrefs).

    One filter before you celebrate any placement: only dofollow links pass UR. A nofollow mention in a major publication may be great for the brand, but it won’t move this metric. No tactic here works on a predictable timeline, and anyone promising one is selling something.

    Fix broken links and redirect chains

    Equity leaks. When links point at 404s, or pass through chains of redirects before reaching the destination, part of the value never arrives at the page.

    Crawl the site with Ahrefs Site Audit (or your crawler of choice), consolidate redirect chains into single 301s, and repoint internal links straight at final URLs. It’s the same hygiene that helps you fix common SEO issues and optimize crawl budget, and it protects the equity you already earned.

    High UR is only half the battle: make Google understand the page

    UR tells you how much authority a page has accumulated. It says nothing about whether search engines understand what the page is. That job belongs to structured data: the JSON-LD markup that tells Google and AI engines whether your URL is a product, a review, an FAQ, or a how-to, and makes it eligible for rich results and AI citations.

    A page with UR 45 and no schema competes as one more blue link.

    If your pages run on WordPress, Schemafy generates valid JSON-LD across 16 schema types without writing code, and you can verify the output with Google’s Rich Results Test. Pair the authority you’ve built with markup that machines can parse; how to use schema markup covers the implementation side. Learn more at schemafy.net.

    FAQs about URL Rating

    Is URL Rating a Google ranking factor?

    No. URL Rating is a third-party metric created by Ahrefs, and Google doesn’t use it. However, UR approximates the same link signals Google’s PageRank measures, which is why Ahrefs’ studies show a clear positive correlation between higher UR and better organic rankings.

    What is the difference between UR and DR?

    UR (URL Rating) measures the backlink strength of a single page, while DR (Domain Rating) measures the strength of an entire domain’s backlink profile. Internal links affect UR but not DR, so a strong site can still have individual pages with very low UR.

    What is a good URL Rating?

    As a rough benchmark, a UR of 20+ is decent and 40+ indicates a strong page-level backlink profile. The more useful benchmark is competitive: check the UR of the pages ranking in the top 5 for your target keyword and aim for that range.

    Why is my page’s UR higher than my site’s DR?

    Because they measure different things. A single page can attract many strong dofollow backlinks (a viral post, a free tool) while the rest of the domain has few. Internal links also boost UR without touching DR, widening the gap further.

    How can I increase URL Rating for free?

    Through internal linking. Find your highest-UR pages in Ahrefs (Best by links), then add contextual internal links from them to the page you want to strengthen. Only followed links pass UR, and internal links are the one lever you fully control at zero cost.

    Final thoughts

    UR is a thermometer for page-level link equity: read it against the top 5 for your keyword, never as an absolute number, and remember that the cheapest way to raise it is the internal linking lever most sites ignore.

    The next step takes ten minutes. Pull the UR of the pages outranking you, compare, and if the gap is closable, start moving internal links from your strongest pages this week. And once the authority is there, make sure Google actually understands the page: with a tool like Schemafy, adding the structured data layer takes minutes, not a sprint.

    [CTA_DOWNLOAD]

  • Crawling vs Indexing: What’s the Difference (and Why Your Pages Get Stuck)

    Crawling vs Indexing: What’s the Difference (and Why Your Pages Get Stuck)

    Crawling is how Google discovers your pages; indexing is how it stores them and decides whether to show them in search results. A page can be crawled and still never get indexed, and that gap is exactly where traffic dies. This guide covers the difference in about 2 minutes, then gets to the useful part: diagnosing and unsticking pages that Google visited but refused to index.

    What Is Crawling in SEO?

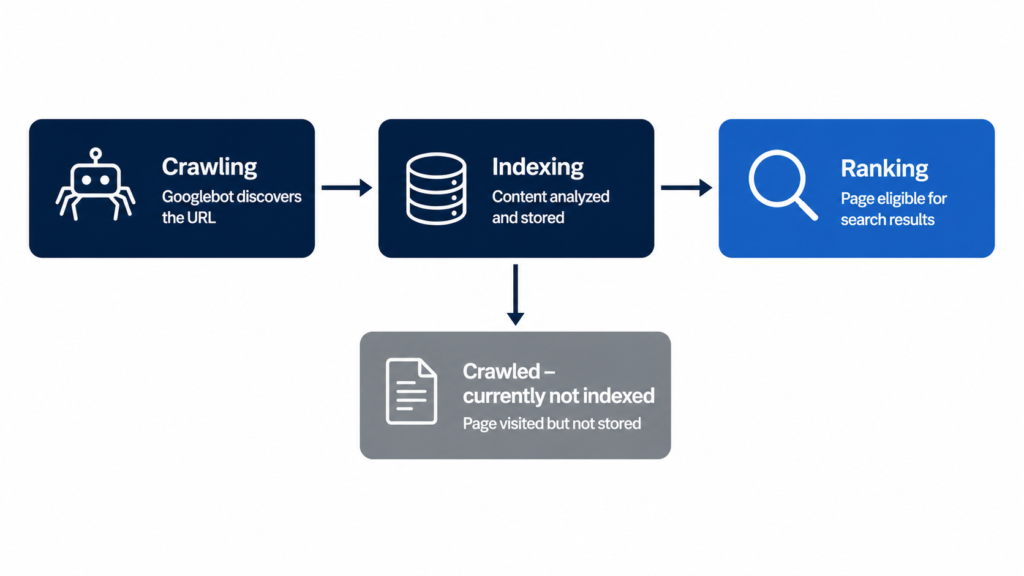
    Crawling is the discovery process. Bots like Googlebot and Bingbot (also called crawlers or spiders) follow links and read sitemaps to find new or updated URLs. Think of a librarian walking the aisles noting which books exist: nothing is evaluated yet, only discovered.

    Google’s own documentation describes this as the first of three stages, crawling, indexing, and serving, and warns that not every page makes it past each stage (source: How Google Search Works).

    One more constraint worth a line: crawl budget. On large sites, Google doesn’t crawl everything. If you run thousands of programmatic URLs, some of them simply wait their turn.

    What Is Indexing in SEO?

    Indexing is what happens after the visit. Google analyzes the crawled content, the text, the title, alt attributes, structured data, then decides whether to store the page in its index.

    Treat indexing as a quality filter, not a formality. Only indexed pages can rank. During this stage Google also determines whether a page is a duplicate or the canonical version, and only the canonical is eligible to appear in results (source: How Google Search Works).

    Indexing is also where Google processes your structured data and your meta description in WordPress, along with the rendered HTML and the site’s quality signals. Everything the indexer can’t parse cleanly counts against clarity.

    Crawling vs Indexing: The Key Differences at a Glance

    Here is the whole distinction in one table:

    AspectCrawlingIndexing
    PurposeDiscovering new and updated URLsStoring and evaluating content
    Done byCrawlers (Googlebot, Bingbot)Google’s indexing systems
    OrderFirst stepSecond step, after crawling
    FrequencyContinuousRe-evaluated after each crawl
    What improves itInternal links, clean sitemapsContent quality, uniqueness, clarity
    ResultURL known to GooglePage eligible to rank

    The practical takeaway: crawling problems are architecture problems. Indexing problems are quality problems. Fixing the wrong one wastes your sprint.

    Search engine pipeline showing crawling, indexing, ranking, and the crawled but not indexed path.

    “Crawled – Currently Not Indexed”: Why Google Skips Pages

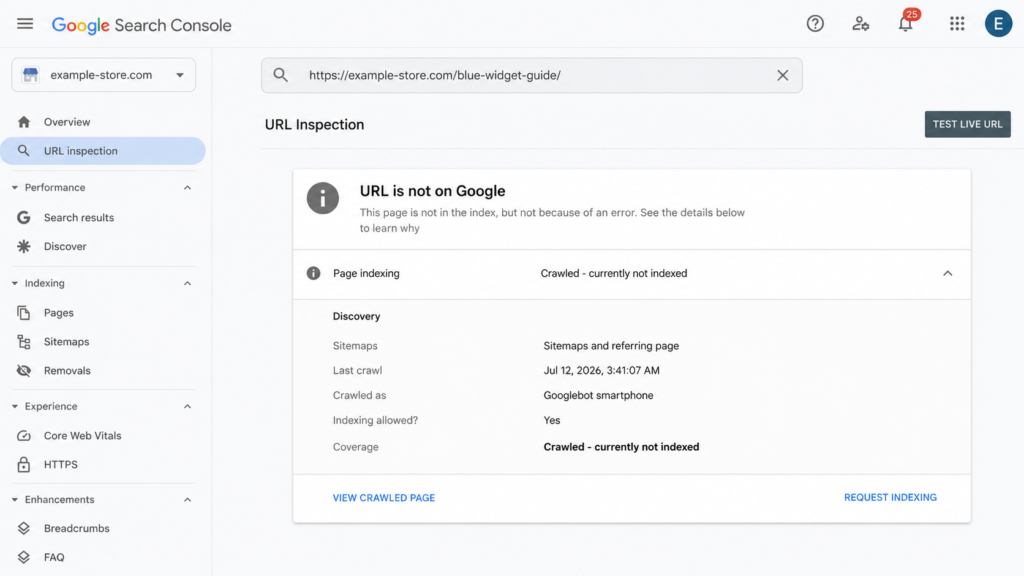
    Crawled – currently not indexed is the Google Search Console status behind most “why isn’t my page ranking” questions. It means exactly what it says: Googlebot visited the page, evaluated it, and decided it wasn’t worth a spot in the index. For now.

    The status is not permanent and it is not a bug. It’s a documented, massive-scale quality decision, covered in depth by Onely and SEOTesting. Improve the page and Google can re-evaluate it on a future crawl.

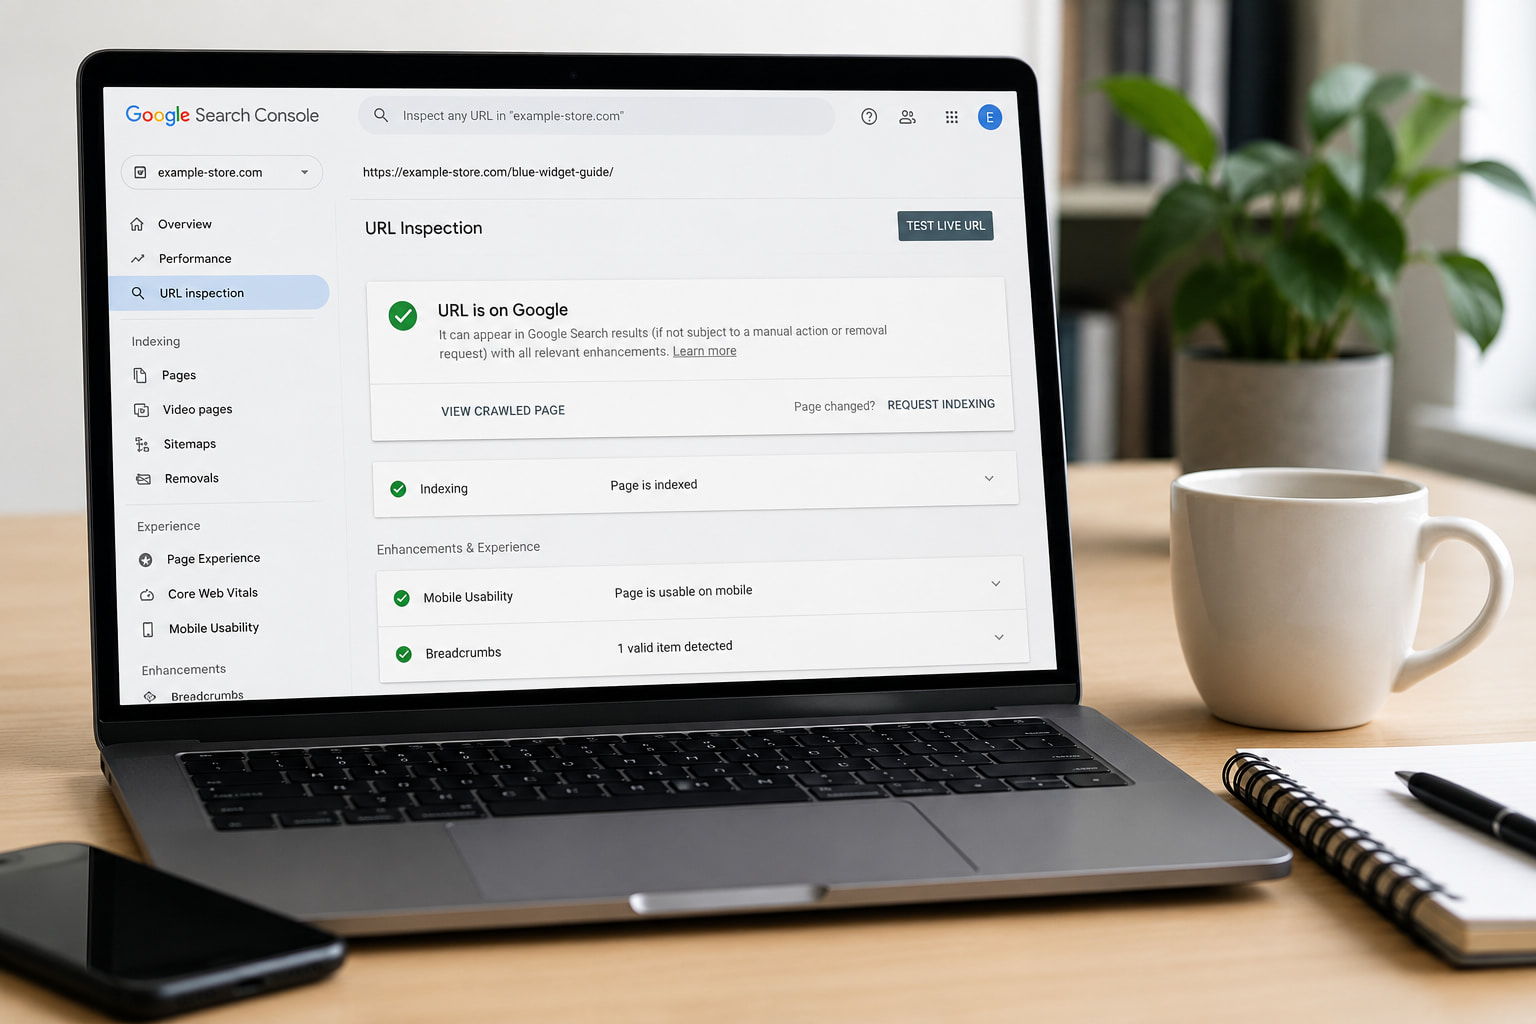
    Google Search Console URL Inspection showing a crawled page that is currently not indexed.

    The most common causes

    Five patterns account for most of these exclusions:

    • Thin or duplicate content: pages that add nothing the index doesn’t already have.
    • Barely-edited AI content at scale: the number one trigger in 2026; volume without editing reads as noise.
    • Orphan pages: no internal links pointing at them, so nothing signals they matter.
    • Low site-wide quality perception: weak sections drag down Google’s appetite for the rest.
    • Rendering problems: content that never appears in the rendered HTML can’t be evaluated.

    Two more patterns show up in the documented cases: conflicting indexing signals (a canonical tag pointing one way while internal links point another) and pages that were indexed in the past and then quietly dropped when Google re-evaluated them.

    None of these are edge cases. They are the standard failure modes documented across the industry guides linked above. Each one has a visible symptom in Search Console, which is why the next step is always the same: inspect the exact URL and read what Google actually saw.

    How to check any page in Google Search Console

    1. Paste the full URL into URL Inspection.
    2. Read the verdict: indexed, or one of the “not indexed” statuses.
    3. Click View Crawled Page and compare the rendered HTML against what you see in the browser. Missing content here means a rendering problem, not a quality problem.
    4. Improve the page first, then click Request Indexing (see Google’s guide to asking for a recrawl). Requesting indexing without changing anything does nothing.

    How to Get Your Pages Crawled and Indexed Faster

    Two levers, and they are different levers. Crawling is fixed with architecture. Indexing is fixed with quality plus clarity. The four fixes below split cleanly along that line.

    Match the fix to the status you’re seeing. “Discovered, currently not indexed” and slow first crawls point at the architecture side: links and sitemaps. “Crawled, currently not indexed” points at the quality side: content and clarity. Working the wrong lever is the most common way to lose a month on this.

    Fix your internal linking

    Internal links from strong pages do two jobs at once: they give crawlers a discovery path and they signal that the linked page matters. “Strong” means pages that already rank or attract links: your homepage, your top guides, your category hubs. A practical rule: no page more than 3 clicks from the homepage, and zero orphans.

    Programmatic sites deserve a special warning. Templates generate orphan pages in bulk, and a clean SEO slug won’t rescue a page nothing links to. Breadcrumbs help too: they hand crawlers your architecture on a plate.

    Submit and clean your XML sitemap

    Your sitemap is a priority list for the crawler, so treat it like one. Only indexable URLs belong in it: no redirects, no 404s, no noindexed pages. Submit it in Search Console.

    One tactic worth knowing: a temporary sitemap containing only your stuck URLs. It concentrates crawler attention on exactly the pages you want re-evaluated.

    Cut thin and duplicate content

    Consolidate near-identical pages: add a canonical tag or merge them outright. Delete pages with no search value at all.

    The honest version of this advice: if a page doesn’t deserve to be in Google, Google already decided that for you. The status report is the receipt.

    Add structured data so Google understands the page

    Schema markup doesn’t force indexing. Nobody can promise that. What it does is remove ambiguity: it tells the indexer exactly what the page is (a Product, an Article, a FAQPage, a LocalBusiness) and makes it eligible for rich results. Google states directly that it “uses structured data that it finds on the web to understand the content of the page” (source: Google Search Central), and its own case studies on that page report results like Rotten Tomatoes measuring a 25% higher click-through rate on pages with structured data, and Nestlé measuring an 82% higher click-through rate on pages showing as rich results.

    If you’d rather not hand-write JSON-LD, Schemafy generates it for 16 schema types and verifies the output with Google’s Rich Results Test; the full walkthrough is in our guide on how to use schema markup, and there’s a free schema markup generator if you want to test a page right now.

    Do AI Crawlers Work the Same Way? (GPTBot, ClaudeBot & Friends)

    AI answer engines run their own crawlers, and they inherit the same two-step problem: first discover the page, then understand what it is.

    OpenAI operates 3 separate crawlers, each with its own job: GPTBot for model training, OAI-SearchBot for ChatGPT search, and ChatGPT-User for live fetches during a conversation (source: OpenAI crawler documentation). Anthropic’s ClaudeBot honors robots.txt and is controlled with its own User-agent: ClaudeBot directive (source: Anthropic); Anthropic also runs separate search and user-request bots, and each one needs its own robots.txt line (via Search Engine Journal). Perplexity’s PerplexityBot rounds out the list you’ll see most often in server logs.

    The separation matters in practice. You can allow OAI-SearchBot so your pages can show up in ChatGPT’s search answers while disallowing GPTBot to keep your content out of training data, and OpenAI notes that robots.txt changes take roughly 24 hours to propagate to its systems (source: OpenAI crawler documentation). The same logic applies to Anthropic’s three bots: allowing ClaudeBot does nothing for Claude-SearchBot or Claude-User.

    There’s no classic Google-style index behind these engines, but there is retrieval, and an ambiguous page gets skipped either way. A page these bots can fetch but can’t classify is in the same position as a page Google crawls but doesn’t index: technically visible, practically invisible. This is the core idea behind generative engine optimization: the same clarity that earns you indexing earns you citations.

    The efficient part: the JSON-LD you write for Google is the same signal these engines parse. You build it once and it covers both. Two practical checks: confirm your robots.txt isn’t blocking these user agents by accident, and remember that allowing one bot from a vendor does nothing for its siblings.

    Make Every Page Machine-Readable Before Google Decides

    Crawling is getting found. Indexing is getting understood and stored. The first is fixed with links and a sitemap; the second, with clear, machine-readable content.

    That second half is what Schemafy does: it generates valid schema across your whole site (from a template, with AI, or in bulk), verifies it with Google’s Rich Results Test, and runs alongside Yoast and Rank Math. Can we promise indexing? No. But a page Google can’t understand is a page Google can skip.

    [CTA_DOWNLOAD]

    FAQs About Crawling and Indexing

    What happens first, crawling or indexing?

    Crawling always happens first. Googlebot has to discover a URL, through links or your sitemap, before Google can analyze and store it. Indexing is the second step, where Google evaluates the crawled content and decides whether it’s worth adding to its index. No crawl, no index.

    Can a page be crawled but not indexed?

    Yes, and it’s common. Google Search Console reports it as “Crawled – currently not indexed”: Googlebot visited the page but decided it didn’t add enough value to store. Thin content, duplicates, and weak internal linking are the usual causes. It’s not permanent. Improve the page and Google can re-evaluate it.

    How long does it take Google to index a new page?

    Anywhere from a few hours to several weeks. Sites with strong authority and frequent updates get crawled and indexed faster. You can speed things up by linking to the new page from important pages, including it in your sitemap, and requesting indexing via URL Inspection in Search Console.

    How do I check if my page is indexed?

    Paste the full URL into the URL Inspection tool in Google Search Console. It tells you whether the page is indexed and why not if it isn’t. For a quick check without Search Console, search site:yourdomain.com/your-page on Google: if it appears, it’s indexed.

    Does schema markup help with indexing?

    Schema markup doesn’t force Google to index a page, but it removes ambiguity: it tells the indexer exactly what the page is, a product, an article, a local business. Google confirms it uses structured data to understand pages, and clearly understood pages are eligible for rich results.

  • How to Optimize Crawl Budget: A Practical Guide for 2026

    How to Optimize Crawl Budget: A Practical Guide for 2026

    Most crawl budget guides assume you already have a crawl budget problem. Across ten client stores, maybe two actually do.

    Crawl budget is the set of URLs Google can and wants to crawl on your site. Optimizing it means Google spends those requests on the pages that make money instead of on filter URLs nobody searches for.

    This guide starts by telling you honestly whether it applies to you, then gives you the eight fixes that matter.

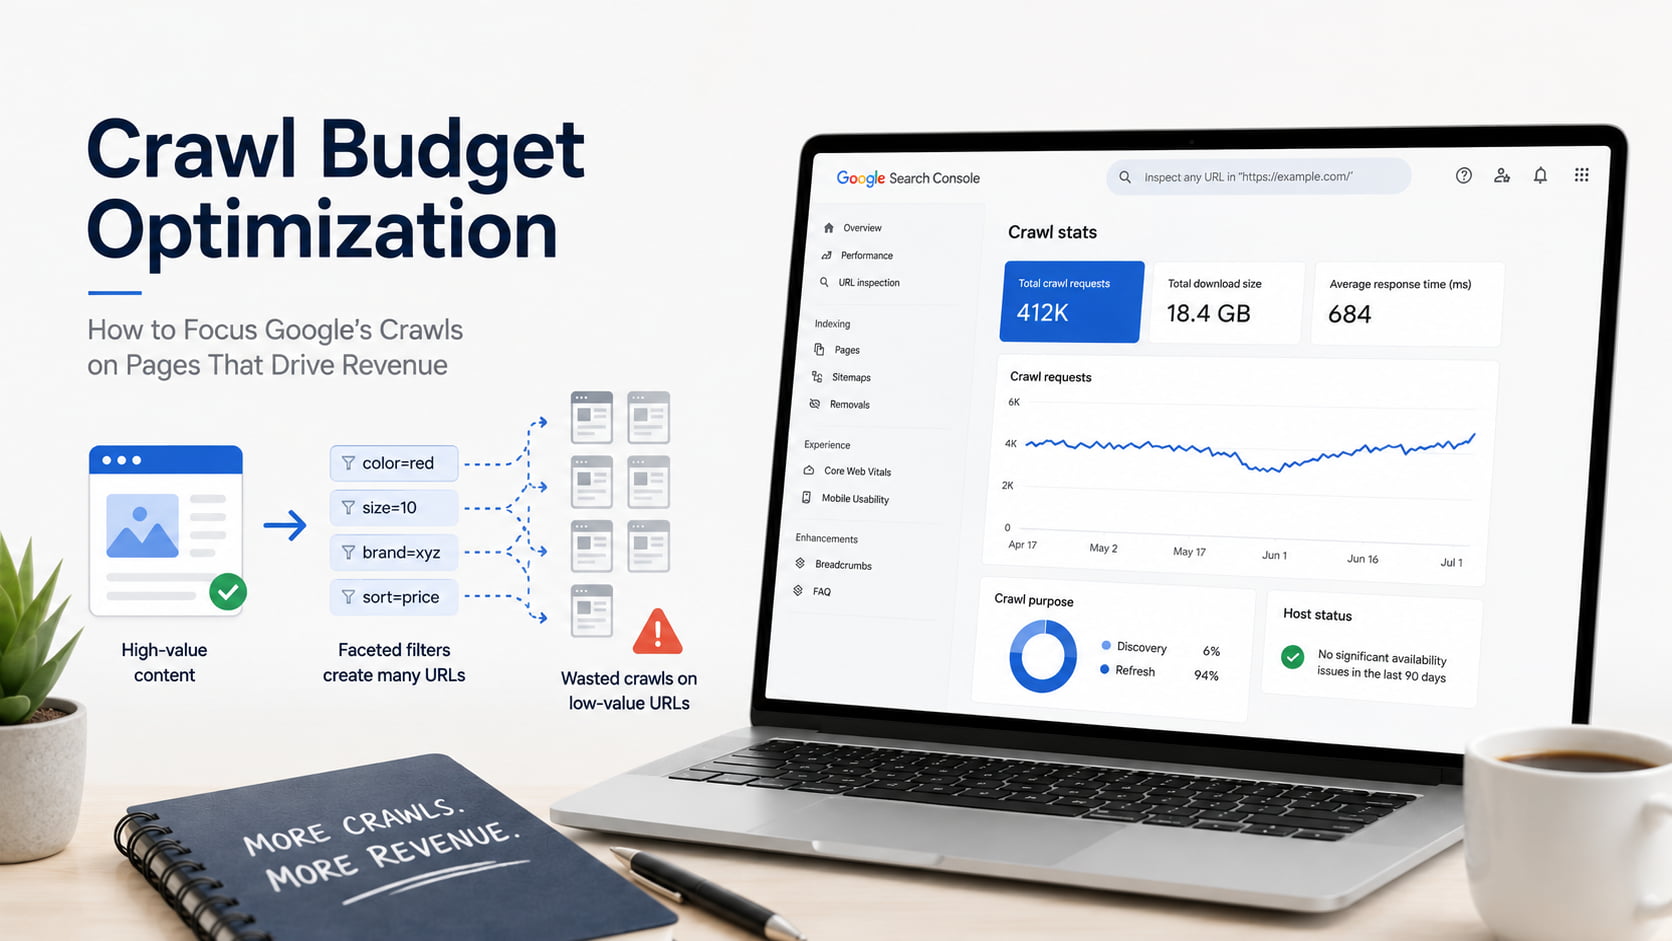
    Caption: Three Search Console checks tell you which client sites deserve a crawl budget audit and which do not.

    SEO specialist reviewing Google Search Console and WordPress dashboards in a modern office.

    What is crawl budget?

    Crawl budget is the set of URLs Google can and wants to crawl on your site over a given period. Google sets it with two things: how much your server can handle, and how much Google wants your content. Google treats each unique hostname as its own site with its own budget.

    That last detail catches people managing portfolios. Your store and your blog subdomain do not share a budget, so a bloated subdomain is not stealing crawls from the money pages (Google Search Central).

    Here is the rough arithmetic worth running before you do anything else. Take your indexable URLs and divide them by the average daily requests in your Crawl Stats report. If the answer is close to ten, Google needs more than a week to walk your site once. That is a field heuristic, not official guidance, but it is the fastest way to decide whether the rest of this guide is worth your afternoon.

    Crawl capacity vs. crawl demand

    Crawl capacity is how many simultaneous connections Googlebot will hold open without hurting your server. It goes up when your responses stay fast and stable, and it comes down when latency climbs or you return server errors and rate-limiting codes. This is the hosting lever.

    Crawl demand is how much Google wants to crawl you. It is driven by how many URLs Google thinks you have, how popular those URLs are, and how stale they look. Google is direct about which part you own: perceived inventory is “the factor that you can positively control the most.” This is the URL inventory lever, and it is where seven of the eight fixes below live.

    One detail almost nobody writes down: the crawl capacity limit is shared across all of Google’s crawlers, while crawl demand is calculated per crawler. If AdsBot is hammering a client store, it is taking capacity away from Googlebot.

    Does crawl budget actually matter for your site?

    For most sites, no. Google says so plainly at the top of its own guide: if your pages get crawled the same day you publish them, you do not need to read it.

    The guide is written for two profiles. Large sites with 1 million or more unique pages that change roughly weekly, and medium or larger sites with 10,000 or more unique pages that change daily. Search Console is blunter still: “if you have a site with fewer than a thousand pages, you should not need to use this report or worry about this level of crawling detail” (Search Console Help).

    This is not new. When Gary Illyes published Google’s canonical explanation back in 2017, the first thing he did was warn that crawl budget is not something most publishers need to worry about, and that sites with up to a few thousand URLs get crawled efficiently. Nine years later the message has not moved.

    Site profileTypical crawlable URLsChange frequencyDoes crawl budget matter?
    Brochure or service siteUnder 100RarelyNo
    Blog or small store100 to 1,000WeeklyNo
    Mid-size WooCommerce store1,000 to 10,000WeeklyRarely, unless facets are crawlable
    Large store with open faceted navigation10,000+DailyYes
    Marketplace or programmatic site1M+Weekly or fasterYes

    Read the second column carefully, because it says crawlable URLs, not products. A WooCommerce store with 800 products and five open filters is not an 800-page site. It is a site with tens of thousands of crawlable URLs wearing an 800-product costume. That is how a portfolio of ten clients produces two or three real cases.

    If none of your clients qualify, the principles still earn their keep. The same URL sprawl that burns budget on a large site delays indexing on a small one.

    How to check if you have a crawl budget problem

    Four checks, ordered by what they cost you in minutes. With ten accounts, the order matters more than the thoroughness.

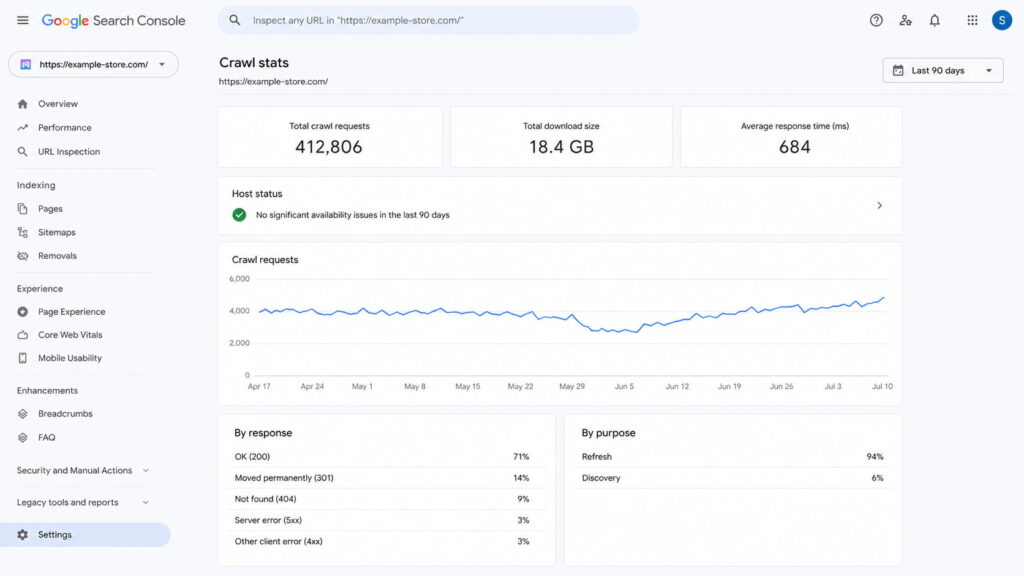
    1. Open the Crawl Stats report. It lives under property settings and only works on root-level properties. Read three numbers: total crawl requests, average response time, and host status. The report covers the last 90 days.
    2. Run the ratio. Compare average daily requests against your indexable URL count. Then check the Crawl purpose breakdown, which splits requests into Discovery (a URL Google has never crawled) and Refresh (a recrawl of something known). If Refresh eats almost everything while Discovery sits near zero and you are publishing new products weekly, you have found your symptom.
    3. Check the Pages report. “Discovered – currently not indexed” and “Crawled – currently not indexed” are normal in small numbers. Thousands of them, with product URLs inside, is the clearest signal Search Console will give you.
    4. Read the server logs. Log-file analysis is the gold standard because it is the only method that tells you what share of Googlebot’s requests went to junk. It is also the only one that needs hosting access, a parser and a couple of hours per account. The red flag is unmistakable: most requests landing on URLs with filter and sort parameters instead of on product and category pages.

    The first three checks take about fifteen minutes per property. Across ten clients that is one morning, and you finish it knowing exactly which two accounts deserve the log analysis.

    Google Search Console Crawl Stats report showing crawl requests and host status.

    Caption: Refresh at 94% and Discovery at 6% on a store publishing weekly is what a crawl budget symptom looks like.

    How to optimize your crawl budget: 8 steps

    The fixes below are ordered by impact and follow the principle Google puts first in its own guide: manage your URL inventory before you touch anything else.

    1. Block low-value URLs in robots.txt.
    2. Consolidate duplicate content onto one canonical URL.
    3. Tame faceted navigation and URL parameters.
    4. Flatten redirect chains to a single hop.
    5. Fix soft 404s and return proper status codes.
    6. Clean and update your XML sitemap.
    7. Link internally to your priority pages.
    8. Speed up server response and rendering.

    1. Block low-value URLs in robots.txt

    This is the highest-impact move because it removes entire URL spaces from consideration instead of fixing URLs one at a time. On WordPress those spaces are predictable: admin paths, cart and checkout, internal site search, staging subdirectories and sort parameters.

    User-agent: *
    Disallow: /wp-admin/
    Disallow: /cart/
    Disallow: /checkout/
    Disallow: /*?s=
    Disallow: /*?orderby=

    One clarification that trips up half the industry: robots.txt controls crawling, not indexing. Blocking a URL does not remove it from the index if Google already has it. Google does note that blocking “significantly decreases the chance the URLs will be processed by other Google systems,” so it is not useless for index hygiene, but it is not a deindexing tool.

    Two warnings. Do not block CSS or JavaScript that Google needs to render your pages, which on a WooCommerce theme usually means leaving /wp-content/ alone. And do not reach for crawl-delay: the non-standard rule is not processed by Google’s crawlers at all.

    In a portfolio, this file is the one fix that replicates almost unchanged across clients running the same stack.

    2. Consolidate duplicate content

    Duplicates make Google spend several requests on the same content. Google lists consolidation as the first item under URL inventory management for exactly that reason: the goal is to focus crawling on unique content rather than unique URLs.

    On WordPress the usual sources are http and https or www and non-www resolving in parallel, inconsistent trailing slashes, session IDs appended by a plugin, and above all the tag and category archives your theme generates automatically. A WooCommerce store with 40 product tags is quietly publishing 40 near-identical listing pages.

    Fix it in this order: canonical tags pointing at the version you want, 301 redirects for versions that should not exist at all, and internal links that consistently use the chosen URL. A clean URL structure makes the third step much cheaper.

    The nuance that separates a technical SEO from the average guide: canonical is a signal, not a directive. Google may choose a different URL, and it will keep crawling the non-canonical versions for a while before the volume drops.

    3. Tame faceted navigation and URL parameters

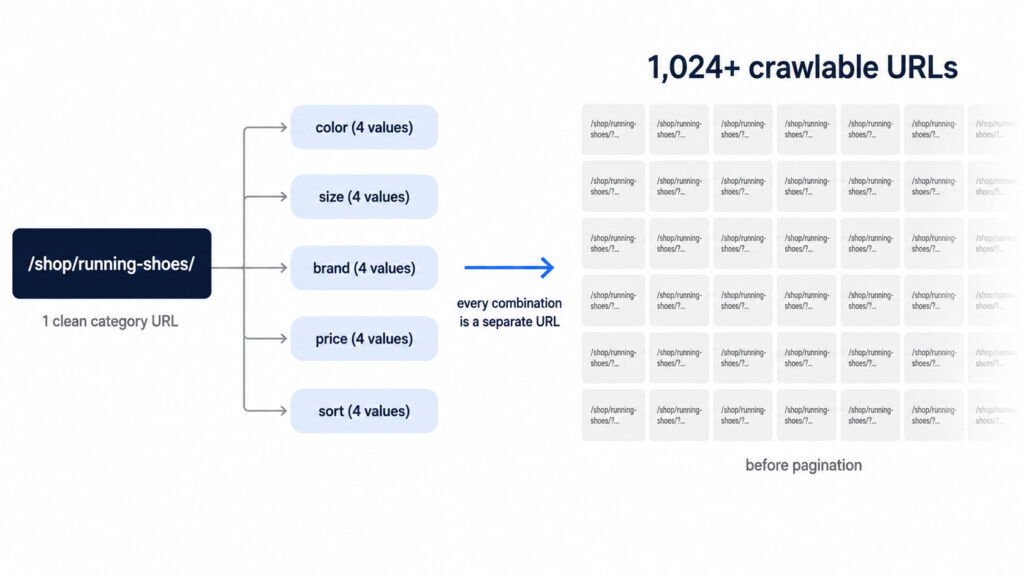
    Do the arithmetic once and this section sells itself. Five filters with four values each, combinable in any order, produce over a thousand URL combinations before you count sorting and pagination. Google’s own term for the result is an infinite URL space, and it causes two specific harms: overcrawling of useless URLs, and slower discovery of the new ones you care about.

    Fix it in Google’s recommended order.

    Start by disallowing the filter parameters in robots.txt if you do not need those URLs indexed. Google’s own example blocks each parameter and whitelists the unfiltered listing:

    User-agent: Googlebot
    Disallow: /*?*color=
    Disallow: /*?*size=
    Allow: /*?products=all$

    If your theme allows it, switch filters to URL fragments instead of parameters. Google generally does not crawl fragments, so the filtering stops affecting crawling entirely.

    Canonical tags to the clean category and rel="nofollow" on facet links are the second-line options, and Google is explicit that both are less effective long term. nofollow in particular only works if every anchor pointing at that URL carries it, anywhere on the web.

    Two details worth writing on a sticky note. The URL Parameters tool in Search Console is gone, so any process that still expects it needs updating. And when a filter combination returns nothing, serve a 404 at that URL rather than redirecting to a shared error page.

    Diagram showing how faceted navigation creates thousands of crawlable URLs.

    Caption: Five filters with four values each generate over a thousand URLs from a single category page.

    4. Flatten redirect chains and fix broken links

    Google counts every hop in a redirect chain as a separate request. If page1 redirects to page2 which redirects to page3, Search Console records three requests to deliver one page. A migrated client site with three-hop chains is spending triple to serve the same catalog.

    Point internal links straight at the final URL, flatten inherited chains to a single hop, and crawl the site with Screaming Frog, Sitebulb or Ahrefs to find them, and if you are still assembling that stack there is a breakdown of SEO tools by use case. On sites you inherit after a migration, chains are the default finding rather than the exception.

    Now the correction, because most guides on this topic get it backwards. Google states that pages serving 4xx status codes, except 429, do not waste crawl budget. Google attempted the request, got a status code and no content, and moved on. Broken internal links are still worth fixing for user experience and internal link equity, but they are not a crawl budget line item. If you want the full treatment of those, fix the underlying SEO issues as a separate pass.

    What genuinely hurts is 5xx errors and timeouts. They do not spend your budget, they shrink it: a meaningful volume of server errors signals poor health and Google slows crawling in response.

    5. Fix soft 404s and error pages

    A soft 404 is a page that returns HTTP 200 while being effectively empty or missing. On WooCommerce the classic case is a category page whose products all went out of stock and which now returns a successful response with zero results.

    These are expensive because the status code tells Google there is content worth revisiting. In Google’s words, “soft 404 pages will continue to be crawled, and waste your budget.”

    Return a 404 or 410 for pages that are genuinely gone, 301 the ones with a real replacement, and watch the soft 404 rows in the Search Console Pages report. The contrast is worth internalizing: a 404 is a strong signal not to crawl that URL again, while a blocked URL stays in the crawl queue much longer and gets recrawled once the block lifts.

    6. Keep your XML sitemap clean and current

    Your sitemap is the list of URLs you are declaring important, and Google reads it regularly. That only works if the list is honest.

    A sitemap stuffed with noindexed, redirected and 404ing URLs does two kinds of damage. It spends crawl requests on URLs you did not want crawled, and it erodes the file’s usefulness as a priority signal.

    Four rules cover it. Include only canonical, indexable, 200-status URLs. Keep <lastmod> accurate rather than stamping it with your last deploy date, which is what most WordPress sitemap plugins do by default. Split large sitemaps into a sitemap index. Submit the file in Search Console.

    One myth dies here too: compressing your sitemap does not increase your crawl budget, because the server still has to serve the file either way.

    7. Strengthen internal linking to priority pages

    Internal links are how Googlebot discovers pages and how it infers which ones matter. A page with no internal links pointing at it gets crawled rarely, if at all.

    On WooCommerce, orphans are usually products reachable only through internal search or through facet URLs you just blocked in step 1. That is the side effect worth auditing right after you touch robots.txt: check that blocking the facets did not orphan the products behind them.

    Deciding which pages are priority is a search intent question before it is a crawling one. Link those pages from your highest-authority pages, keep them within a few clicks of the home page, and find orphans by crawling the site and diffing the result against your sitemap.

    The honest caveat, in Google’s own framing: pages linked from the home page “may be seen as more important, and therefore crawled more often. However, this doesn’t mean that these pages will be ranked more highly.” Internal linking buys crawl frequency, not position.

    8. Improve server response time and page speed

    Faster responses let Googlebot fetch more pages per session, because the constraint is time and bot count rather than a fixed page quota. Serve more pages in the same window and Google crawls more of them.

    Here is the part generic speed advice leaves out: time spent rendering counts as much as time spent requesting. A JavaScript-heavy WooCommerce theme burns budget even when your TTFB looks fine, because rendering the page is part of the crawl.

    Reduce TTFB, put caching and a CDN in front of the site, support 304 responses so Google can reuse its cached copy of unchanged pages, and keep host status green in Crawl Stats. Across a portfolio, shared hosting is the most common root cause and the most uncomfortable conversation to have with the client.

    Calibrate your expectations, though. Google may spend more time on a slower site that holds more important information, and it says outright that making your site faster for users matters more than making it faster for crawl coverage.

    Mistakes that waste crawl budget (and myths to ignore)

    Half the work in this section is stopping you from spending an afternoon on the wrong fix.

    MythWhat actually happensWhat to do instead
    noindex saves crawl budgetGoogle must crawl the page to see the tag, so the request is spent anywayUse noindex to deindex, robots.txt to stop crawling
    robots.txt removes pages from the indexIt blocks crawling; a known URL can stay indexedAllow the crawl and serve noindex, or remove the URL
    More crawling means better rankingsCrawling is required for indexing but is not a ranking signalOptimize which pages get crawled, not how many
    Broken 404 links waste crawl budgetPages returning 4xx, except 429, do not waste budgetFix them for UX and link equity, not for crawl budget
    Compressing your sitemap increases crawl budgetThe file still has to be fetched from your serverKeep the sitemap accurate instead of small
    crawl-delay controls GooglebotGoogle’s crawlers do not process the ruleReturn 503 or 429 temporarily if you need relief

    Two of those deserve more than a table cell.

    On noindex, Google’s position is more precise than the internet’s version of it. Google tells you not to use it as a crawl budget tool, because it “will still request, but then drop the page when it sees a noindex meta tag.” At the same time, Google acknowledges that removing URLs from the index can indirectly free up budget over the long run, since crawlers can then focus elsewhere. So: noindex for index control, robots.txt for crawl control, and no expectation of an overnight effect either way.

    On crawling and rankings, Google is unambiguous: improving your crawl rate will not necessarily improve your positions. Crawling is a precondition, not a signal. It is the same category of misunderstanding as believing meta descriptions are a ranking factor, which they are also not a ranking factor.

    Where the budget actually goes: infinite URL spaces from facets, duplicate content across parallel URLs, multi-hop redirect chains, and soft 404s that never stop looking alive. Add one nobody counts, alternate URLs and embedded resources. Your CSS, JavaScript and XHR fetches consume crawl budget too.

    How structured data and clean metadata help crawlers

    Everything above decides which pages Google visits. None of it decides what Google understands once it arrives. That is a separate problem with separate tools.

    Valid JSON-LD gives a crawler the entity type, the price, the availability and the rating without making it infer any of that from your HTML, and it is the entry requirement for rich results. On a store where the product template is the same across a thousand pages, that difference is the whole game. Structured data is doing the interpretation work your markup otherwise leaves ambiguous, and there is a full walkthrough of how to use schema markup if you are starting from zero.

    Clean metadata does the same job at the SERP layer. Unique titles and descriptions stop hundreds of pages from introducing themselves identically, which on a templated WooCommerce catalog is the default state rather than the exception. Writing a meta description in WordPress one page at a time is fine for a blog and unworkable for a catalog, and you can preview how the snippet renders before you commit to a pattern.

    Be clear on the limit: none of this increases your crawl budget. It makes each crawl more useful, which is a different claim and the only one worth making.

    Optimize crawl budget with Schemafy

    Schemafy does not manage your crawling. It does not edit robots.txt, generate sitemaps, set canonicals or read server logs, and any plugin that claims to solve crawl budget for you is selling you something.

    What it does is the layer after the crawl. Schemafy generates valid JSON-LD across 16 schema types, through a template builder, an automatic site scan or an AI generator, so the pages Google does fetch are immediately legible. And its bulk meta editing works from a CSV import, which is how hundreds of product pages get unique titles and descriptions instead of the same boilerplate repeated across a catalog.

    If you want to see the output before installing anything, you can generate valid JSON-LD or validate your JSON-LD in the browser.

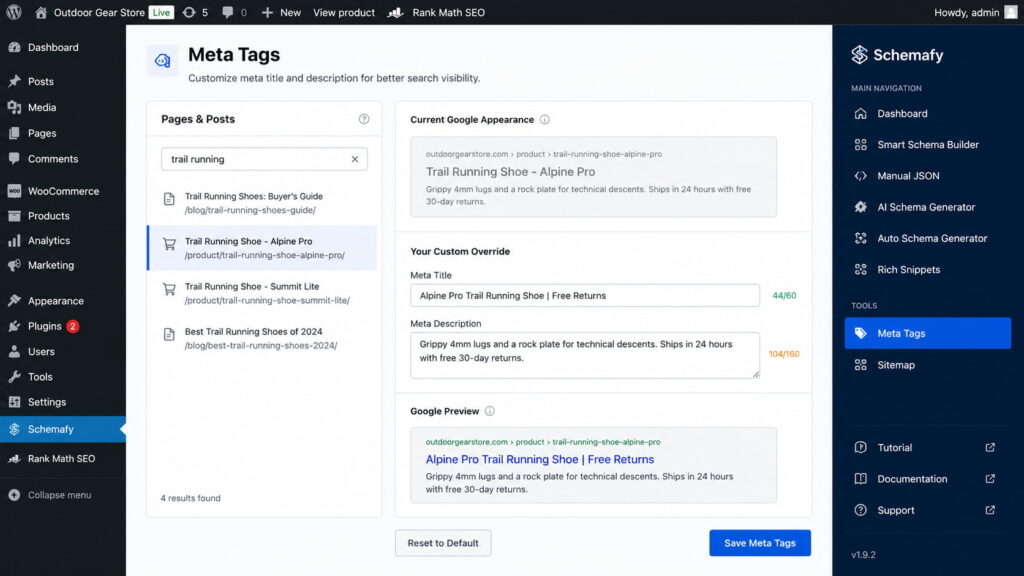
    Schemafy Meta Tags editor for a WooCommerce product in WordPress.

    Caption: Character counters and a live Google preview on a single product page; the same fields import in bulk from CSV.

    Final thoughts

    Crawl budget is an inventory problem wearing a technical costume. You are not looking for a trick that makes Googlebot work harder, you are deciding which URLs deserve to exist and removing the rest from consideration.

    The next step is fifteen minutes, not a project. Open Crawl Stats on your largest client property, run the ratio, and look at the Discovery versus Refresh split before you change a single line of robots.txt. Once the crawl is going where you want it, the follow-on work is making those pages earn their place, which is where the broader playbook to increase organic traffic picks up.

    Frequently asked questions

    Does crawl budget matter for small websites?

    For most small sites, no. Google can easily crawl and index sites under about 1,000 pages, and Google has said crawl budget isn’t a concern for most publishers. It becomes important on large sites (1M+ pages) or medium sites (10k+) that change daily. Small sites still benefit from clean architecture.

    Does noindex save crawl budget?

    Not directly. Google has to crawl the page to see the tag, so the request is spent either way. Over the long run, removing URLs from the index can indirectly free up crawling for other pages. Use noindex to deindex and robots.txt to stop crawling.

    How do I increase my crawl budget?

    You raise crawl budget by improving crawl capacity and demand: speed up server response, fix 5xx errors, publish and update valuable content, and build internal and external links to important pages. You can’t set a number directly, but a fast, healthy, popular site gets crawled more.

    How often does Google crawl my site?

    It varies by site. Google crawls popular, frequently updated pages more often and low-value pages rarely. Check the Crawl Stats report in Google Search Console to see your actual crawl frequency, total requests, and average response time over the last 90 days.

    Does page speed affect crawl budget?

    Yes. Faster pages let Googlebot fetch more of your site in each session, effectively increasing crawl capacity. Slow responses and server errors make Googlebot slow down to avoid overloading your server, so it crawls fewer pages. Rendering time counts as much as response time.

    [CTA_DOWNLOAD]

  • How to Fix SEO Issues: A Step-by-Step Guide for 2026

    How to Fix SEO Issues: A Step-by-Step Guide for 2026

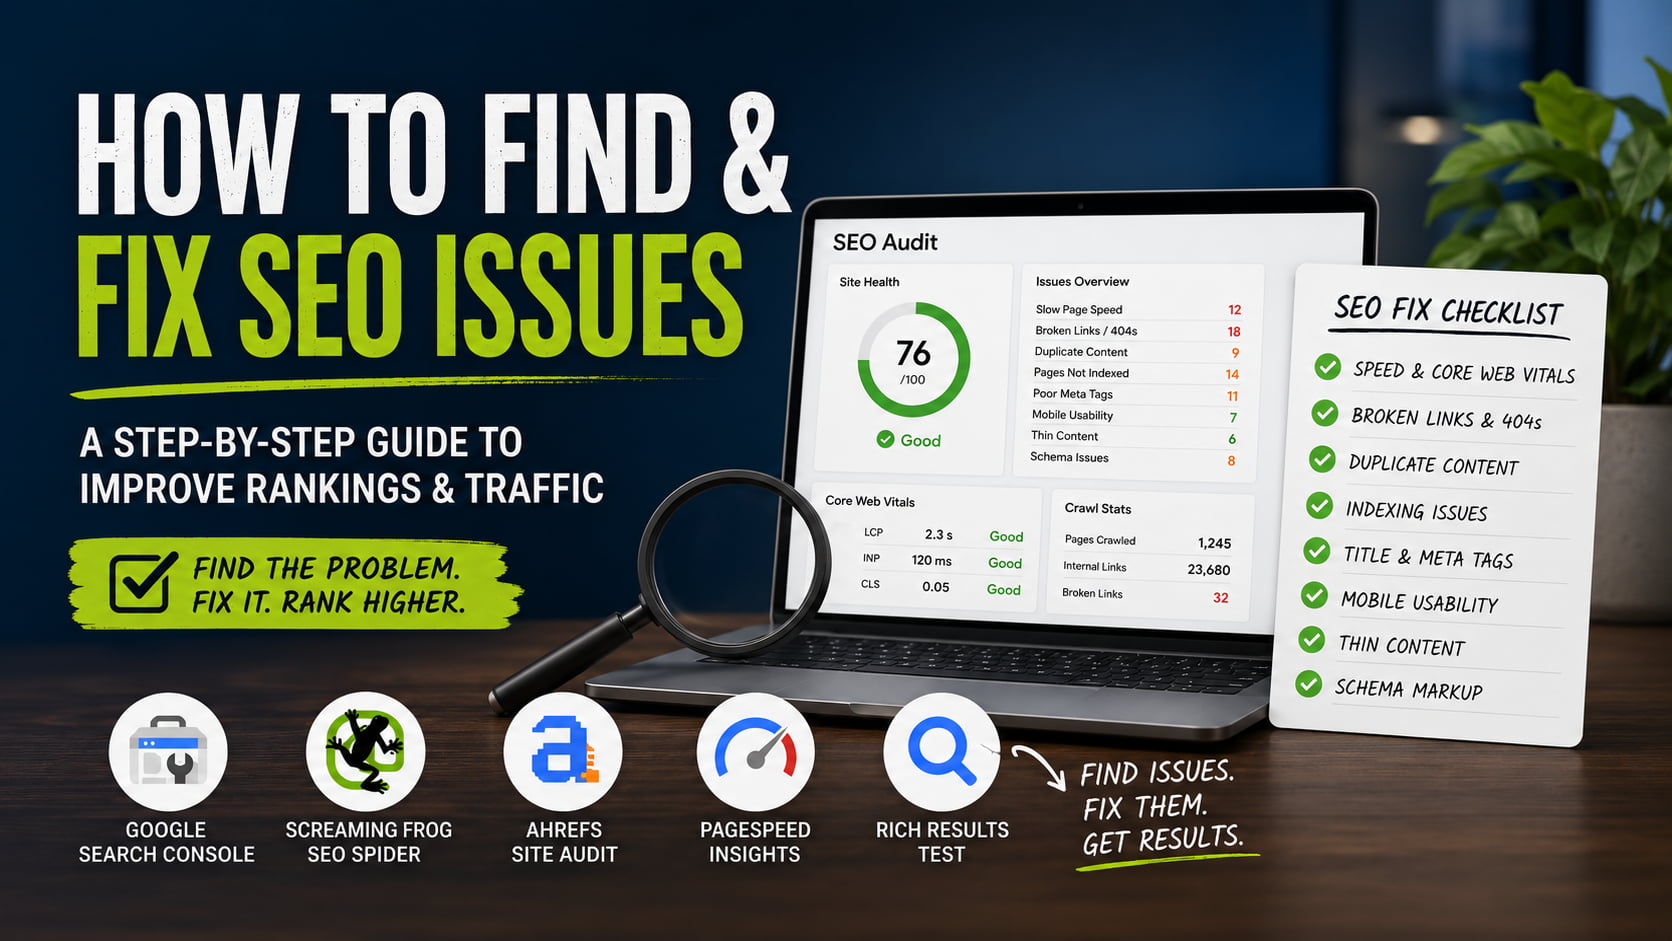
    If your rankings stalled or your traffic slipped, the cause is rarely a mystery. Most SEO problems fall into a handful of buckets, and nearly all of them are fixable without an agency. This guide shows you how to fix SEO issues by symptom: find each one, understand why it hurts, and follow the steps to clear it. The starting point is a free crawl in Google Search Console, Ahrefs, or Screaming Frog.

    In this guide:

    • How to Find SEO Issues Before You Fix Them
    • How to Fix Slow Page Speed and Poor Core Web Vitals
    • How to Fix Broken Links and 404 Errors
    • How to Fix Duplicate Content
    • How to Fix Pages That Aren’t Getting Indexed
    • How to Fix Missing or Weak Title Tags and Meta Descriptions
    • How to Fix Mobile Usability Problems
    • How to Fix Thin or Low-Value Content
    • How to Fix Missing or Broken Schema Markup
    • How to Prevent SEO Issues From Coming Back
    • Fix Your Schema Issues in Minutes with Schemafy
    • Frequently Asked Questions

    How to Find SEO Issues Before You Fix Them

    You can’t fix what you can’t see. Before you touch a single page, measure. Guessing wastes hours and usually fixes the wrong thing.

    Three free tools surface almost every issue on this list. Google Search Console reports indexing problems and Core Web Vitals errors. A crawler like Screaming Frog or Ahrefs finds broken links and duplicate content. Google PageSpeed Insights scores speed and gives page-by-page fix instructions.

    Run all three, then work down the list below. Each section is one issue your audit will flag.

    1. Run a Google Search Console audit for indexing and Core Web Vitals errors.
    2. Crawl your site with Screaming Frog or Ahrefs to surface broken links and duplicate content.
    3. Test key pages in Google PageSpeed Insights for speed and Core Web Vitals.
    4. Validate your structured data with Google’s Rich Results Test.
    5. Work down the list below, fixing one issue type at a time.

    If you run several client sites, this three-tool pass is the standard check to run before you bill a single hour of fixes. Here is the full map of what you will find and where to fix it.

    SEO issueHow to spot itHow to fix it
    Slow page speed / poor CWVPageSpeed Insights, GSC Core Web Vitals reportCompress images, cut unused scripts, cache, lazy-load
    Broken links and 404sScreaming Frog or Ahrefs crawl301-redirect internal links, remove dead external links
    Duplicate contentCrawler duplicate report, GSC coverageCanonical tags, 301s, noindex thin archives
    Pages not indexedGSC Page indexing reportRemove noindex, add internal links, request indexing
    Weak titles and meta descriptionsCrawler on-page report, SERP previewRewrite unique, keyword-first tags per page
    Mobile usabilityReal-device checks, LighthouseResponsive theme, larger tap targets, no interstitials
    Thin contentHigh bounce, low time-on-pageExpand with data, consolidate near-duplicates
    Missing or broken schemaRich Results Test, GSC EnhancementsAdd valid JSON-LD for the right type

    How to Fix Slow Page Speed and Poor Core Web Vitals

    Speed is part of how Google judges a page, and mobile speed matters most. Page experience is not a single ranking signal, but Google’s core systems weigh Core Web Vitals, HTTPS, and mobile-friendliness together, according to Google’s page experience documentation.

    Aim for the thresholds Google calls “good”: Largest Contentful Paint at or below 2.5 seconds, Interaction to Next Paint below 200 milliseconds, and Cumulative Layout Shift below 0.1. Interaction to Next Paint replaced First Input Delay in March 2024, so if you are still tracking FID, you are watching a retired metric (web.dev).

    Work through these fixes in order:

    1. Compress and serve next-gen images. Convert heavy JPEGs and PNGs to WebP or AVIF. Images are the most common cause of a slow Largest Contentful Paint.
    2. Cut unused scripts and plugins. A stack of 4 or 5 overlapping SEO and marketing plugins loads scripts on every page. Deactivate what you do not use.
    3. Enable caching and pick a lightweight theme. A bloated theme can undo every other fix.
    4. Lazy-load below-the-fold media so images and videos load only when the reader scrolls to them.

    Re-test in PageSpeed Insights after each change. It tells you exactly which resource is slowing the page, so you fix the real bottleneck instead of guessing.

    How to Fix Broken Links and 404 Errors

    Broken internal and external links waste crawl budget, frustrate readers, and signal a neglected site. Every dead link is a small tax on how efficiently Google crawls you.

    Crawl the site with Screaming Frog or Ahrefs to list every 404 and every redirect chain. Then fix them:

    • 301-redirect broken internal links to the closest live page.
    • Update or remove dead external links pointing off your site.
    • Fix redirect chains by pointing the original link straight to the final URL, not through two or three hops.

    On a WooCommerce store, deleted and out-of-stock products are the most common source of 404s. When you retire a product, redirect its URL to the parent category or a close replacement instead of letting it 404. If you manage client sites, keep a redirect map for every migration so old URLs never dead-end.

    How to Fix Duplicate Content

    This is the highest-value section for any store owner. Duplicate content is where WooCommerce and WordPress sites quietly bleed rankings, and almost nobody audits for it.

    Near-identical pages come from three places. Product variants for color and size can each spin up their own URL. Filtered, tag, and category archive URLs create thin variations of the same list. And a single product reachable through several category paths can exist at several addresses. Google then has to guess which version to rank.

    Point Google at the right version:

    • Add canonical tags so every duplicate points to the primary version of the page.
    • 301-redirect true duplicates that should not exist at all.
    • Use hreflang if you run regional stores in different languages or currencies.
    • Apply noindex to thin tag and archive pages that add no unique value.

    Canonicalization matters most on stores with product variations. You set canonical tags through your existing SEO plugin, such as Yoast or Rank Math, or in your theme templates. A consistent canonical policy across client sites saves you from relitigating this on every audit.

    How to Fix Pages That Aren’t Getting Indexed

    Indexing is eligibility to rank. If a page is not indexed, it cannot earn a single visit, no matter how good it is.

    Open the Page indexing report in Google Search Console and read the exclusion reason for each affected URL. Then work through the usual causes:

    • Confirm the page is not set to noindex and is not blocked in robots.txt.
    • Add internal links pointing to the page so Google can discover and prioritize it.
    • Improve thin content, since low-value pages are often left unindexed on purpose.
    • Once the page is worth indexing, submit it through URL Inspection and click Request Indexing.

    The usual culprits are thin, low-quality content and orphan pages with no internal links. On large client sites, orphan pages pile up fast, so clean URL slugs and a sensible internal-link structure prevent most indexing gaps before they start.

    How to Fix Missing or Weak Title Tags and Meta Descriptions

    Title tags influence rankings. Meta descriptions influence click-through. Weak or duplicate tags leave both on the table.

    Write a unique, keyword-first title tag for every page, kept to about 60 characters so it does not truncate in search. Write a compelling meta description of roughly 155 characters with a clear benefit or call to action. Front-load the primary keyword in both, and never reuse the same title across pages. If you want the background on why descriptions still matter, see whether meta descriptions are a ranking factor and the step-by-step guide to add a meta description in WordPress.

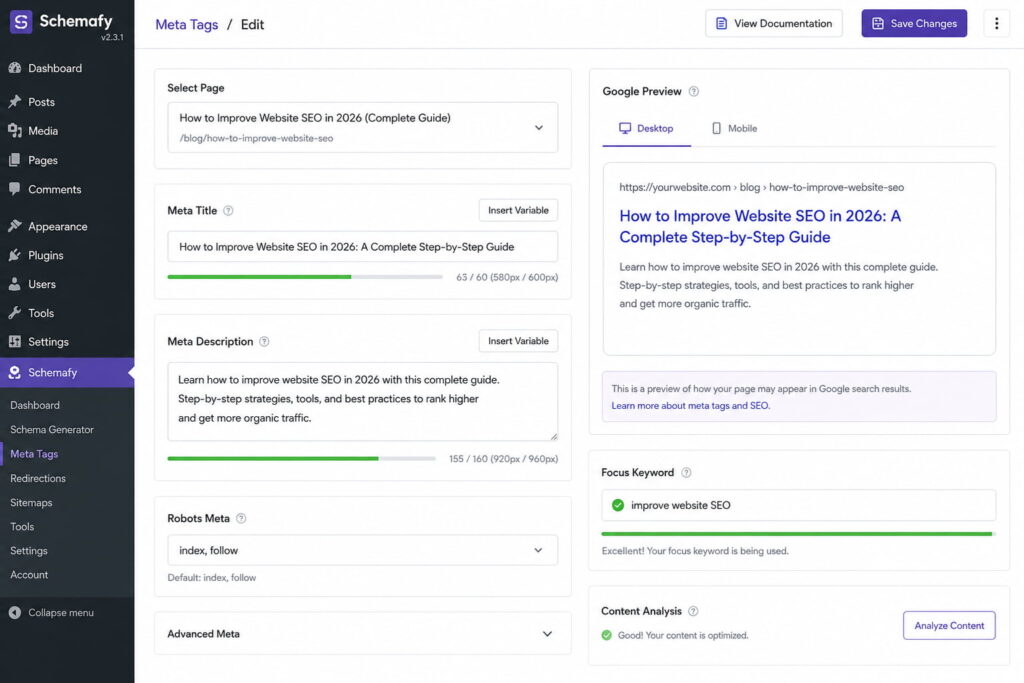
    Editing tags one page at a time is fine for a homepage. It does not scale to hundreds of posts or products. In Schemafy, open WP Admin > Schemafy > Meta Tags, search for the page, and edit the Meta Title and Meta Description fields. A character counter and validation status keep you inside the limits, and the Google Preview shows the live search snippet before you save. Click Save Meta Tags to apply.

    Schemafy Meta Tags screen with SEO fields and Google SERP preview.

    Schemafy shows the live Google Preview as you rewrite a product page’s title and description, so you catch truncation before it hits the SERP.

    To rewrite tags in bulk, open Meta Tags > Bulk Import CSV, click Download Template for a file with the required url, meta_title, and meta_description columns, fill in your rows, and upload it. The import preview flags each row as Valid, Warning, or Invalid, then Import Rows applies only the valid ones. You can also test any title and description length against a live snippet with the SERP preview tool before you commit.

    How to Fix Mobile Usability Problems

    Google uses mobile-first indexing, which means it evaluates the mobile version of your site for ranking, as explained in Google’s page experience guidance. If your mobile experience is broken, your desktop polish will not save you.

    Fix the fundamentals:

    • Use a responsive theme that adapts cleanly to phone screens.
    • Make tap targets and font sizes large enough to use without pinching or zooming.
    • Remove intrusive interstitials and pop-ups that cover the content on load.
    • Simplify navigation so the core paths work with a thumb.

    Test on a real device and run Lighthouse in Chrome, since Google retired the standalone Mobile Usability report in Search Console. Because mobile Core Web Vitals feed the same page-experience signals, most speed fixes from earlier in this guide also improve mobile usability.

    How to Fix Thin or Low-Value Content

    Thin content underperforms, and Google may decline to index it at all. Pages that say very little give search engines very little reason to rank them.

    Start by finding pages with high bounce and low time-on-page in your analytics. Then decide, page by page, whether to expand or consolidate:

    • Expand pages worth keeping with real data, answers to the follow-up questions readers ask, images, and internal links.
    • Consolidate or 301-redirect near-duplicate thin pages into one strong page.
    • Add unique descriptions to category and collection pages instead of leaving them bare.

    The test for every page is whether it matches search intent better than what already ranks. If it does not, expand it until it does, or fold it into a page that does.

    How to Fix Missing or Broken Schema Markup

    Most SEO guides mention schema in passing. That is a mistake, because broken structured data is one of the few issues that changes how your listing looks in search, not just where it ranks.

    Missing, invalid, or incomplete structured data means no rich results: no star ratings, no price, no FAQ, no breadcrumbs. You lose click-through even when your ranking is fine. The impact is measurable. Rotten Tomatoes added structured data to 100,000 pages and saw a 25% higher click-through rate on marked-up pages, and Nestlé measured pages shown as rich results getting an 82% higher click-through rate than non-rich pages, both reported in Google’s structured data documentation.

    That makes schema a fixable, high-return SEO issue rather than a technical footnote.

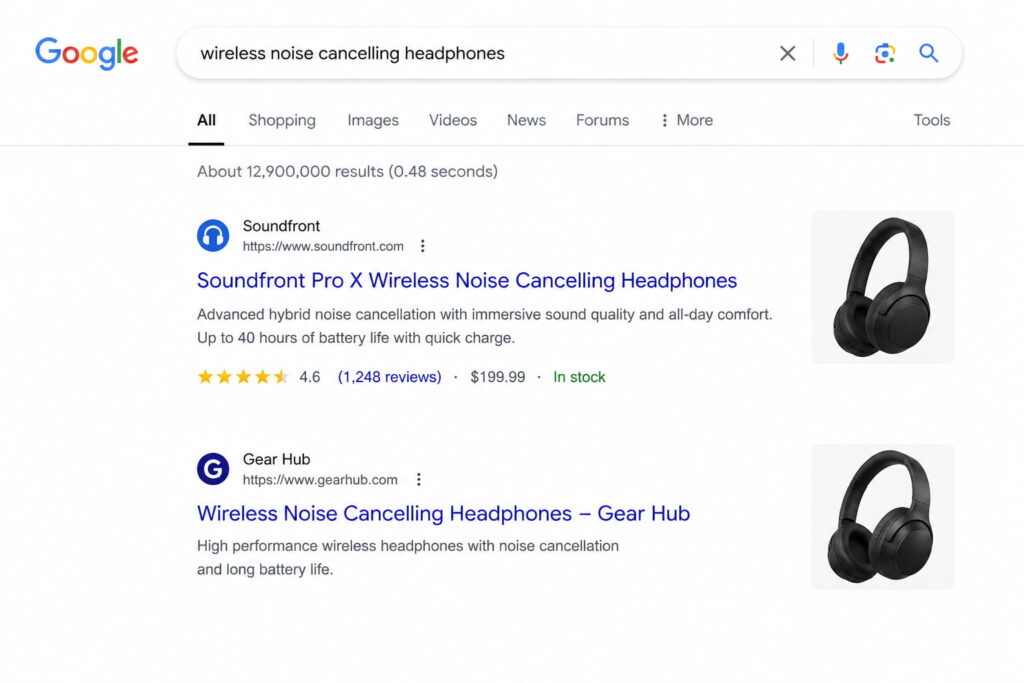
    Google search results comparing a rich product result with a standard listing.

    A single product with valid Product and Review schema earns stars and a price in the SERP, while the plain results below compete on text alone.

    How to check your structured data

    Check your key pages before you change anything. Run them through Google’s Rich Results Test and the Schema Markup Validator, then open the Enhancements and Rich results reports in Search Console to see errors and warnings across the whole site. Look for missing required properties, such as a product price or a review rating, and for invalid syntax.

    Most schema problems fall into four buckets:

    • No schema at all on pages that qualify for rich results.
    • The wrong @type for the page, such as Article on a product page.
    • Missing required fields, so the markup is present but ineligible.
    • Markup that does not match the visible content on the page.

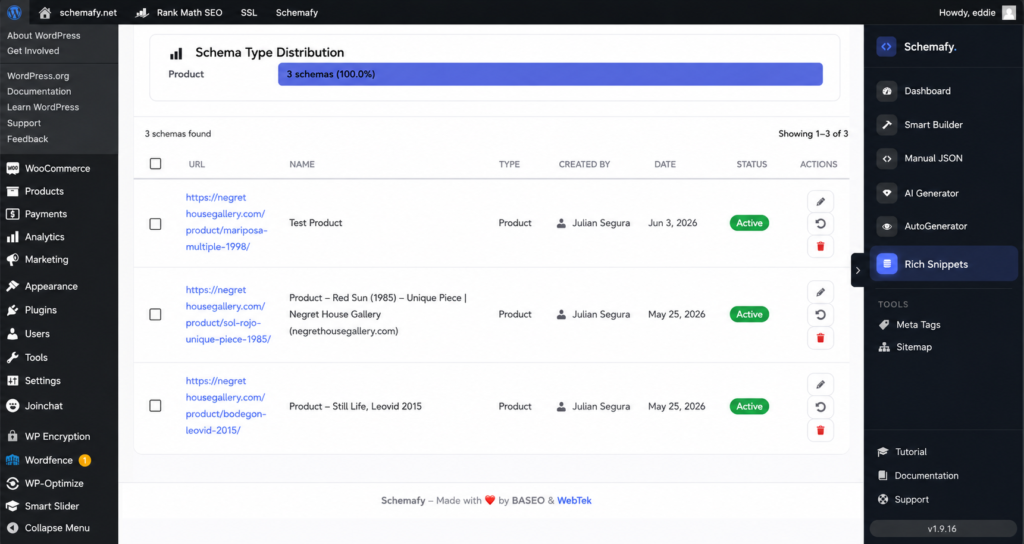
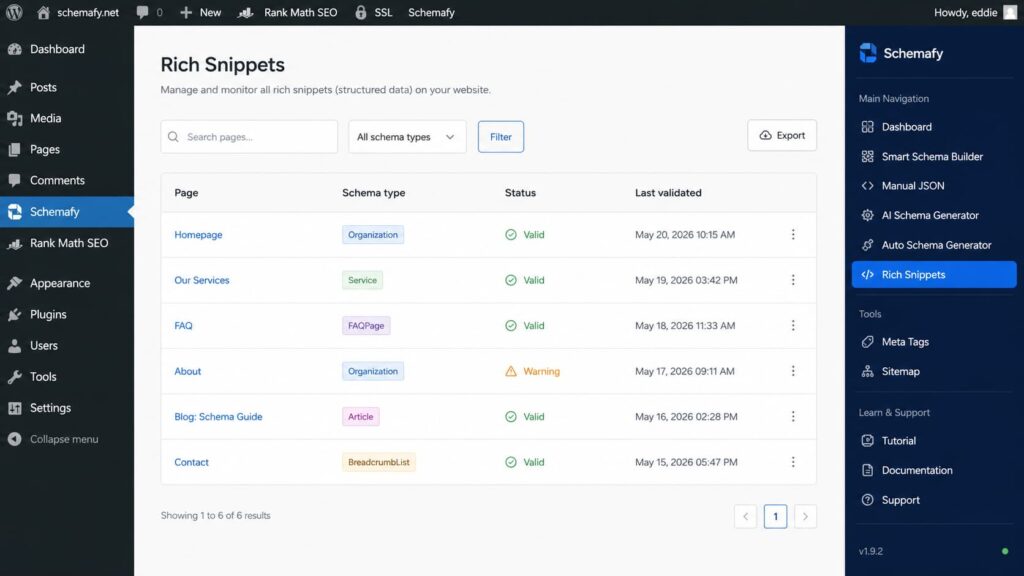
    That last one matters: Google does not guarantee rich results even for valid markup, and it requires your structured data to match what users actually see, per Google’s structured data guidelines. If you want to inspect or hand-edit the raw code, a JSON-LD editor validates it against the same specification. Inside Schemafy, the Rich Snippets screen lists every schema already applied across your site, so you can see coverage and gaps in one place.

    How to fix it fast on WordPress

    You have two paths. The first is editing JSON-LD by hand in your theme files, such as functions.php or template files. It works, but it is error-prone, usually needs a developer, and breaks when the theme updates. The second is a dedicated plugin that injects validated JSON-LD without touching your theme.

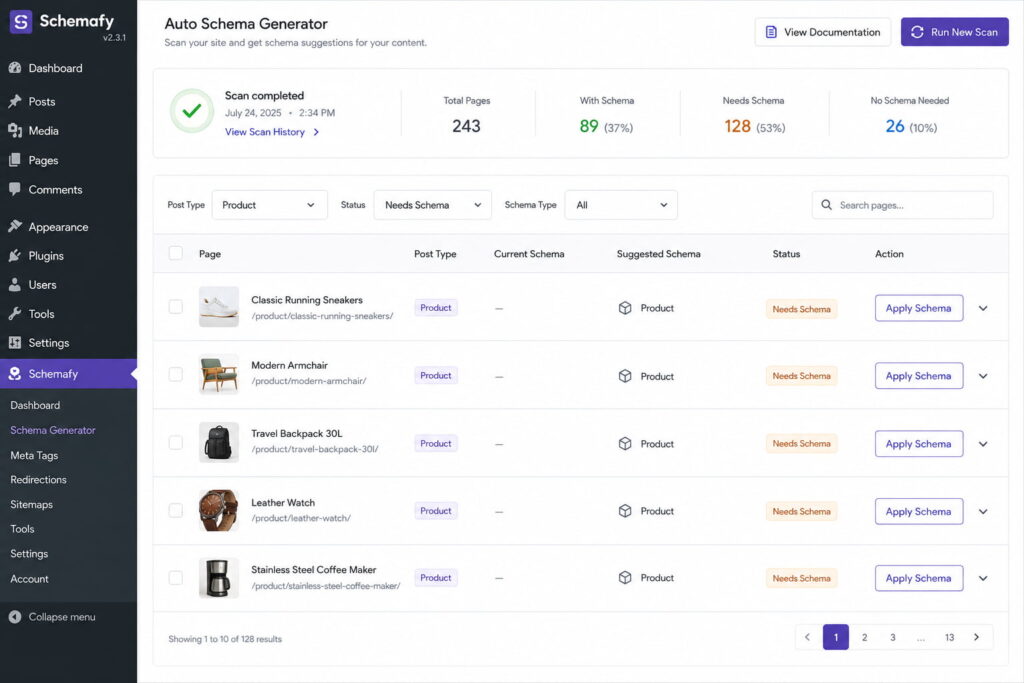
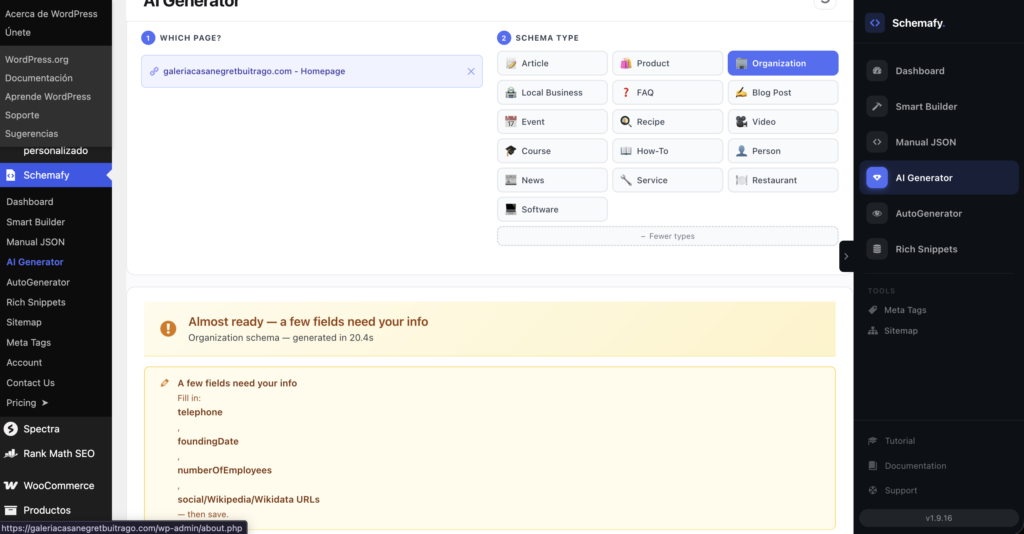
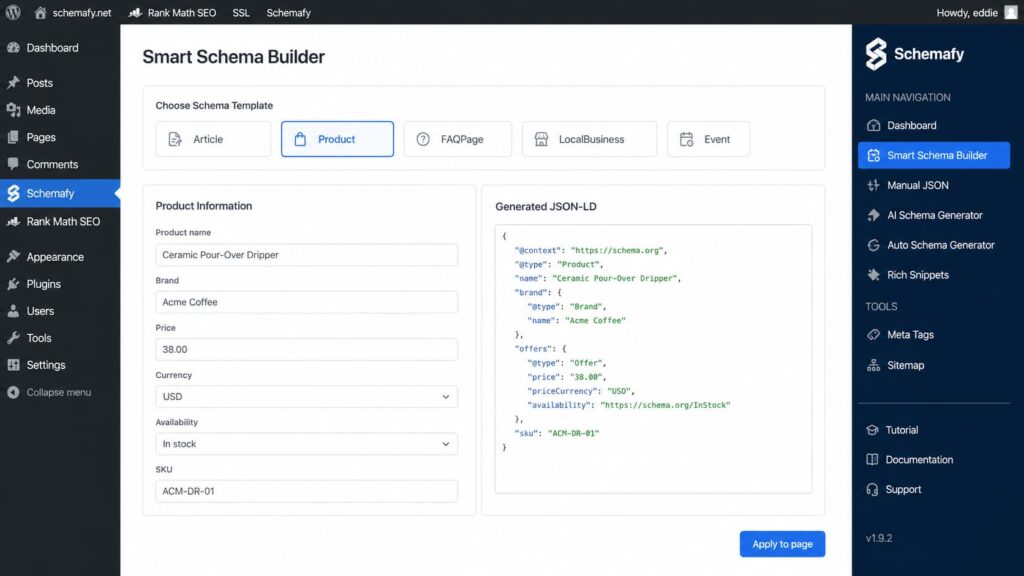
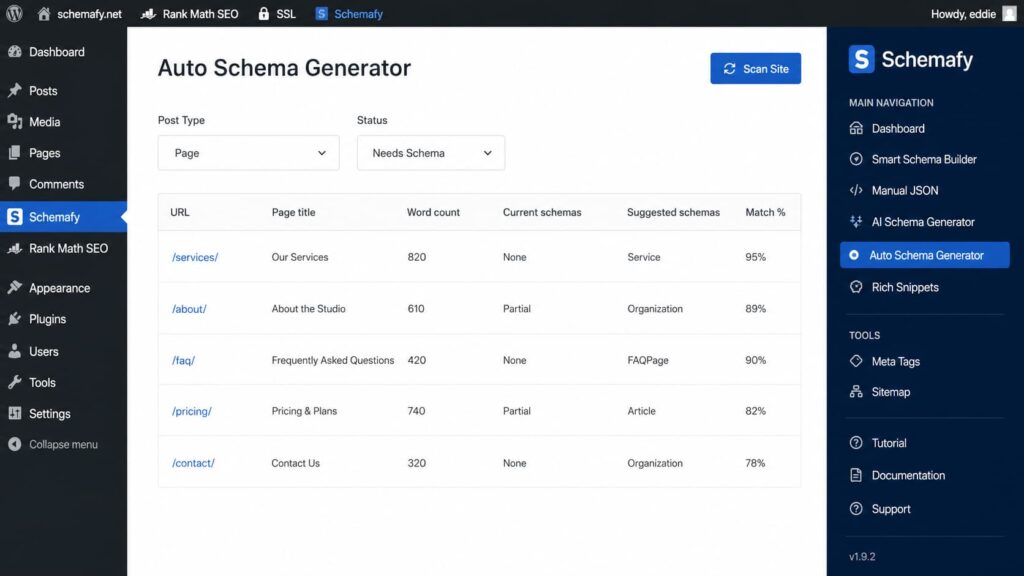
    Schemafy takes the second path. To cover a whole site, open WP Admin > Schemafy > Auto Schema Generator, click Scan Site, and filter by Post Type and Status, for example Product and Needs Schema. The scan lists every page with its current and suggested schemas so you can see coverage at a glance. For a specific page or a complex type, open AI Schema Generator, select the page, choose a type such as Product or FAQPage, click Generate Schema with AI, review the generated JSON-LD and its validation status, and click Save to Website. You can also start from a template with the schema markup generator or follow the full walkthrough on how to use schema markup. Either way, you add Product, Review, BreadcrumbList, and FAQPage schema that stays valid, without writing code.

    Schemafy Auto Schema Generator showing product pages that need schema.

    Schemafy’s Auto Schema Generator flags every product page missing schema after a single scan, so you fix coverage in bulk instead of page by page.

    [CTA_DOWNLOAD]

    How to Prevent SEO Issues From Coming Back

    SEO is not one-and-done. Most sites fix their issues once, stop monitoring, and watch broken links, speed regressions, and missing schema creep back within months. Maintenance beats emergencies.

    Build a short routine you can repeat:

    • Schedule a monthly crawl with your usual tool.
    • Watch Search Console for new coverage and Core Web Vitals errors.
    • Re-validate your schema after every theme or plugin update, since updates are what silently break markup. In Schemafy, the Rich Snippets screen shows what is still applied so you can spot anything that dropped.
    • Keep a simple audit checklist so nothing gets skipped.

    If you manage client sites, turn that checklist into a repeatable monthly pass and you will grow organic traffic more steadily than any one-time cleanup ever could.

    Fix Your Schema Issues in Minutes with Schemafy

    Of every issue in this guide, schema is one of the fastest to fix and one of the very few that directly changes how your listing looks in search. Rich results are a click-through win you can capture this week.

    Schemafy is the no-code way for WordPress sites and WooCommerce stores to add valid JSON-LD, including Product, Review, BreadcrumbList, and FAQPage, without editing theme code. It complements the SEO work you are already doing. The fastest first step is to scan your site and see exactly what schema is missing.

    [CTA_DOWNLOAD]

    Frequently Asked Questions

    Quick answers to the questions store owners and agencies ask most about fixing SEO issues.

    How do I check what SEO issues my site has?

    Start with three free tools: Google Search Console for indexing and Core Web Vitals errors, a crawler like Screaming Frog or Ahrefs to find broken links and duplicate content, and Google PageSpeed Insights for speed. Together they surface almost every fixable SEO issue on your site.

    How long does it take to fix SEO issues?

    Individual fixes, like redirects, meta tags, or schema, take minutes to hours. Seeing ranking or traffic changes takes longer: Google must recrawl and reprocess your pages, which can be days for small fixes and several weeks for content or indexing changes across a larger site.

    What are the most common SEO issues?

    The most common SEO issues are slow page speed, broken links, duplicate content, pages not getting indexed, weak title tags and meta descriptions, poor mobile usability, thin content, and missing or invalid schema markup. Most sites have several at once, and nearly all are fixable without a developer.

    Can I fix SEO issues myself without a developer?

    Yes. Most SEO issues, like meta tags, redirects, image compression, indexing, and content, can be fixed in your CMS or WordPress settings without code. Schema markup is the main exception, but no-code plugins let you add valid structured data without editing theme files.

    Does schema markup help fix SEO issues?

    Schema markup doesn’t boost rankings directly, but it fixes a real visibility issue: without valid structured data your pages can’t show rich results like star ratings, prices, or FAQs. Adding correct JSON-LD schema improves how your listing looks and lifts click-through rate.

  • What Is an SEO Slug?

    What Is an SEO Slug?

    Think of a slug like the label on a shipping box. Google and your readers both read the label before they open the box, which is to say, before they ever click. A slug is a short, readable label at the end of a web address. Get it right once and you stop thinking about it. This guide covers what a slug is, why it matters, and how to write and change one safely.

    What Is a Slug in SEO? (Quick Definition)

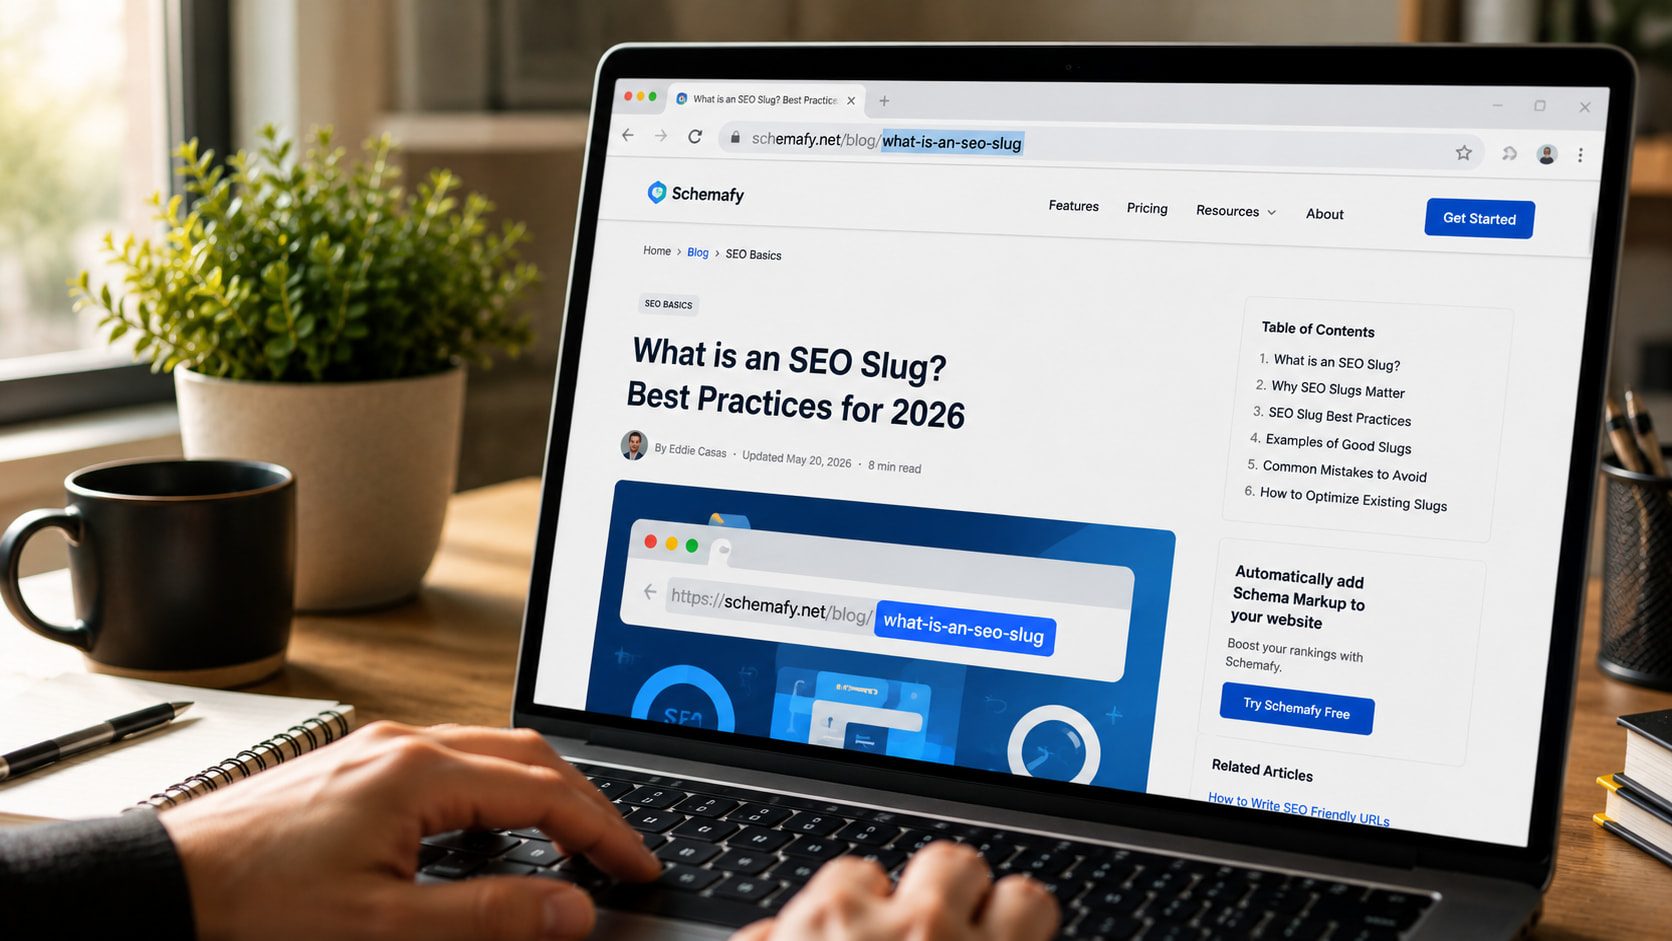
    An SEO slug is the part of a URL that comes after the domain and identifies a specific page. In schemafy.net/what-is-an-seo-slug, the slug is what-is-an-seo-slug. It’s the human-readable label, written in lowercase words separated by hyphens, that tells users and Google what a page is about before they click.

    That label does real work. The domain tells people which site they’re on. The slug tells them which page. A good slug is descriptive enough that you could read it out loud and know roughly what’s on the other end. A bad one is a string of numbers that means nothing to anyone.

    Slug vs. URL vs. Permalink: What’s the Difference?

    These three terms get mixed up constantly, but they name different things.

    TermWhat it isExample
    URLThe full web address of a pagehttps://schemafy.net/blog/what-is-an-seo-slug
    PermalinkThe permanent, full URL of a specific post or pagehttps://schemafy.net/blog/what-is-an-seo-slug
    SlugThe editable end segment that names the pagewhat-is-an-seo-slug

    The URL is the whole address. The permalink is that address treated as permanent, the one you’d share or link to. The slug is just the tail end you can edit. Change the slug and you change the permalink.

    Why SEO Slugs Matter

    The slug helps search engines crawl (read) and index your page, and it gives them a plain-language hint about the topic. Google recommends using simple, descriptive words in your URLs and notes that the words in a URL path can help it understand the page.

    Your slug is also visible. It shows up in search results and in breadcrumb trails, so a clear slug can nudge up your click-through rate. When the URL matches what someone searched for, they trust the result a little more. You can see exactly how a slug reads next to your title and description with a free SERP simulator, the same live preview an SEO plugin like Schemafy shows you before you publish.

    Be honest with yourself about the weight here. On its own, a slug is a minor ranking factor, not magic, much like whether meta descriptions affect ranking. What makes slugs worth your time is the effort-to-payoff ratio. A clean slug takes a minute, needs no code, and helps both readers and search engines. That’s about as easy as on-page wins get.

    Google search results showing clean SEO slugs versus an auto-generated URL.

    What Makes a Good SEO Slug: 7 Best Practices

    A good slug follows seven simple rules, and none of them require code. Here they are.

    Keep It Short (3–5 Words)

    The sweet spot is 3 to 5 words, or roughly 50 to 60 characters. Shorter slugs are easier to read, share, and remember, and they keep your keyword from getting buried. Trim the fat: /the-complete-ultimate-guide-to-writing-seo-slugs-in-wordpress/ becomes /seo-slugs/ and loses nothing a searcher cares about.

    Include Your Target Keyword

    Put your main keyword in the slug once, and let it sit there naturally. People are more likely to click a result whose URL matches what they typed, and the match reinforces relevance. One clean use is enough. Repeating the keyword to look “more optimized” is keyword stuffing, and it reads as spam.

    Use Hyphens, Not Underscores

    This one is a real technical rule, not a style preference. Google treats hyphens as word separators, like spaces, but it does not treat underscores the same way. So seo-slug reads as two words, while seo_slug reads as one word, seoslug. As Search Engine Roundtable notes, Google has recommended hyphens over underscores since 2007, and Google’s own style guide on hyphens treats them as the standard separator. Always use hyphens.

    Stick to Lowercase Letters

    Some servers treat Page and page as two different URLs. That can split your signals or create duplicate-content confusion for the same content. Keep every slug lowercase and you sidestep the problem entirely.

    Remove Stop Words

    Words like “a,” “the,” “is,” “in,” “to,” and “and” add length without adding SEO value. Drop them. /how-to-write-a-good-slug/ tightens to /write-good-slug/. The one caveat: keep a stop word if removing it makes the slug confusing to read. Clarity beats brevity when they conflict.

    Skip Dates and Years

    Avoid baking a year into an evergreen slug. A slug like /seo-tips-2025/ looks stale the moment the calendar flips, and fixing it means changing a live URL, which carries risk (more on that below). If the content isn’t tied to a specific year, leave the year out.

    Avoid Special Characters

    Spaces, %, &, and accented letters don’t belong in a slug. They either break or get URL-encoded into ugly strings, so a space turns into %20 and a clean address becomes a mess. Stick to lowercase letters, numbers, and hyphens, and nothing else.

    Good vs. Bad Slug Examples

    The fastest way to internalize the rules is to see bad slugs next to their fixed versions. Each row below breaks one rule, and the good version puts it back.

    Bad slugWhy it’s badGood version
    /the-ultimate-complete-guide-to-seo-slugs-for-beginners/Too long, keyword buried in filler/seo-slugs/
    /seo_slug_guide/Underscores read as one joined word/seo-slug-guide/
    /how-to-write-a-good-slug-for-the-page/Stop words add length, no value/write-good-slug/
    /SEO-Slug-Guide/Uppercase risks duplicate URLs/seo-slug-guide/
    /?p=123Auto-generated ID means nothing/seo-slug/

    The pattern is the same every time. The good versions are short, lowercase, hyphenated, and free of filler. Once you’ve seen a few, you can spot a weak slug on sight.

    How to Change a Slug in WordPress (Safely)

    Changing a slug in WordPress takes about a minute and doesn’t require touching code. Here’s the whole process.

    1. Open the post or page in the WordPress editor.
    2. Find the URL or Permalink field, in the sidebar of the block editor, or just under the title in the classic editor.
    3. Click Edit and type your new slug in lowercase, with hyphens.
    4. Update or publish the post to save it.
    5. Set a 301 redirect from the old slug to the new one (see the next section).

    You can edit category and tag slugs too, from Settings, though those change the URLs of your archive pages, so treat them with the same care. If you’re already tidying up on-page details, it’s a good moment to also add a meta description in WordPress for the same page.

     WordPress editor showing how to edit an SEO slug.

    Why You Need a 301 Redirect

    Here’s the catch that trips people up. Changing a live slug breaks the old URL. Every link pointing at the old address, and the ranking power those links built up, was aimed at that exact URL. Break it and you can lose that value, what SEOs call link equity.

    The fix is a 301 redirect, a permanent forward from the old slug to the new one. It hands the old URL’s ranking power to the new page. Most SEO plugins handle this, including Yoast and Rank Math, or you can use a dedicated redirect plugin. Set the redirect the moment you change the slug, not later.

    One caveat: if a page already ranks well with an imperfect slug, sometimes the safest move is to leave it alone. Even Google advises against redirecting URLs just to swap underscores for hyphens on pages that are already performing.

    Common SEO Slug Mistakes to Avoid

    Most slug problems come down to a handful of repeat offenders. Watch for these:

    • Leaving the auto-generated ?p=123 slug WordPress assigns by default.
    • Stuffing the same keyword into the slug two or three times.
    • Letting slugs run long with the full title and every stop word.
    • Changing a live slug without setting a 301 redirect.
    • Baking a year or date into an evergreen slug.

    None of these is hard to avoid once you know it’s there. Clean slugs are one of the small, compounding habits that, alongside better content and links, help you increase organic traffic over time.

    SEO Slug FAQs

    A few quick answers to the questions that come up most often about slugs.

    Does the slug affect SEO ranking?

    Yes, but modestly. A slug helps search engines understand a page’s topic and encourages clicks when it matches a user’s query. It’s a minor ranking signal on its own. A clear, keyword-relevant slug supports rankings, but it won’t outweigh content quality or backlinks.

    Should I change slugs on old, ranking pages?

    Usually no. Changing a slug on a page that already ranks breaks the old URL and can erase its ranking power. If you must change it, set up a 301 redirect from the old slug to the new one to preserve link equity.

    How long should an SEO slug be?

    Aim for 3 to 5 words, or roughly 50 to 60 characters. Short slugs are easier to read, share, and remember, and they keep your target keyword front and center. Remove stop words like “the” and “to” to stay concise.

    Can a slug have numbers in it?

    Yes. Numbers are fine in slugs (for example, /10-seo-tips/). Just avoid auto-generated ID slugs like ?p=123, which mean nothing to users or search engines, and avoid years in evergreen content so the URL doesn’t age.

    Final thoughts

    A clean slug is one of the cheapest wins in on-page SEO. It takes a minute, needs no code, and gives both readers and search engines a plain-language hint about your page before they commit to a click. It won’t outrank great content or strong links on its own, but it’s a small habit that compounds across every page you publish.

    The next step is the part search engines actually lean on to understand a page: structured data and meta tags. Once your URLs read well, that’s where the bigger gains sit. A plugin like Schemafy handles the schema and meta side for WordPress without code, so your pages show up correctly in search once the slug is sorted. If you want to go there next, here’s how schema markup works.

    [CTA_DOWNLOAD]

  • FAQ Schema Markup: The Complete Guide (JSON-LD + Code)

    FAQ Schema Markup: The Complete Guide (JSON-LD + Code)

    Most guides still tell you FAQ schema earns those dropdown questions under your result in Google. As of May 2026, it doesn’t. Google removed FAQ rich results from Search entirely. But the markup matters more than ever now, for a different reason: it is how machines and AI answer engines read your questions and answers. This guide covers what FAQ schema is, whether it still earns its keep, the JSON-LD to copy, and how to add and validate it.

    What Is FAQ Schema Markup?

    FAQ schema markup is structured data, in the FAQPage format from Schema.org, that labels a list of questions and their answers so search engines and AI systems can read them as discrete Q&A pairs. You add it as JSON-LD in the page’s code. It doesn’t change what visitors see.

    That last point trips people up. FAQ schema doesn’t rewrite your content or redesign your page. It sits in a <script> tag and tells a machine “this string is a question, and this string is its answer.” Nothing more.

    It is also not a ranking factor. Google has never treated FAQ markup as a signal that lifts your position. What it does is remove ambiguity about what your content means, which is exactly what both search crawlers and AI answer engines need.

    JSON-LD is the format to use. It has been Google’s recommended way to add structured data since 2015, and it is a W3C recommendation, so you are not betting on a proprietary syntax. FAQ (FAQPage) is one of the schema types you can generate with a plugin instead of hand-coding, the same operational shift covered in how to use schema markup more broadly. That matters once you have more than a page or two to mark up.

    FAQPage vs QAPage: Which One Do You Need?

    These two types look similar and get mixed up constantly. The difference is who writes the answers.

    Use FAQPage when your site publishes both the question and the single, authoritative answer. Think a support page, a product FAQ, a policy explainer. Use QAPage when users can submit their own answers to a question, like a forum thread or a community Q&A. Google is explicit: if there is one answer and users can’t add alternatives, it is FAQPage.

    TypeUse it whenWho writes the answersExample
    FAQPageOne authoritative answer per questionYou (the site)Product FAQ, support page, policy page
    QAPageUsers can submit alternative answersYour usersForum thread, community Q&A

    Pick wrong and your markup describes something the page isn’t, which is one of the fastest ways to get structured data ignored.

    Does FAQ Schema Still Work in 2026?

    Yes and no, and the distinction is the whole point of this section.

    The rich result is gone. According to Google’s own documentation, as of May 7, 2026, FAQ rich results no longer appear in Google Search. Google is dropping the FAQ search appearance, the rich result report, and support in the Rich Results Test in June 2026, with the Search Console API following in August 2026.

    As of May 7, 2026, FAQ rich results are no longer appearing in Google Search. Support in the Rich Results Test is being dropped in June 2026. Source: Google Search Central documentation

    So if your reason for adding FAQ schema was the expandable questions under your listing, that reason expired. Don’t build a page around a feature that no longer renders.

    The markup itself still does real work. The FAQPage format turns a wall of text into clean question-answer pairs that machines can lift without guessing. That is valuable to a different audience than it used to be.

    Why Rich Results Shrank (and Who Still Gets Them)

    The decline started well before 2026. In August 2023, Google announced that FAQ rich results would only show for well-known, authoritative government and health websites. Every other site lost the feature that month.

    The impact was immediate. After the change, roughly 82.96% of sites with FAQ schema stopped earning FAQ results, up from 46.06% in February of that year, per Search Engine Land. A separate study measured a 37% drop in FAQs appearing in results.

    So who still gets the dropdowns today? Nobody. The 2023 change narrowed eligibility to gov and health sites; the May 2026 change removed the appearance entirely. There is no tier of site that earns the classic FAQ rich result anymore.

    The Real Payoff Now: AI Overviews, ChatGPT & Perplexity

    Here is where the value moved. AI answer engines read structured Q&A pairs and reuse them.

    When Google AI Overviews, ChatGPT, or Perplexity assemble an answer, pre-formatted question-answer pairs are easy to extract and attribute. Your FAQPage markup hands them the exact text you want associated with each question, instead of making them infer it from prose. Google now publishes a dedicated guide to optimizing for generative AI search, which tells you where its own priorities sit.

    Practitioners tracking answer engine visibility report that FAQ-structured content gets pulled into AI answers more often than the same content left unstructured, a pattern the AEO and GEO literature keeps returning to. Treat the specific percentages floating around with caution, but the direction is consistent. If you care about being cited in AI answers, this is the discipline: it is part of generative engine optimization, and clean FAQ markup is one of its cheapest inputs.

    The goal changed from “earn the dropdown” to “be the source the machine quotes.” FAQ schema still serves that goal.

    How to Add FAQ Schema Markup (Step by Step)

    The process is four steps whether you hand-code the JSON-LD or generate it. Write the FAQ, produce the markup, place it on the page, then validate.

    1. Write a real, visible FAQ on the page.
    2. Generate the FAQPage JSON-LD.
    3. Paste it into the page’s code.
    4. Validate the syntax and monitor it after edits.

    You have two honest options at step 2: write the JSON-LD by hand (the code is below) or generate it. If you have one page, hand-coding is fine. If you have dozens or hundreds, generating and maintaining it is the only sane path.

    Step 1: Write a Real, Visible FAQ First

    Google’s guidelines are strict on one thing: every question and answer in your markup must be visible to the user on the page. The answer can sit behind an expandable accordion, but it has to be reachable. You cannot mark up content that only exists in the JSON-LD block.

    That rule is not bureaucratic. The markup is supposed to describe the page, so write the FAQ as real page content first. Use questions people actually ask, and answer each one directly in one or two sentences.

    Get the human-readable version right before you touch any code. The markup mirrors it.

    Step 2: Generate the JSON-LD

    Hand-writing FAQPage markup for one page takes a few minutes. Doing it for 400 product pages does not scale, and every manual edit is a chance to desync the markup from the visible text.

    To generate it for a single page in WordPress, open WP Admin → Schemafy → AI Schema Generator, search for the page or paste its URL, choose FAQ under Schema Type, and click Generate Schema with AI. Open Review technical JSON-LD to read the output, check the validation indicator, and click Save to Website. If the draft isn’t right, Regenerate.

    To do it across a whole site, open WP Admin → Schemafy → Auto Schema Generator and click Scan Site. Filter Post Type and set Status to Needs Schema, then review the suggested schemas and match percentages before applying in bulk. This is how you mark up hundreds of pages without opening each one.

    WordPress FAQ schema markup generator showing FAQPage JSON-LD creation and validation inside the Schemafy plugin.

    Schemafy generating FAQPage JSON-LD for a single page from the AI Schema Generator, with the output validated before it goes live.

    If you prefer to fill fields yourself, Open Schemafy and navigate to Smart Builder. Select the FAQ schema template, enter each question and answer into the corresponding FAQ fields, and review the generated FAQPage JSON-LD output. Before publishing, verify that all questions, answers, and schema properties match the current Schemafy interface and your page content, then save the schema. You can also generate a block in the browser with a standalone schema markup generator if you just want the code.

    Step 3: Paste It Into Your Page

    The JSON-LD goes inside a <script type="application/ld+json"> tag. Google accepts it in either the <head> or the <body>, so placement is flexible.

    In WordPress, a schema plugin applies the markup to the page for you, so you never edit the theme. To paste your own block instead, Open Schemafy and navigate to Manual JSON. Paste your FAQPage JSON-LD markup into the JSON editor, select the page or URL where the schema should be applied, and review the configuration before saving. Confirm that all field names, menu paths, and save actions match the current Schemafy interface before publishing the schema.

    Once schemas are live, you can view and edit everything applied across the site from the Rich Snippets screen, which keeps you from losing track of which page has which markup.

    Step 4: Validate and Monitor

    Validate the syntax before you publish. A single missing bracket or misnamed property makes the whole block unreadable to a crawler.

    One honest caveat about tooling: Google is retiring the FAQ report and FAQ support in its Rich Results Test during 2026, so don’t rely on that specific tool to confirm FAQ markup going forward. Use a general JSON-LD validator instead. A JSON-LD editor and validator checks your block against the Schema.org and Google structured data specs in real time.

    Then monitor. The most common way FAQ markup breaks is drift: someone edits the visible answer and the JSON-LD keeps the old text. Recheck after any content change so the markup still matches what a visitor reads.

    FAQ Schema JSON-LD Code (Copy-Paste)

    Here is a minimal, valid FAQPage block based on Google’s official example. Replace the questions and answers with your own, keep the structure, and paste it into your page.

    Basic FAQPage Example

    <script type="application/ld+json">
    {
      "@context": "https://schema.org",
      "@type": "FAQPage",
      "mainEntity": [{
        "@type": "Question",
        "name": "Does FAQ schema still earn rich results in Google?",
        "acceptedAnswer": {
          "@type": "Answer",
          "text": "No. As of May 2026, Google no longer shows FAQ rich results in Search. The FAQPage markup still helps search engines and AI systems understand your questions and answers."
        }
      }, {
        "@type": "Question",
        "name": "Which JSON-LD format should I use for FAQs?",
        "acceptedAnswer": {
          "@type": "Answer",
          "text": "Use the FAQPage type with a mainEntity array of Question items, each containing a name and an acceptedAnswer of type Answer with a text property."
        }
      }]
    }
    </script>
    

    The required properties are small in number. FAQPage needs mainEntity, an array of Question items. Each Question needs a name (the full question text) and an acceptedAnswer. Each Answer needs a text property with the full answer. Everything else is optional.

    WordPress, Webflow & Next.js/React

    The JSON-LD is identical across platforms. Only the placement differs.

    On WordPress, a schema plugin like the Schemafy plugin injects the block for you, so you don’t paste anything into the theme or risk an update wiping it out.

    On Webflow, paste the <script> block into the page’s custom code (Page settings → Custom code, before </body>) or into an Embed element on the page.

    On Next.js or React, render the <script type="application/ld+json"> tag in the head. In the App Router you can return it from a component or the metadata export; in the Pages Router use next/head or next/script. Serialize the object to a JSON string with JSON.stringify and set it as the script’s content rather than as children, so it isn’t escaped.

    [SCREENSHOT: The Schemafy Rich Snippets management screen showing a list of applied schemas with a FAQPage entry attached to a WordPress page.]

    Schemafy Rich Snippets screen showing active FAQPage schema markup.

    A FAQPage schema applied to a WordPress page, managed alongside every other schema from the Rich Snippets screen.

    Google’s FAQ Schema Guidelines & Character Limits

    Google’s FAQ documentation sets a short list of required properties. Get these right and your markup is technically valid.

    TypeRequired propertyWhat it holds
    FAQPagemainEntityAn array of Question items (at least one)
    QuestionnameacceptedAnswerThe full question text, and its answer
    AnswertextThe full answer text

    Inside the Answer text, Google supports a limited set of HTML tags: <h1> through <h6><br><ol><ul><li><a><p><div><b><strong><i>, and <em>. Any other tags are ignored, so don’t put custom markup or scripts in an answer.

    The content rules matter as much as the syntax. Every question and answer must be visible on the page. Use one answer per question, or switch to QAPage. Don’t use FAQPage for advertising copy. And if the same FAQ appears on many pages, mark up only one instance for the whole site, per Google’s structured data guidelines.

    On character limits: Google does not define one in the FAQPage spec. There is no maximum length for a question or an answer. The real constraint is that the markup must contain the complete text of each question and answer, and that text must match what is visible on the page. Concise answers are still a good idea, since a tight one or two sentences is easier for an AI engine to quote cleanly, but that is best practice, not a hard rule.

    Common FAQ Schema Mistakes to Avoid

    Most FAQ markup problems come down to a handful of repeat offenders. Google’s guidelines rule out several of these directly.

    • Marking up content that isn’t visible on the page. The JSON-LD has to describe text a visitor can actually see.
    • Using FAQPage where QAPage belongs, on pages where users submit their own answers.
    • Using FAQ markup for promotional or advertising copy rather than genuine questions.
    • Duplicating the same FAQ block across many URLs. Mark up one instance for the site.
    • Letting the JSON-LD drift out of sync with the visible question and answer text after an edit.
    • Building the page around the old dropdown rich result that no longer exists.

    The drift problem gets worse with scale. If you maintain FAQ markup across hundreds of pages by hand, some copy will fall out of sync eventually. Generating and managing it from one place, then reviewing coverage from the Auto Schema Generator and Rich Snippets screens, keeps markup and visible text aligned without a manual audit.

    FAQ Schema Best Practices for 2026

    The best practices follow directly from where the value now sits.

    Write real, concise, visible questions and answers, one clear idea per answer. Keep the markup identical to the visible text after every edit. Generate and maintain FAQPage at scale instead of typing it, using the Auto Schema Generator for bulk coverage and the AI Schema Generator for individual pages. Validate the syntax before publishing.

    Then think one step further than search. When you write each answer, picture an AI engine lifting that single question-answer pair into a response. If the answer stands on its own in two sentences, it travels well. If it only makes sense in the surrounding paragraph, tighten it.

    That mindset, clean pairs that survive being quoted out of context, is what separates FAQ markup that still earns attention in 2026 from markup that just sits in the page unused.

    Schemafy’s Auto Schema Generator flagging pages that need schema and suggesting FAQPage across a whole site in one scan.

    Ready to Win AI Citations With Structured Data?

    The dropdown rich result is gone, so the job changed. The work now is making sure search engines and AI answer engines can read your questions and answers as clean, quotable pairs, which comes down to correct FAQPage markup that mirrors your visible content.

    Write a real FAQ, mark it up properly, validate the syntax, and then generate and maintain the FAQPage (and the other schema types your pages need) instead of hand-coding each one.

    [CTA_DOWNLOAD]

    Frequently Asked Questions

    Does FAQ schema help SEO?

    FAQ schema is not a ranking factor, and as of May 2026 it no longer produces a rich result in Google Search. It still helps search engines and AI systems understand your questions and answers as structured pairs, per Google’s documentation.

    Is FAQ schema still worth it in 2026?

    Yes, but for structural clarity and AI-search citation rather than for the old expandable questions. If you want your Q&A content to be readable and quotable by AI answer engines, FAQPage markup is a cheap, low-risk input.

    What’s the difference between FAQPage and QAPage?

    FAQPage is for one authoritative answer per question, written by the site. QAPage is for pages where users can submit their own answers, like a forum or community thread.

    How many FAQs should I add per page?

    Google doesn’t set a number. Include only the questions that are genuinely relevant to the page, keep every one visible to the reader, and keep the answers concise. Padding a page with questions no one asks helps no one.

    Where do I put FAQ schema code?

    Inside a <script type="application/ld+json"> tag, in either the <head> or the <body> of the page. On WordPress, a schema plugin injects it for you so you don’t edit the theme.

  • Schema Markup Generator: How to Create and Apply JSON-LD in WordPress

    Schema Markup Generator: How to Create and Apply JSON-LD in WordPress

    A schema markup generator is like a label printer. Schema markup is the set of labels that tell search engines what is inside your page. Printing one label is easy: pick a type, fill a form, copy the code. Most guides stop there and let you believe the job is done. The real work starts after you copy that snippet, when you have to stick the label on every box by hand.

    What is a schema markup generator?

    A schema markup generator is a tool that turns page details you enter, such as product, article, FAQ, or business information, into valid JSON-LD structured data. Search engines and AI systems read that code to understand your page, and it can make the page eligible for a rich result like a star rating or an FAQ dropdown.

    The problem it solves is real. Writing JSON-LD by hand is slow and easy to get wrong, and a single misplaced comma or wrong property name can break your eligibility for rich results. A generator removes that risk. You describe the page, it writes the syntax.

    Here is what a generator does not solve on its own. It produces the code, but it does not put the code on your site. You are left with a valid block of JSON-LD in your clipboard and no automated way to apply it. On a five-page site that is fine. On a store with hundreds of products, that gap is the whole problem.

    How a schema generator creates JSON-LD

    The mechanism is simple, and you never touch code to run it. You pick a type (Article, Product, FAQPage), fill in the fields the type asks for, and the generator assembles a <script type="application/ld+json"> block from your answers. Our complete guide to using schema markup walks through what each type expects.

    Here is what a generator hands back for a simple Organization type:

    {
      "@context": "https://schema.org",
      "@type": "Organization",
      "name": "Acme Coffee Roasters",
      "url": "https://acmecoffee.com",
      "logo": "https://acmecoffee.com/logo.png",
      "sameAs": [
        "https://www.instagram.com/acmecoffee",
        "https://www.linkedin.com/company/acmecoffee"
      ]
    }
    

    That block lives inside a script tag, separate from the HTML your visitors see. You can add it or remove it without touching your layout, which makes it safe to test. Google recommends JSON-LD for exactly this reason: it is the easiest format to implement and maintain, and it keeps structured data cleanly separated from your page markup (per Google Search Central).

    JSON-LD vs. Microdata vs. RDFa: which format to generate

    There are three ways to write structured data. They are not equal in practice.

    FormatWhere the code livesGoogle-recommended
    JSON-LDIn a <script> tag, separate from HTMLYes
    MicrodataInline, mixed into your HTML tagsSupported, not preferred
    RDFaInline, mixed into your HTML tagsSupported, not preferred

    Generate JSON-LD. That is the whole recommendation. Microdata and RDFa wrap themselves around your visible HTML, so editing a page risks breaking the markup, and every template change is a chance to introduce an error. JSON-LD sits in one clean block you can swap in and out. Google says the same thing.

    Which schema types a good generator should support

    A good generator does not try to cover all 800-plus types in the schema.org vocabulary. It covers the types Google actually uses for rich results, because those are the ones that change how your page looks in search. Google validates rich results for a limited set of types, not the entire vocabulary (Google Search Console Help).

    Schemafy’s generators (the Smart Schema Builder, the Auto Schema Generator, and the AI Schema Generator) cover the 16 canonical Schema.org types that matter for WordPress content: Article, Product, Organization, LocalBusiness, Person, Event, Recipe, Review, FAQPage, WebPage, Course, HowTo, JobPosting, Service, VideoObject, and BreadcrumbList.

    The hard part is knowing which type your page needs. This table maps the common cases:

    If your page is…Use this schema type
    A blog post or news articleArticle
    A store productProduct
    A company or brand pageOrganization
    A store or restaurant with a locationLocalBusiness
    A Q&A or help sectionFAQPage
    A step-by-step tutorialHowTo
    A product or service ratingReview
    A webinar or conferenceEvent

    The schema types that actually earn rich results

    Not every type changes your search listing. A handful do most of the work: Product, FAQPage, Review and AggregateRating, LocalBusiness, Article, HowTo, and Event. These are the ones that trigger visible rich results, the star ratings and FAQ dropdowns that pull the eye.

    Schema is not a direct ranking factor, but the sites that rank well tend to use structured data consistently, and the visible rich results move click-through rate. Google’s own case studies show the size of the effect: Rotten Tomatoes measured a 25% higher click-through rate across 100,000 pages with structured data, and Food Network saw a 35% increase in visits after adding search features to about 80% of its pages (Google Search Central).

    You can generate any of these types with a free schema markup generator and preview how the result looks before you commit.

    How to use a schema markup generator, step by step

    The workflow is the same across almost every tool. Seven steps take you from a blank form to a monitored rich result.

    1. Pick the schema type that matches your page.
    2. Fill in the fields the generator asks for.
    3. Generate the JSON-LD.
    4. Copy the code.
    5. Add it to your page’s HTML.
    6. Test it in Google’s Rich Results Test.
    7. Monitor rich results in Search Console.

    Steps 1 through 4 are where a generator earns its keep. Inside WordPress, Schemafy runs that flow with no JSON-LD to write and no code to paste into a template. You pick a type, fill a form, and the plugin holds the output for you instead of dropping it into your clipboard.

    Generating schema with a visual builder

    For the standard types, the Smart Schema Builder is the fastest path. You choose a template (Article, Product, FAQPage), fill in the fields in a plain form, and get valid JSON-LD back. There is no JSON-LD to write and nothing to hand-code.

    [WORKFLOW: open the Smart Schema Builder, choose a template (Article / Product / FAQPage), fill in the form fields, and generate valid JSON-LD, then apply it to the selected page. Verify exact menu paths and field labels against the current UI before publishing.]

    Schemafy's Smart Schema Builder generates valid Product JSON-LD from a plain form, no code required.

    Generating complex schema with AI

    Some types are nested or awkward, and you may not know which fields they require. For those, the AI Schema Generator reads your page content and builds the right type for you. You connect your own ChatGPT or Claude API key, and the plugin uses it to draft the schema from what is already on the page.

    Open WP Admin → Schemafy → AI Schema Generator, select the page or paste its URL, choose a schema type, and click Generate Schema with AI. Review the generated fields and the validation status, then click Save to Website. The output is still valid JSON-LD; the AI just assembles it so you do not have to guess the required properties. For custom edge cases you can also refine the code in the JSON-LD editor with real-time validation.

    The part most schema generators skip: applying the markup

    Here is the honest split that no standalone generator will tell you. Generating the snippet is about 20% of the work. Applying it and keeping it in sync is the other 80%, and that is the part a web-based generator leaves entirely to you.

    Think about what you actually hold after you click “generate.” A valid block of code in your clipboard. Now paste it into 300 pages. There is no button for that on a standalone tool. The generator’s job ends at the copy, and yours begins.

    That gap is where most schema efforts quietly die. The two sections below show why the manual route breaks down and what applying schema automatically looks like instead.

    Why pasting JSON-LD into every page doesn’t scale

    Copy-paste works until it doesn’t, and the wall arrives fast. Pasting schema by hand into 800 WooCommerce products or 1,200 programmatic URLs is not a task you finish. It is a task you abandon halfway through.

    The bigger problem is drift. The moment you change a price, rename a product, or update a title, the snippet you pasted last month is wrong. Nobody goes back to fix 800 hand-pasted blocks. So the schema rots: still present, quietly inaccurate, and Google’s guidelines say markup that does not match your visible content can cost you eligibility. Without a tool that applies and updates the markup for you, hand-pasting is a maintenance debt you take on the day you start.

    Generating and applying schema automatically in WordPress

    This is the step a standalone generator cannot do. Schemafy’s Auto Schema Generator scans your site, detects schema opportunities by post type and status, and applies the markup without you pasting code into a single page.

    The flow is direct. Open WP Admin → Schemafy → Auto Schema Generator, click Scan Site, then filter Post Type to Product and Status to Needs Schema. The plugin lists every page that is missing schema with a suggested type and a match percentage, and you apply the markup across them from that screen instead of one product at a time. Because the WordPress schema plugin works with WooCommerce out of the box, your product pages are covered automatically as you add them.

    Schemafy's Auto Schema Generator flags every product missing schema and applies the markup in bulk, no page-by-page pasting.

    Generate and apply schema across every WordPress page without pasting code. Install Schemafy free →

    How to test and validate your schema markup

    Generating and applying schema is not the last step. You confirm it works. Paste the code or the live URL into Google’s Rich Results Test to see which rich result features the page qualifies for, and into the Schema Markup Validator for a general check against the schema.org vocabulary.

    Read the results carefully. A valid item in the Rich Results Test does not guarantee Google will show the rich result, but an invalid item guarantees it won’t (Google Search Central). Fix any warnings, then track rich result impressions in Search Console over the following weeks to confirm the markup is doing its job. Schemafy validates against Google’s Rich Results specification in real time as you build, so most errors get caught before they ever reach the test, and you can refine anything unusual in the JSON-LD editor with real-time validation.

    Free schema generator tools compared

    Most schema generators do the first job well: they produce clean JSON-LD from a form. They differ on the second job, whether they also apply that markup to your site or leave you at the clipboard.

    ToolSchema typesOutput formatGenerates vs. also appliesPlatform
    TechnicalSEO.comCommon Google typesJSON-LDGenerates onlyWeb (any site)
    Google Structured Data Markup HelperLimited setJSON-LD or MicrodataGenerates onlyWeb (any site)
    RankRanger / Merkle generatorCommon Google typesJSON-LDGenerates onlyWeb (any site)
    JSON-LD.com17 typesJSON-LDGenerates onlyWeb (any site)
    Schemafy16 canonical typesJSON-LDGenerates and appliesWordPress plugin

    The standalone tools are genuinely good at generating valid markup, and for a handful of pages any of them will do. The difference is the “applies” column. Every web-based generator hands you code and stops; Schemafy generates the JSON-LD and then applies it across your WordPress pages, which is the part that matters once you are past a dozen URLs.

    Does schema markup help SEO and AI search?

    This is the question everyone asks, so here is the direct answer. Schema markup is not a direct ranking factor, and it hasn’t been one since Google said so in 2018 (Google Search Central). Adding schema will not, by itself, move you up the results page. If that is the promise a tool is selling, it is selling the wrong thing, the same way meta descriptions are not a direct ranking factor yet still shape your click-through rate.

    What schema does is help search engines and AI systems understand your content, and it makes you eligible for rich results that lift clicks. Google’s Nestlé case study found 82% higher click-through rate on pages that earned a rich result versus pages that did not (Google Search Central). The same structured data that feeds rich results also feeds AI answers: clean schema helps AI Overviews, ChatGPT, and Perplexity read and cite your page, which is the core of generative engine optimization. Structured data is one of the most reliable ways to grow organic traffic without chasing rankings directly.

    Final thoughts

    Generating schema stopped being the hard part years ago. Any decent generator writes valid JSON-LD from a form in seconds. The real problem is applying that markup across every page and keeping it accurate when your content changes, and that is an operational job, not a code one.

    The fastest first step is to audit which pages are missing schema, then automate the application instead of pasting code by hand. That is the difference between schema you set up once and schema that quietly stays correct.

    Audit what is missing, then automate the markup. Get Schemafy free on WordPress.org →

    Frequently asked questions

    Is a schema markup generator free?

    Yes. Most schema markup generators, including Schemafy’s, are free to use and require no signup. You enter your page details, pick a schema type, and get valid JSON-LD to copy. Paid tools add automation, like applying and updating that schema across hundreds of pages without manual work.

    How do I generate schema markup for my website?

    Pick the schema type that matches your page (Product, Article, FAQ, LocalBusiness), fill in the fields in a generator, and copy the JSON-LD it outputs. Paste that code into your page’s HTML, then test it in Google’s Rich Results Test to confirm it is valid before publishing.

    What is JSON-LD schema?

    JSON-LD is the JSON-based format Google recommends for structured data. It lives in a script tag, separate from your visible HTML, so you can add or remove it without touching your design. A generator writes valid JSON-LD for you, avoiding the syntax errors that break rich result eligibility.

    Which schema type should I use?

    Match the type to the page: Product for store items, Article for blog posts, FAQPage for Q&A sections, LocalBusiness for a physical location, Review for ratings. Using the wrong type, or missing required fields, blocks rich results. A good generator only shows the fields each type needs.

    How do I add schema markup to WordPress?

    You can paste JSON-LD manually into each page, but that does not scale past a handful of pages. A WordPress schema plugin generates and applies the markup for you, detecting schema opportunities across your posts and products and keeping the code in sync when content changes.

    Is schema markup a Google ranking factor?

    No, schema markup is not

  • The 12 Best Answer Engine Optimization Tools in 2026

    The 12 Best Answer Engine Optimization Tools in 2026

    An answer engine optimization (AEO) tool is software that monitors, improves, and measures how often your brand is cited in AI-generated answers on engines like ChatGPT, Perplexity, Gemini, and Google AI Overviews. It is the AEO software category that has exploded as AI search visibility became a real acquisition channel.

    Here is the problem: there are dozens of these tools now, and most do only one part of the job. Run an agency across 10 or more WordPress or WooCommerce client sites and the wrong pick means paying for a dashboard that shows what is broken without fixing it. This guide sorts the field into three layers, hands you a comparison table you can act on, and names the tool that fits each layer. We tested them across monitoring, content, and technical schema work.

    Marketing professional reviewing AI search citations and analytics.

    The AEO stack has three layers. Most buyers only shop the first two.

    In this guide:

    What Answer Engine Optimization Tools Actually Do

    A good AEO tool does five things. It monitors your brand across multiple engines, not just ChatGPT. It tracks visibility at the level of individual prompts, so you know which questions surface you and which surface a competitor. It benchmarks you against those competitors. It traces citations back to the source pages the model pulled from. And, the part most tools skip, it gives you something to act on instead of just a score.

    The metric that ties this together is AI Share of Voice (SoV). The formula is simple: the number of AI responses that mention your brand divided by the total AI responses across your tracked prompt set, times 100 (via AirOps). If you appear in 23 of 100 strategic queries and a competitor appears in 41, your SoV is 23% against their 41%. That gap is the number your client will ask about.

    This is where AEO splits from traditional SEO. SEO optimizes to win a ranked link and the click; AEO optimizes to be cited inside the answer itself, which the reader may never click through. The two stack rather than compete, since the same work that helps you increase organic traffic also feeds AI answers. It is close enough to generative engine optimization that vendors like Profound and Conductor use the terms almost interchangeably.

    AI answer engine results page showing project management software recommendations and cited sources.

    An answer engine cites a handful of sources. AEO tools measure whether one of them is you.

    The 3 Types of AEO Tools (and Why It Matters Before You Buy)

    Buying an AEO tool without understanding the categories is how you end up paying for capability you do not need. Most tools specialize in one of three layers. Almost every listicle you will read compares only the first two and treats the third as an afterthought, which is exactly backwards for a lot of buyers.

    1. AI Visibility & Monitoring Tools

    These tools monitor where and how often your brand appears or gets cited in AI answers. Otterly.AI, Peec AI, AthenaHQ, Scrunch, and Meltwater’s GenAI Lens all live here. Choose one when you need diagnosis and a competitive benchmark before you spend on optimization. The limitation is baked into the category: they tell you what is happening, not how to fix it.

    2. Content Optimization & Generation Tools

    These tools structure or generate content so answer engines can interpret and cite it: 30-to-60-word direct answers, question-form headings, FAQ blocks, conversational phrasing, and even the meta descriptions that frame how a result reads. Writesonic, Frase, Surfer SEO, and Omnibound sit in this layer. Reach for one when you already know your gaps and need to produce the pages that close them.

    3. Technical AEO & Schema Tools

    This is the layer the other listicles skip. These tools make sure your site is actually accessible and interpretable by AI systems: structured data and schema markup, indexability, extractability. Answer engines cite sources they can read, trust, and parse cleanly, and schema markup is what tells the engine what each thing on your page actually is. Get this wrong and your monitoring and content work both return less. Schemafy lives here, as does Screaming Frog in a partial, crawl-focused way. If you want the deeper mechanics, we cover using schema markup for AI search separately. This is the foundation the first two layers stand on.

    How We Evaluated These Tools

    We weighted five criteria. Engine coverage came first: at minimum a tool should track ChatGPT, Perplexity, Claude, Gemini, and Google AI Overviews, and five is the floor, not the ceiling. Then prompt-level tracking depth, because a brand-level score without the underlying queries is a vanity number. Then the quality of the recommendations, meaning whether the tool tells you what to do or only what is wrong. Then price against value. Then ease of implementation, which matters more when you are rolling a tool out across many client sites. Throughout, we favored tools that hand you an action over tools that hand you a dashboard.

    The 12 Best AEO Tools in 2026

    These are grouped by what each is best for, not ranked one through twelve, because the best tool depends on your stage and the layer you are missing. We take the same by-use-case approach in our roundup of AI SEO software if you want the broader picture. Each entry follows the same shape: what it is, the layer it belongs to, the engines it covers, starting price, who it fits, and one honest limitation.

    Best for AI Visibility Monitoring: Otterly.AI

    Otterly.AI is a Layer 1 monitoring tool that tracks how your brand is referenced across ChatGPT, Perplexity, Gemini, Microsoft Copilot, and Google’s AI Overviews. It reports share of voice and shows the competitor gap on each tracked prompt. Pricing runs from a Lite plan at $29 per month up to Standard at $189 per month for 100 prompts and Premium at $989 per month for 1,000 prompts, so it scales from solo diagnosis to agency-scale tracking. Best for teams that need a clean read on where they stand before investing in optimization. The limitation: it is diagnosis, not optimization, so pair it with something that acts on the findings.

    Best Enterprise Platform: Profound

    Profound is a Layer 1-to-2 platform used by teams at companies like Ramp, DocuSign, and Figma. It goes past counting mentions to analyze how AI platforms describe and position your brand, surfacing the “narrative gaps” where a competitor gets better framing than you do. Pricing starts at $99 per month, but that Starter tier tracks a single engine (ChatGPT); the broader multi-engine view most brands actually want starts around $399 per month, and full enterprise deployments are custom-quoted (via Rankability). Best for enterprise teams with budget and a need for scale and security. The limitation is the price and the learning curve.

    Best All-in-One (Monitor + Optimize): Writesonic / MaxAEO

    Writesonic spans Layers 1 and 2. It shows your AI visibility, explains why you are missing citations, and then helps you fix the content and authority gaps behind those misses, with plans from $49 to $499 per month (per Writesonic). MaxAEO takes a similar all-in-one path, folding monitoring and optimization into one flow with citation tracing, sentiment, and competitor tracking. Best for teams that want measurement and action in a single workflow instead of stitching two tools together. The limitation: an all-in-one rarely goes as deep as a specialist tool in any single layer.

    Best for Unified SEO + AEO: Conductor

    Conductor is a Layer 1-to-2 enterprise platform that unifies traditional SEO and AEO in one place, tracking AI Overview appearances and share of voice alongside conventional rankings inside a compliance-ready (SOC 2 Type II) environment. Best for enterprise teams that do not want a silo between their SEO and AEO reporting. Pricing is custom enterprise, typically north of $800 per month and often quoted annually in the five figures. The limitation: it is overkill for a small business or a lean agency.

    Best Free AEO Tool: HubSpot AEO Grader / Otterly.AI

    HubSpot’s AEO Grader is genuinely free, runs without an account, and scores your content’s AI readiness in a single check, which makes it a strong starting point. HubSpot’s continuous AEO monitoring runs about $50 per month if you want ongoing tracking. Otterly.AI’s free tier gives a basic visibility snapshot across a couple of engines. Best for testing the water before you spend. The limitation: engine coverage and features are capped on the free options, so continuous optimization still needs a paid plan.

    Best Technical / Schema Tool: Schemafy

    If answer engines only cite sources they can read and trust, then structured data is what makes your content machine-readable, and it is the foundation the other two layers stand on. Schemafy is a Layer 3, WordPress-native schema tool. It generates and automates schema markup (JSON-LD) so AI systems can parse what your pages are: its Auto Schema Generator scans a site and suggests schema per page, the AI Schema Generator connects your own ChatGPT or Claude API key to build more complex types, the Smart Schema Builder handles template-based types, and Manual JSON covers custom edge cases. It validates output against Google’s Rich Results specification and covers the types that matter most for AEO, including FAQPage, HowTo, Article, and Organization. Best for agencies that want to attack the root cause of low citation rates, not just measure them. The honest limitation: this is the foundation layer, so you pair it with a monitoring tool to close the loop.

    WordPress Schemafy plugin Auto Schema Generator showing pages that need schema markup, with suggested schema types and match scores.

    Schemafy’s Auto Schema Generator flags pages missing schema and suggests the right type for each one.

    Best Budget Tracker: AIclicks

    AIclicks is a Layer 1, AI-native tracking platform that covers six LLMs (ChatGPT, Perplexity, Gemini, Claude, Copilot, and Grok) in one unified dashboard, with prompt cluster mapping to group related queries. Its Starter tier lands at $39 per month, which makes broad multi-engine tracking accessible to mid-market teams that would balk at a $400 platform. Best for mid-market operators who need wide coverage on a tight budget. The limitation: it is focused on tracking, so it stays in the monitoring layer.

    Best for B2B Content: Omnibound

    Omnibound is a Layer 2 tool built around buyer-centric content creation with attribution back to pipeline, which is the pitch B2B teams actually care about. Pricing is custom and not publicly listed, so plan on a sales conversation. Best for B2B teams that need to tie AEO effort to revenue rather than to a visibility score. The limitation: the B2B focus makes it a narrower fit if you run e-commerce or local client sites.

    AEO Tools Comparison Table (Price, Engines, Best For)

    Here is the field side by side. Category maps to the three-layer framework above.

    ToolCategoryAI Engines CoveredStarting PriceBest For
    Otterly.AILayer 1 (Monitoring)ChatGPT, Perplexity, Gemini, Copilot, AI Overviews$29/moVisibility monitoring
    Peec AILayer 1 (Monitoring)ChatGPT, Gemini, Claude, Perplexity~€89/moVisibility + sentiment
    AIclicksLayer 1 (Monitoring)ChatGPT, Perplexity, Gemini, Claude, Copilot, Grok$39/moBudget multi-LLM tracking
    ProfoundLayer 1–2ChatGPT ($99); 3 engines at $399+$99/moEnterprise narrative gaps
    WritesonicLayer 1–2ChatGPT, Perplexity, Gemini, Google AI Overviews$49/moAll-in-one monitor + fix
    MaxAEOLayer 1–2ChatGPT, Perplexity, Gemini, CopilotCustomUnified monitor + optimize
    ConductorLayer 1–2AI Overviews + major LLMsCustom ($800+/mo)Unified SEO + AEO (enterprise)
    HubSpot AEO GraderLayer 1ChatGPT, Perplexity, GeminiFreeFree AI-readiness check
    OmniboundLayer 2 (Content)Major answer enginesCustomB2B content + pipeline
    SchemafyLayer 3 (Technical / Schema)Feeds all engines via structured dataFree on WordPress.orgSchema markup foundation

    Prices verified as of 2026 and subject to change. “Custom” means the vendor quotes per deployment.

    Free vs. Paid AEO Tools: What You Actually Give Up

    A free AEO tool gives you a snapshot: whether AI mentions your brand at all, usually across one to three engines, with no continuous tracking and no real recommendations. It is a diagnosis, not a program. Paid tools add the parts that make AEO an ongoing practice.

    Here is what the free tier costs you in practice:

    • Continuous tracking instead of a one-time snapshot.
    • Competitive intelligence on the prompts where rivals out-cite you.
    • Coverage of five or more engines rather than one to three.
    • Actionable recommendations rather than a bare score.

    Entry-level paid plans start around $29 to $49 per month (Otterly.AI’s Lite tier, Writesonic’s base). The mid-tier band of roughly $100 to $500 per month is the best balance for a growing team, buying continuous tracking and real optimization without an enterprise contract. The practical move: start free to diagnose, then move to paid once you need continuous optimization rather than a one-time reading.

    How to Choose the Right AEO Tool for Your Stage

    Do not buy on feature count. Buy on your stage and the layer you are missing. Here is what a sensible stack looks like at three budgets.

    Startup (Under $200/mo)

    Pair a monitoring tool with a free or low tier (Otterly.AI) with a technical foundation (Schemafy) and a free checker (HubSpot’s AEO Grader). The goal at this stage is to diagnose where you stand and fix the technical base before you spend on anything heavier. You will burn very little budget and still cover two of the three layers.

    Growth ($200–$800/mo)

    Move to a monitor-plus-optimize platform (Writesonic or MaxAEO, or Profound’s mid plan), add content optimization, and keep schema automated underneath. The goal is to close the loop: measure, fix, re-measure. This is the band where AEO turns from a report into a repeatable process.

    Enterprise ($800+/mo)

    Run Conductor or Semrush Enterprise for unified SEO and AEO reporting, add custom reporting for stakeholders, and layer Profound on top for narrative-gap analysis. The goal here is scale, governance, and a single source of truth across teams that would otherwise silo their SEO and AEO work.

    The Layer Most AEO Tools Skip: Structured Data

    Almost every comparison you will find stacks up monitoring tools and content tools and stops there. The gap is that answer engines cannot cite what they cannot interpret with confidence. Structured data (schema markup) tells the engine explicitly what your content is: this is an FAQ, this is a product, this is the author, this is the organization. That machine-readability feeds both extractability and the trust signals that LLMs reward.

    The numbers back the emphasis. Industry analyses report that content with proper schema markup is roughly 2.5 times more likely to appear in AI-generated answers, and pages with complete structured data around 3.2 times more likely to be cited in AI Overviews (via Digital Estate Media). Treat those as directional, not gospel: schema amplifies a page that already ranks, it does not rescue one that does not. A top-three page with no schema still beats a buried page with perfect markup.

    The tactics that make content answer-ready are consistent across the sources:

    • Answer the core question directly in 30 to 60 words near the top.
    • Write headings as the questions people actually ask.
    • Add FAQ schema to question-and-answer blocks.
    • Keep paragraphs short so the extraction is clean.
    • Cite credible, verifiable sources.
    • Refresh content so the engines see it as current.

    The most impactful schema types for AEO are FAQPage, HowTo, Article, and Organization, and the mechanics of using schema markup for AI search reward getting these right. Monitoring your AI visibility without fixing this layer is measuring a problem you are not solving. This is the layer where Schemafy fits, and where a free tool like a schema markup generator, a way to validate your JSON-LD, or a SERP preview to check how a result renders each earns its place in the stack.

    Screenshot of the Schemafy WordPress plugin showing the Rich Snippets dashboard, with a table of applied schemas, validation statuses, and last validation dates across site pages.

    Valid, machine-readable schema is what lets an answer engine trust and cite the page.

    Frequently Asked Questions

    What is an answer engine optimization tool?

    An answer engine optimization (AEO) tool is software that monitors, improves, and measures how often your brand is cited in AI-generated answers on engines like ChatGPT, Perplexity, Gemini, and Google AI Overviews. The best tools cover monitoring, content optimization, and technical structured-data readiness.

    Are AEO tools worth it?

    Yes, if AI search sends or influences your buyers. AEO tools reveal whether ChatGPT, Perplexity, and Gemini cite you or your competitors, and show what to fix. Start with a free grader to diagnose, then invest in paid tools once you need continuous tracking and optimization.

    What is the best free AEO tool?

    The HubSpot AEO Grader is a strong free option for assessing your content’s AI readiness, and Otterly.AI’s free tier gives a basic visibility snapshot across a few engines. Free tools are best for diagnosis; ongoing optimization typically requires a paid plan.

    How much do AEO tools cost?

    Most SaaS AEO tools cost between $39 and $199 per month, with entry plans around $49 to $100. Mid-tier platforms run $100 to $500 per month, and enterprise solutions often start at $10,000 or more per year with custom pricing. Free tiers exist for basic monitoring.

    Do I need an AEO tool if I already do SEO?

    Yes. SEO optimizes for ranked links and clicks; AEO optimizes to be cited inside AI answers, which use different signals like extractability, structured data, and trust. Your SEO stack won’t track AI Share of Voice or citations, so a dedicated AEO tool fills a real gap.

    Which AI engines should an AEO tool track?

    At minimum, an AEO tool should track ChatGPT, Perplexity, Claude, Gemini, and Google AI Overviews. Five engines is the baseline; broader coverage is better as newer answer engines gain search share. Prioritize tools that also show prompt-level and competitor data.

    Start With the Foundation, Then Layer On Tools

    The three-layer framework is the whole point: monitor where you stand, optimize the content, and above all make sure the technical base is machine-readable. The “right” AEO tool is not the one with the longest feature list. It is the one that fills the layer you are actually missing, and for most teams the neglected layer is structured data. A monitoring dashboard on top of unreadable pages just measures the problem more precisely.

    If you run 10 or more client sites, the fastest first move is fixing the foundation so everything you monitor and optimize afterward actually gets cited. Start there.

    [CTA_DOWNLOAD]

  • AI SEO Software: The Best Tools of 2026 (Tested by Use Case)

    AI SEO Software: The Best Tools of 2026 (Tested by Use Case)

    Most “best AI SEO software” lists rank 15 tools in a flat line and call it a day. That framing is wrong. There is no single best tool. There is a best tool for the job in front of you, and in 2026 one of those jobs (getting cited inside AI answers) barely existed two years ago. This guide sorts the field by use case, not by star rating.

    Marketing professional viewing Google search results and an AI-generated answer on dual monitors.

    The modern AI SEO stack spans two search worlds: the classic Google SERP and the answers that LLMs generate.

    What is AI SEO software?

    AI SEO software is any tool that uses machine learning or large language models to speed up SEO work: keyword and topic research, on-page content optimization, and tracking whether your brand shows up in AI answers from ChatGPT, Perplexity, and Google’s AI results. The best tools cover both classic search and AI search.

    That definition hides three different products wearing one label. The first is a classic suite with AI features bolted on. The second is an AI-native content optimizer built around a grading engine. The third is the newest category: AI-visibility trackers that watch whether you get cited in generated answers. That third category barely existed two years ago, and it is where most of the new tooling is being built.

    Your real problem is not a shortage of options. More than 40 tools now claim the “AI SEO” label. The job is matching the tool to the work you actually do.

    AI SEO vs. traditional SEO tools: what actually changed

    The old stack was three boxes: a keyword tool, a rank tracker, and a crawler. You read the data and made the changes yourself.

    AI SEO software collapses parts of that loop. LLMs cluster keywords and draft briefs. Grading engines score your draft against the live SERP in real time. And a fourth box appeared that did not exist in the old stack: AI-visibility tracking, which measures whether generative engines mention you at all.

    One thing both worlds share is structured data basics. Google and generative engines both parse schema to understand what a page is about, which is why it sits underneath almost every tool on this list.

    How AI SEO software works

    Strip away the marketing and AI SEO software operates in three layers.

    The first layer is research. LLMs cluster hundreds of keywords into topics, surface content gaps, and turn a blank page into a brief in minutes instead of an afternoon.

    The second layer is on-page optimization. Tools grade your draft against the top-ranking pages for a query, scoring term coverage and topical completeness so you can see what a competitive page includes before you publish.

    The third layer is output and visibility. Structured data makes your content machine-readable, and AI-visibility trackers watch whether ChatGPT, Perplexity, and Google’s AI experiences actually cite you. Google’s own guidance on performing well in AI experiences points to the same fundamentals: clear, well-structured, genuinely useful content.

    One caveat worth stating plainly. “AI” in this market ranges from a genuine LLM workflow to a thin wrapper around an API. Judge a tool by what it measures and what it does, not by how many times the word “AI” appears on its pricing page.

    Diagram showing the three layers of AI SEO software: Research, On-page Optimization, and Visibility, connected in a workflow from keyword clustering to AI search tracking.

    AI SEO software works across three layers: research, on-page optimization, and visibility in both classic and AI search.

    How we evaluated these tools

    We did not test all 40-plus tools, and we are not pretending otherwise. We grouped the field by use case and picked representative leaders in each, judged on what the tool actually does rather than how it markets itself.

    Here is the standard each tool had to clear:

    • Solves a clear, single use case rather than claiming to do everything.
    • Does real work, not a thin wrapper that renames an LLM prompt.
    • Has verifiable public features and pricing (no “contact us for the magic”).
    • Fits into a real content or WordPress workflow.
    • Is honest about AI-visibility claims instead of overstating what it can measure.

    Prices were verified in 2026 and change often, so treat every figure as a starting point, not a quote. Where a tool only sells custom plans, we say so instead of inventing a number.

    Best AI SEO software by use case

    The point of this section is simple: each subsection below is a different job, not a spot on a leaderboard. A solo content operator and a 40-client agency should walk away with different shortlists.

    Read for the job that matches yours. The [pricing table](#ai-seo-software-pricing-compared) further down gives you the at-a-glance version once you know which categories you care about.

    Use caseRecommended starting pointWhy
    All-in-one suiteSemrush OneResearch, tracking, and AI visibility under one login
    Content optimizationSurfer or RankabilityGrade drafts against the live SERP
    AI visibility / GEOProfound, Peec AI, or FraseTrack brand citations inside AI answers
    Agentic automationAirOpsAutonomous content workflows at scale
    WordPress foundationA structured-data layerMake content readable to Google and AI engines

    Best all-in-one platform: Semrush One

    If you want one tool of record, Semrush One is the default. It bundles keyword research, rank tracking, and site audit with the newer AI Visibility Toolkit, which tracks how your brand shows up across ChatGPT, Perplexity, and Google AI Mode.

    The math tells you who it is for. Semrush One Starter runs $199/mo (5 sites, 500 daily tracked keywords, 50 AI prompts per day), and the AI Visibility Toolkit is a $99/mo add-on covering one domain and 25 prompts (source: Semrush AI pricing). That is the most you will pay in this guide, and for a solo writer who only needs content grading, it is overkill.

    Buy Semrush One when a team or agency needs a single source of truth and will actually use the breadth. Skip it when you need one slice of the work and resent paying for the other nine.

    Best for content optimization: Surfer & Rankability

    Two tools own the “make this draft rank” job, and they approach it differently.

    Surfer SEO is built around its Content Editor, which grades a draft against the live SERP using NLP term coverage. It is the strongest option for optimizing a page at a time, and the editor alone justifies the cost for many teams. You can sanity-check how a title and description will read with a SERP snippet preview before you ship.

    Rankability leans the other way, toward topical coverage and clustering rather than keyword density, and it wraps the research-to-report loop that agencies live in (source: Rankability vs Surfer). Rankability starts at $99/mo; Surfer’s paid plans start in the low hundreds per month.

    Choose Surfer if your main job is producing and optimizing pages. Choose Rankability if you also need clustering and client-ready reporting in the same tool.

    Best for AI visibility / GEO tracking

    This is the category that did not exist in the old stack. AI visibility (also called AEO or generative engine optimization) tracks whether your brand is mentioned or cited in AI answers, usually with prompt-level share of voice against named competitors.

    Three tools lead. Profound is the enterprise category leader, with a ChatGPT-only Starter plan at $99/mo. Peec AI is the mid-market pick, starting around €75/mo for 25 prompts and monitoring ChatGPT, Perplexity, Claude, Gemini, and Google AI Overviews (source: Surmado AI visibility comparison). Frase adds prompt-level share of voice with the actual answer text shown.

    These trackers tell you whether you are cited. They do not make you more citable. That part is upstream, in how parseable your content is. Structured data is a big lever here: a schema layer like Schemafy on WordPress, backed by a free schema markup generator, makes your pages easier for generative engines to read and quote. It is a complement to a visibility tracker, not a substitute for one.

    AI visibility tools measure whether you appear in blocks like Google’s AI Overview, where a single citation can outweigh a page-one ranking.

    Best agentic / done-for-you automation

    Agentic SEO is the 2026 buzzword. The idea: agents that plan, draft, optimize, and publish with far less human input than a traditional tool.

    AirOps is the clearest example that ships real work. It uses a modular “Power Steps” system to build content workflows, can bulk-automate updates to 100-plus articles in one run, and publishes directly to Webflow, Shopify, WordPress, or Strapi (source: Whatagraph AI SEO tools).

    Be skeptical about the “done-for-you” framing. Bulk generation is genuinely useful for refreshes and templated pages. It is also the fastest way to publish a hundred mediocre pages if no one is steering. What these tools automate is production. What they cannot automate is the judgment about whether the production is worth doing, which is the subject of a section further down.

    Best for agencies managing multiple clients

    Agencies have a different problem: bulk operations, multi-site management, white-label reporting, and proving value across a dozen or more accounts.

    Semrush One fits the multi-site and reporting need, and Rankability ships the client-ready reports plus AI-visibility view that renew retainers. Surfer covers one important slice, page optimization, but leaves ranking diagnosis and reporting to other tools.

    There is also a quiet maintenance job hiding in every WordPress client roster: keeping structured data consistent across dozens of sites. It is unglamorous, it rarely makes the pitch deck, and it is exactly the kind of work that compounds. Handling it once per site (including the meta descriptions across a WordPress site) beats rediscovering the gap during a client’s rankings panic.

    AI SEO software pricing compared

    Prices scale with scope. Content-only tools are cheapest, AI-visibility trackers sit in the middle, and an all-in-one suite plus a visibility add-on is the priciest path. All figures are 2026 starting prices and change often; add-ons stack on top of suite costs.

    ToolBest forStarting priceAI / GEO features
    Semrush OneAll-in-one suite$199/mo (Starter)AI Visibility tracking across ChatGPT, Perplexity, Gemini, and Google AI experiences. Includes SEO, content, keyword research, and competitive intelligence in one platform.
    Surfer SEOContent optimization$99/mo (Essential)Content Editor, NLP-driven optimization, topical coverage analysis, content scoring, and AI visibility support through content optimization workflows.
    RankabilityContent + agency workflow$99/moContent optimization, topical authority analysis, SERP-based recommendations, and AI search visibility tracking for agencies and publishers.
    ProfoundAI visibility (enterprise)Custom pricingEnterprise-grade brand monitoring and share-of-voice tracking across AI answer engines, citation analysis, and AI search intelligence.
    Peec AIAI visibility (mid-market)€89/mo ($95/mo)Includes 50 tracked prompts. Monitors ChatGPT, Perplexity, and Gemini on the starter plan. Tracks AI visibility, citations, competitors, and AI search performance. Claude tracking is Enterprise-only.
    AirOpsAgentic / done-for-youCustom pricingAutonomous content workflows, programmatic SEO, AI-powered content operations, and bulk generation of hundreds of optimized pages and articles.
    SchemafyStructured-data layer (WordPress)Free pluginAuto Schema Generator, AI Schema Generator, JSON-LD automation, and schema deployment directly inside WordPress.

    The takeaway: no one buys all seven. Most stacks pair one primary tool with the structured-data foundation underneath it, then add a visibility tracker only when AI search becomes a real channel.

    What AI SEO software can’t do (the human layer)

    Here is the part the tool reviews skip. Software scores; it does not decide.

    Strategy is the first thing it cannot do. Which topics to bet on, which markets to enter, which content to kill: a grading engine can rank a draft, but it cannot tell you whether the draft should exist. That call is yours.

    Editorial judgment is the second. Real experience, expert review, and genuine trust signals are what Google’s helpful, people-first content guidance rewards, and none of them come out of an autocomplete box.

    Then there is the trap. Automating pages without adding value is not a shortcut; it is a policy violation. In Google’s words, “using automation, including AI, to generate content with the primary purpose of manipulating ranking in search results is a violation of our spam policies” (source: Google Search Central).

    Using automation, including AI, to generate content with the primary purpose of manipulating ranking in search results is a violation of our spam policies.

    Information architecture, real relationships that earn links, and business tradeoffs round out the list. The tools accelerate execution. The strategy that drives sustainable organic growth is still a human job.

    How to choose the right AI SEO tool for your stack

    Skip the feature-list arms race. Choose by the job in front of you and the size of your operation.

    1. Optimizing pages as a solo operator or small team: start with Surfer or Rankability.
    2. Chasing AI-search visibility: add Profound, Peec AI, or Frase, depending on budget.
    3. Running a team that needs one source of truth: Semrush One earns the suite price.
    4. Automating production at scale: evaluate an agentic tool like AirOps, with a human editor in the loop.
    5. Building on WordPress: add a structured-data layer before you buy another dashboard.

    The most common mistake is over-buying: paying for an all-in-one suite to use 2026 of it. The second most common is skipping the cheap foundation. On WordPress, structured data is the low-cost base most stacks ignore. A schema plugin like Schemafy handles that layer so both Google and AI engines can read your content correctly, which makes every tool above it more effective.

    Ready to put AI SEO software to work?

    There is no single best AI SEO software, and anyone selling you one is selling a leaderboard, not a decision. The best tool is the one that matches the job in front of you, and in 2026 AI-search visibility is now part of that job rather than a side quest.

    Before you add another dashboard, make sure the foundation is solid: clean, valid structured data on your WordPress content, so both Google and AI engines can actually read you. Get that right, and every optimizer, tracker, and agent you layer on top has something worth working with.

    Frequently asked questions

    Does AI SEO software replace SEO agencies or teams?

    No. AI SEO software automates repetitive tasks like research, drafting, content grading, and reporting. It does not replace strategy, editorial judgment, or the relationships that earn links and coverage. Teams that use it well spend the time they save on the human work the software cannot do.

    How much does AI SEO software cost?

    It ranges from free (a WordPress schema plugin) to roughly $75 to $199-plus per month per category, with AI-visibility trackers often billed as add-ons that stack on top of a suite. See the [pricing table](#ai-seo-software-pricing-compared) above for 2026 starting prices by tool and use case.

    Can AI SEO software rank content on its own?

    No. It improves your odds by optimizing structure, coverage, and readability, but no tool guarantees rankings, and Google promises no outcomes. Relevance and quality still decide. If a tool promises “#1 in 30 days,” treat that as a reason to walk away, not a feature. It also helps to know what actually moves rankings.

    What’s the difference between AI SEO and GEO/AEO tools?

    AI SEO is the broad category covering research, optimization, and tracking across all search. GEO and AEO are a subset focused specifically on visibility and citations inside generative engines like ChatGPT and Perplexity. Structured data helps both. For a deeper look, see our guide to generative engine optimization.

    Is AI-generated content penalized by Google?

    No, not for being AI. As Google puts it, its “focus is on the quality of content, rather than how content is produced” (source: Google Search Central). Low-value content made to game rankings violates spam policy regardless of how it was created. Structured data aids understanding; it does not trick Google.