Think of schema markup as labels on your content. A search engine reads the labels before it decides how to show your page, as a plain blue link, or as a richer result with stars, prices, or dates. The hard part isn’t the code. It’s choosing the right labels and adding them without breaking anything. This guide walks the whole process for WordPress sites, from picking a type to scaling across an entire site.
What Is Schema Markup?
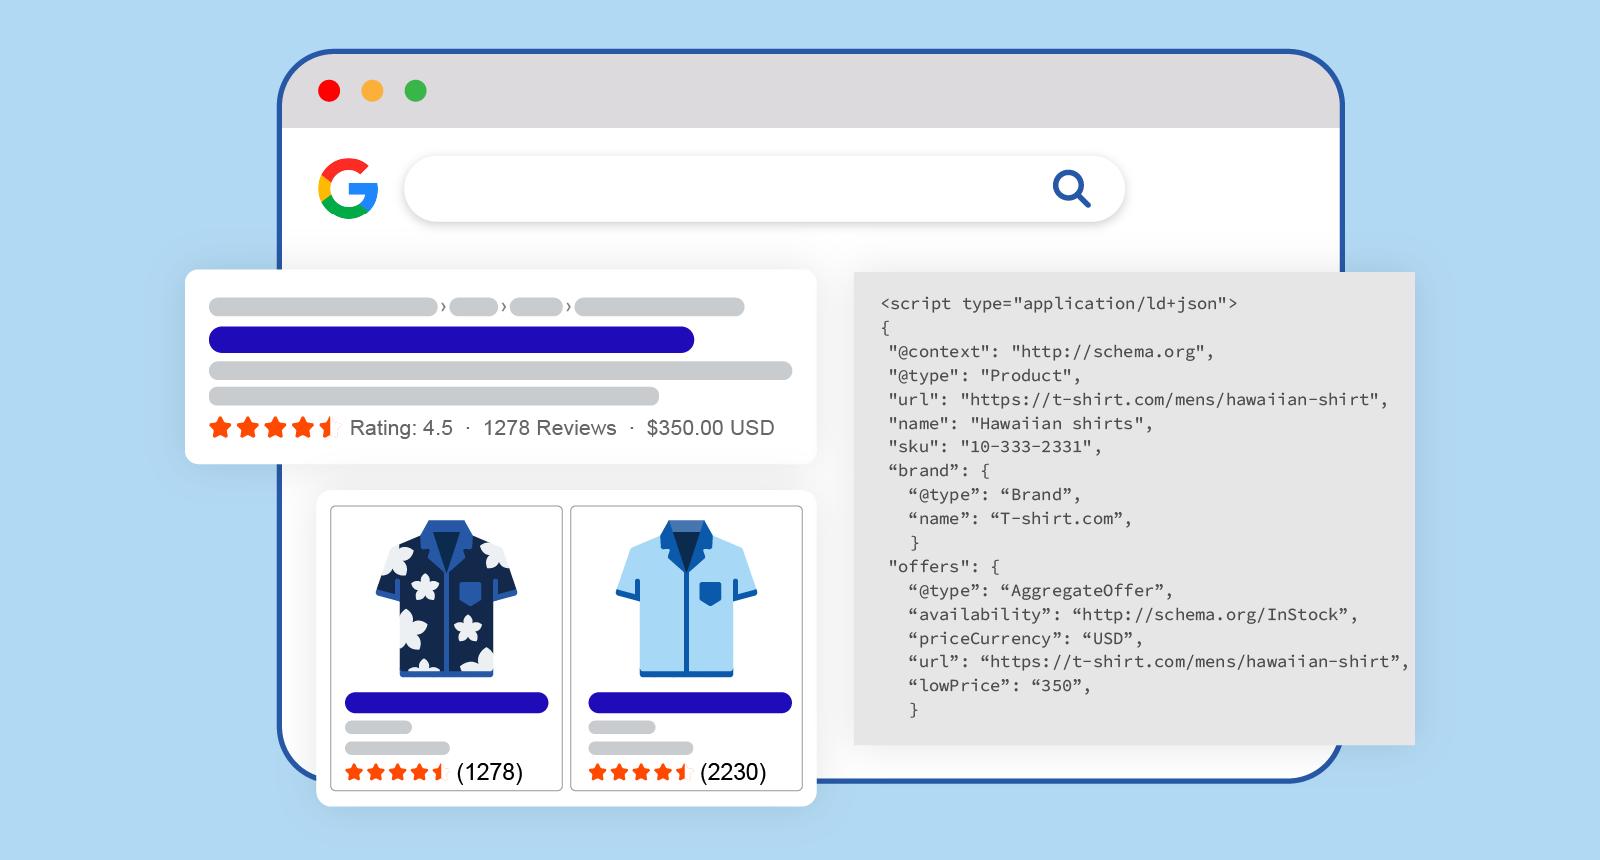
Schema markup is structured data, a small block of code you add to a page, that tells search engines what the page is about: a product, an article, an event, a business. Search engines read these labels to understand your content and decide whether to show it as a richer, more eye-catching result.
There are two layers to any web page. There’s what your visitors see: the headline, the photo, the price. And there’s what search engines read in the background: the markup that says “this number is a price” and “this date is when the event starts.”
Schema markup is that second layer. It’s built on a shared vocabulary called Schema.org, which is what makes the next section work.
How Does Schema Markup Work?
Schema.org is a shared dictionary. Google, Bing, and other engines all agreed on the same set of terms, Product, Article, LocalBusiness, Event, and hundreds more, so a label means the same thing to every engine that reads it.
You express those terms in a format. JSON-LD (a block of code a search engine reads) is the one Google recommends, because it sits in the page’s code separate from the visible content, which makes it easier to add and maintain. Google has confirmed the markup can live in either the <head> or the <body> of the page (via Google Search Central).
Here’s the flow. A search engine crawls your page, finds the JSON-LD block, parses it, and maps each field to a type it already understands. If the markup is valid and the page qualifies, that page becomes eligible for a rich result, the enhanced listing with extra detail. Note the word eligible: markup earns you a ticket, not a guaranteed seat.
Why Schema Markup Matters for SEO
Let’s be precise, because a lot of guides aren’t: schema markup is not a direct ranking factor. Adding it won’t push you up the results by itself.
What it does is change how your listing looks and how clearly the engine understands you. And that shows up in clicks. One study of more than 4.5 million queries found users click rich results about 58% of the time, versus roughly 41% for plain results (via Lantern Digital).
Rich results: clicked ~58% of the time. Plain results: ~41%.
The case studies Google publishes point the same way. Rotten Tomatoes added structured data across 100,000 pages and measured a 25% higher click-through rate on marked-up pages versus those without; Nestlé reported an 82% higher click-through rate on pages that showed as rich results (via Google Search Central). A schema plugin generates that eligible markup for you, so the win is operational rather than something you hand-code page by page.
Does Schema Markup Help with AI Search and AEO?
AEO, answer engine optimization, is the new worry: will schema get my page into AI Overviews and AI answers? It’s worth answering honestly.
Google’s own position is blunt. It says there is “no special schema.org structured data that you need to add” to appear in its AI features, and no extra technical requirements beyond being indexed and eligible to show in Search (via Google Search Central). Schema is not a hidden door into AI answers.
That doesn’t make it pointless for AI. Structured data still clarifies entities and relationships on a page, what’s a product, who’s the author, how things connect, which supports machine understanding of content you already have. The honest framing: schema makes your page easier for machines to read; it doesn’t guarantee an AI citation.
Tip: Treat schema as machine-readability, not as a guaranteed ticket into AI Overviews. The content still has to earn the citation.
Common Types of Schema Markup
Schema.org defines hundreds of types, but most sites only ever need a handful. The goal is to match the type to what the page actually is. The WordPress schema markup plugin approach covers the common ones, so you pick from a list rather than learning the whole vocabulary.
Here are the types most sites reach for, and when each fits.
| Schema type | Best for |
| Article | Blog posts, guides, news, editorial content |
| Product | Ecommerce product pages with price, availability, reviews |
| Organization | Company identity: name, logo, contact, brand |
| Local Business | Physical locations: hours, address, service area |
| FAQ | Genuine question-and-answer content |
| Review | Ratings and aggregate ratings on eligible content |
| Event | Webinars, conferences, workshops, in-person events |
Article Schema
Article schema is for editorial content: blog posts, guides, and news. The fields that matter most are the headline, the author, the publish date, and a representative image. It’s the default for anything that reads like a story or a how-to.
Product Schema
Product schema describes an item for sale, name, price, availability, and rating. On a WooCommerce store, this is what makes your listings eligible for price and stock detail in search, and it feeds the data Google Merchant Center checks. Get the price and availability right and keep them current.
Organization Schema
Organization schema defines your brand as an entity: name, logo, contact details, and links to your official profiles. It usually lives on the homepage or an “about” page and helps search engines connect every other page to a single, clear identity.
Local Business Schema
Local Business schema is for businesses with a physical presence, a shop, a clinic, a restaurant. It carries address, opening hours, geo-coordinates, and service area. If you do client work, this is one of the most common requests you’ll handle, because local results lean on it heavily.
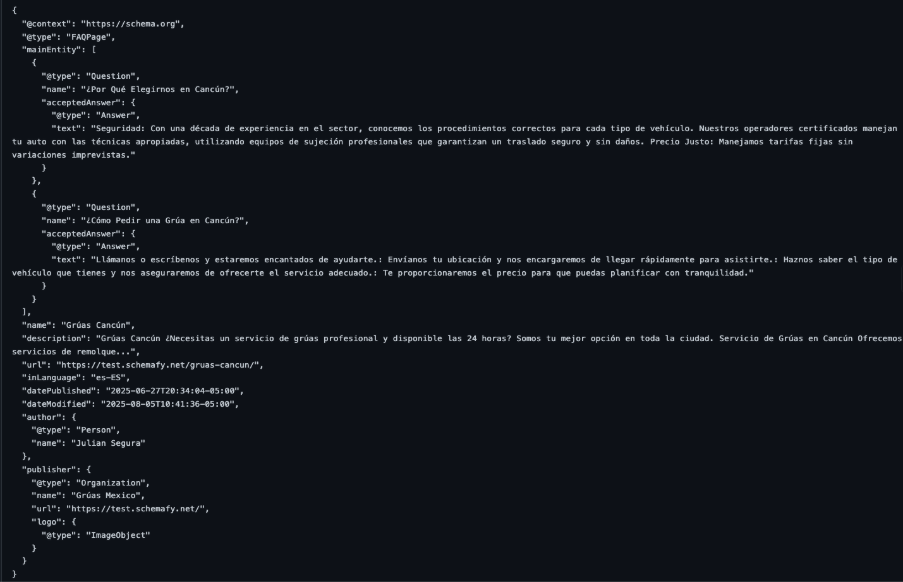
FAQ Schema
FAQ schema marks up genuine question-and-answer pairs. Be realistic about the payoff: in August 2023, Google restricted FAQ rich results to well-known, authoritative government and health sites, and most other sites stopped seeing them (via Google Search Central). The markup can still help machines parse your Q&A, but don’t add it expecting a rich result, and never invent FAQs just to pad the listing.
Review Schema
Review schema covers ratings and aggregate ratings. Stars earn attention: one analysis found review-star results get about 35% higher click-through than plain links (via Search Engine Journal). Google doesn’t let you star-rate your own business, so reserve this for genuinely eligible review content.
Event Schema
Event schema describes something happening at a time and place, a webinar, a conference, a workshop. The core fields are the name, the start date, the location, and whether it’s online or in person. Useful for marketers running live sessions.
How to Choose the Right Schema Markup Type
The rule is simple: match the schema to the page’s primary purpose, not to whatever type sounds impressive. A product page wants Product. A guide wants Article. A storefront’s homepage wants Organization.
When two types could fit, pick the more specific one. Specific beats generic, LocalBusiness tells an engine far more than the broad Organization it descends from. The more precise the type, the more an engine can do with it.
If guessing makes you nervous, you don’t have to. A scanner can read each page and suggest the type for you, which is the no-code shortcut covered further down. Use this table as a starting map.
| Page type | Recommended schema |
| Blog post or guide | Article |
| Product page | Product |
| Homepage / brand page | Organization |
| Store location page | Local Business |
| Webinar or event page | Event |
How to Use Schema Markup on Your Website
The whole job comes down to six repeatable steps. Run them once and you’ll run them the same way on every page after.
- Identify the page type you’re marking up.
- Choose the most specific schema type that fits.
- Generate the markup in JSON-LD.
- Add the markup to the page, paste it manually or auto-inject it with a plugin.
- Test the markup with Google’s Rich Results Test.
- Monitor results in Google Search Console.
Each step is short. Here’s what each one means in practice.
Step 1: Identify the Page Type
Start by sorting your pages into types: blog posts, product pages, location pages, the homepage, service pages. One page type usually maps to one primary schema, so this first pass tells you most of what you’ll need before you touch any code. A scanner that classifies your pages by type makes this almost automatic on a larger site.
Step 2: Choose the Most Specific Schema Type
For each page, pick the most specific type that describes it. A product is a Product, not a generic Thing. A guide is an Article. Resist the urge to stack five types onto one page, accuracy and specificity matter more than quantity, and you’ll add supporting types only when they genuinely apply.
Step 3: Generate the Schema in JSON-LD
JSON-LD is the format to use, because it’s the one Google recommends (via Google Search Central). You don’t write it by hand. A free schema markup generator takes your details through a simple form and outputs valid code, so even if you’ve never seen JSON-LD before, you end up with a clean block.
Use Multiple Schema Types When RelevantThe no-code path on WordPress: let a plugin inject it. Open WP Admin → Schemafy → Auto Schema Generator and click Scan Site. Filter by Post Type and set Status to Needs Schema, review the schema suggested for each page, then apply and save. Schemafy writes the JSON-LD into the page for you. For a single page with an unusual type, the AI Schema Generator (next section) builds the block from the page’s content.
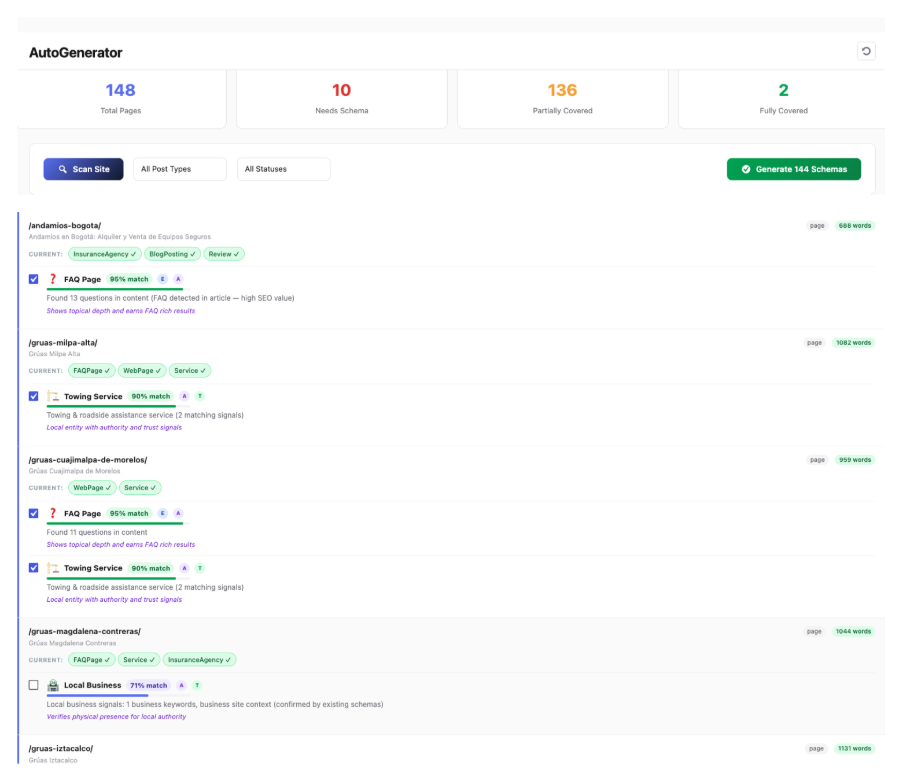
Schemafy’s Auto Schema Generator lists each page with its current schema, suggested schema, and a match percentage so you can apply markup in bulk.
Step 5: Test the Markup Before Publishing
Before anything goes live, validate it. Two free tools cover it: Google’s Rich Results Test checks whether the page is eligible for a rich result, and the Schema Markup Validator checks the syntax against the Schema.org spec. If you’re editing code directly, a JSON-LD editor with validation flags problems as you type. Invalid markup is usually ignored, so fix every error before you publish.
Step 6: Monitor Results in Google Search Console
After deployment, watch Google Search Console. The Enhancements and Rich Results reports show which marked-up items are valid, which throw errors, and which carry warnings. Over a few weeks, track impressions and click-through for the affected pages, and you can preview your search snippet to see how a listing reads before it ever appears. Monitoring is what turns “I added schema” into “I know it’s working.”
Schema Markup Code Example
Here’s what a minimal, valid Article block looks like. You won’t type this by hand in practice, a generator fills it in, but it’s worth seeing once so the fields make sense.
{

  "@context": "https://schema.org",

  "@type": "Article",

  "headline": "How to Use Schema Markup: Complete Guide for SEO and AI Search",

  "author": { "@type": "Person", "name": "Author Name" },

  "datePublished": "2026-05-28",

  "image": "https://example.com/cover.jpg",

  "publisher": {

    "@type": "Organization",

    "name": "Your Site",

    "logo": { "@type": "ImageObject", "url": "https://example.com/logo.png" }

  }

}
The @type declares what the page is. The headline, author, datePublished, and image are the fields Google leans on for an article. Swap Article for Product or Event and the required fields change accordingly, which is exactly why a tool that knows each type’s fields saves you the lookup.
How to Add Schema Markup Without Coding
If you run WordPress, you never have to touch JSON-LD. That’s the part most guides skip.
The workflow is short. Open Schemafy → AI Schema Generator, select the page (search for it or paste the URL), choose a schema type, Article, Product, Organization, Local Business, FAQ, or Blog Post, and click Generate Schema with AI. Review the generated fields and the JSON-LD preview, check the validation status, then click Save to Website. No code, no copy-paste into a theme file.
Schemafy’s AI Schema Generator builds the JSON-LD from the page content and shows a validation status before you save.
For sitewide coverage instead of one page at a time, the Auto Schema Generator scans everything and suggests schema per page, so a whole blog or catalog gets marked up from one screen.
How to Scale Schema Markup Across Large Websites
Marking up one page is easy. The real problem shows up at 800 products or 30 client sites, where doing it page by page simply isn’t an option. This is where the workflow has to change from manual to bulk.
Start with a sitewide scan. In Schemafy → Auto Schema Generator, click Scan Site, then use the Post Type filter (Post, Page, Product, or a custom type) and the Status filter to isolate everything that still needs schema. The bulk selection checkbox and coverage counters let you work through hundreds of pages in passes instead of one at a time.
Meta data scales the same way. Under Schemafy → Meta Tags → Bulk Import CSV, click Download Template, fill the url, meta_title, and meta_description columns for every page you want to change, and click Import Rows, valid rows apply automatically and invalid ones are flagged before they touch the site. It’s the difference between an afternoon and a week.
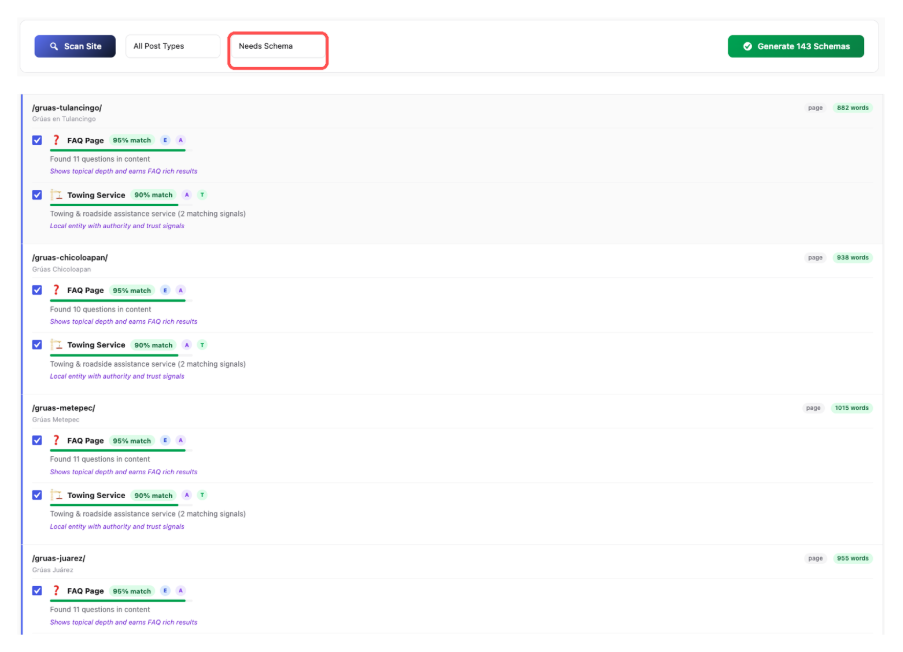
Filtering the Auto Schema Generator by Post Type = Product surfaces every product still missing schema for bulk handling.
Schema Markup Best Practices
A few rules keep your markup clean, accurate, and safe from Google’s structured-data policies. They take minutes to follow and save you from manual actions later.
- Mark up only what’s visible on the page.
- Keep business, product, and review data current.
- Use multiple schema types only when they genuinely apply.
- Avoid spammy or irrelevant markup.
- Re-validate after any redesign or CMS change.
Match Schema to Visible Page Content
Google’s rule is that markup must reflect content users can actually see. Marking up hidden text, placeholder content, or information that isn’t on the page gets the markup ignored, and can trigger a penalty under Google’s structured data policies. If it’s not on the page, don’t put it in the schema.
Keep Business, Product, and Review Data Updated
Stale data is worse than no data. A wrong price or a “in stock” label on a sold-out product creates Merchant Center issues and erodes trust. Opening hours, availability, and ratings all need to match reality. On WooCommerce, letting the plugin keep product schema in sync with the store means the markup updates when the product does.
Use Multiple Schema Types When Relevant
A single page can carry more than one schema. A blog post might combine Article and Breadcrumb markup, for instance. The test is relevance, not volume, add a second type only when the page truly contains that thing. You can review every schema applied across the site in one place. You can review every schema applied across the site in one place.
Avoid Spammy or Irrelevant Markup
Markup that misrepresents the page, irrelevant types, fake reviews, marked-up content that doesn’t exist, risks a manual action. Mark up what’s true and relevant to the page, and nothing else. The short-term SERP grab isn’t worth the long-term risk.
Validate Schema Regularly
Schema breaks quietly. A theme update, a CMS migration, or a redesign can strip or mangle your markup without any warning. Make a habit of re-validating after any structural change to the site, a 10-minute check after a redesign catches errors before they cost you rich results.
Common Schema Markup Mistakes to Avoid
Most schema problems come from a short list of recurring errors. Knowing them upfront saves a round of debugging.
| Mistake | Why it hurts | Fix |
| Missing required fields | Page becomes ineligible for the rich result | Use a generator that prompts for required fields |
| Invalid date or number formats | Markup fails validation | Use ISO formats (e.g., 2026-05-28) and plain numbers |
| Wrong schema type | Engine misreads the page | Match the type to the page’s actual content |
| Duplicate markup | Conflicting signals on one page | Keep one source of schema per page |
| Expecting unsupported rich results | Wasted effort (e.g., FAQ on a non-gov/health site) | Check current eligibility before relying on a result |
That last row matters more than it used to: since Google restricted FAQ rich results in 2023 (via Google Search Central), adding FAQ markup expecting stars-style enhancement is a common waste of effort. Generators that prompt for required fields and enforce valid formats quietly remove most of the top rows from this table.
How to Check If Schema Markup Is Working
Three checks tell you whether your schema is doing its job, and together they take about ten minutes.
First, run the page through Google’s Rich Results Test for a per-URL verdict on eligibility. Second, open the Enhancements reports in Search Console to see valid items, errors, and warnings across the whole site over time. Third, watch the live SERP for your marked-up pages, the proof is in how the listing actually appears.
“Working” looks like this: valid items in Search Console, rich-result impressions trending up, and a listing that shows the extra detail you marked up.
Final Thoughts: The Right Way to Use Schema Markup
The right way to use schema markup isn’t a one-time code paste, it’s a habit: choose the most specific type, generate valid JSON-LD, validate it, monitor the results, and scale the same workflow across the rest of the site. Done consistently, it compounds: every new page ships already legible to search engines, and you stop treating structured data as a chore you bolt on after the fact.
Pick your highest-value page type, usually products or your best guides, and mark it up today; on WordPress you can do the whole thing without writing a line of code, then repeat the same six steps across the rest of the site as you grow.
Add schemas to WordPress without writing code: get Schemafy in the WordPress plugin store →
Leave a Reply