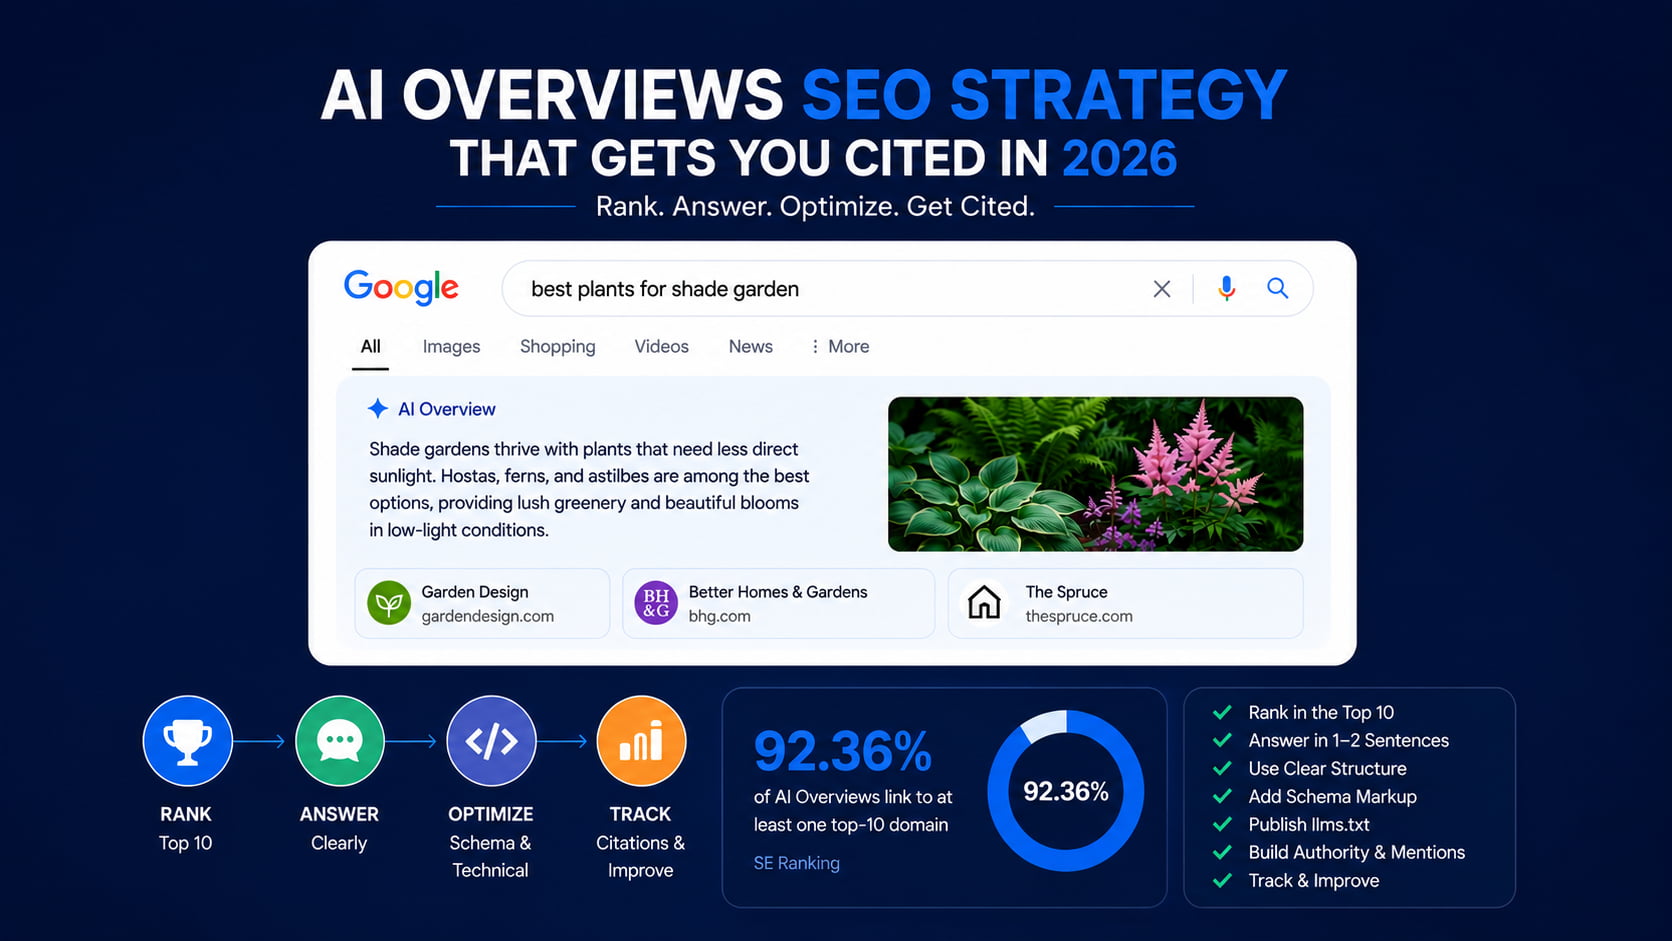
Most guides treat AI Overviews like a new game with secret rules. The data says otherwise: Google links at least one top-10 domain in 92.36% of AI Overviews, according to SE Ranking research.
You don’t need tricks. You need three layers: a page that ranks, answers an AI can lift, and a technical layer most sites skip. Here’s how to build all three across every client site you manage.
What are Google AI Overviews?
AI Overviews are AI-generated summaries that appear at the top of Google results, answering the query directly and citing a handful of source pages. Google builds them with its Gemini models and shows them mainly on informational and long-tail queries, almost always alongside other SERP features.
They change the click math. More searches end without a click, but a citation puts your brand at the top of the page, and Google reports that clicks from results pages with AI Overviews are higher quality, with users spending more time on the site (Google Search Central).
They also rarely travel alone. AI Overviews appear next to at least one other SERP feature 99.25% of the time, with People Also Ask present in 98.54% of cases (SE Ranking). If you report to clients on generative engine optimization, that context matters: the AIO is one feature in a crowded page, not the whole game.
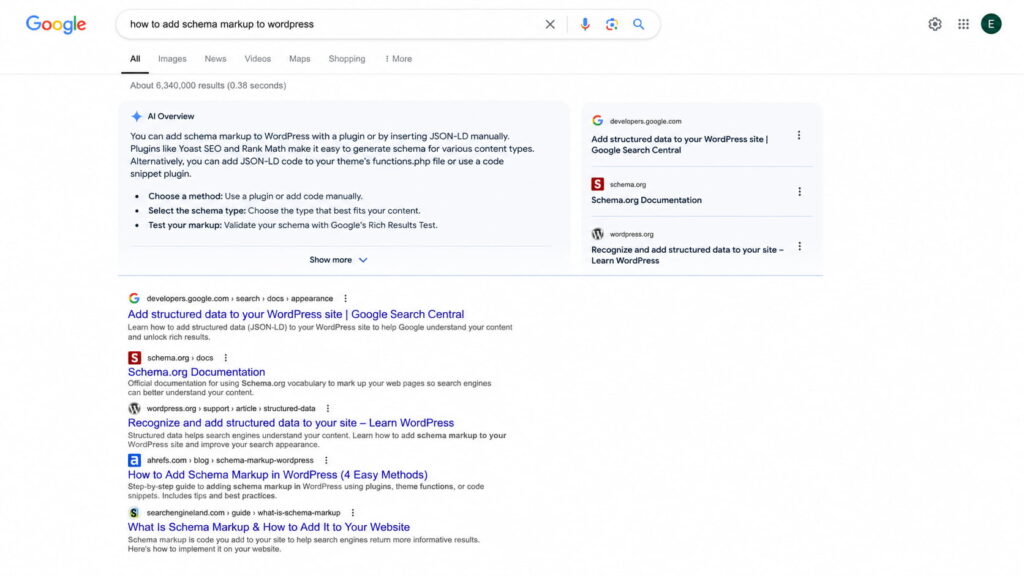
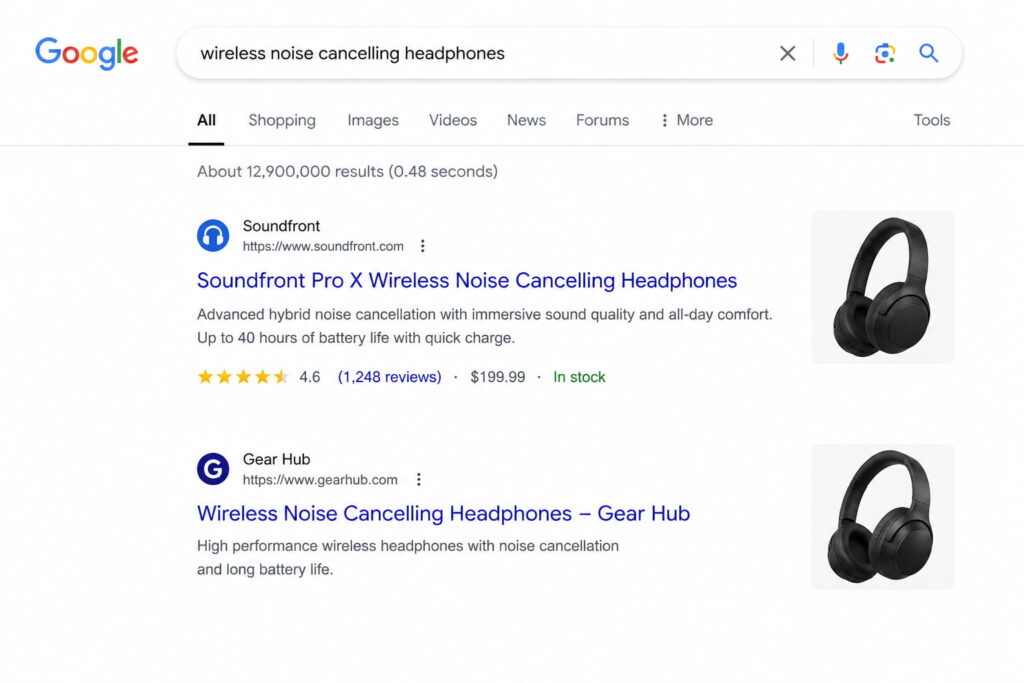
Caption: An AI Overview cites three sources above the first organic result: the citation slot sits higher than position 1.
How Google picks the sources it cites
Google’s official position is short: a page only needs to be indexed and eligible to appear in Search with a snippet. Per Google Search Central, “there are no additional requirements to appear in AI Overviews or AI Mode, nor other special optimizations necessary.”
The controls that do exist are the standard snippet controls: nosnippet, data-nosnippet, max-snippet, and noindex. Those limit what Google can show from your pages, in AI Overviews and everywhere else.
One thing that does not exist: an AI Overview submission process. If a vendor offers to “submit” a client’s site to AI Overviews, that service is fiction. Send them Google’s documentation and keep your budget.
The uncomfortable truth: you still have to rank
The anchor stat: 92.36% of AI Overviews link to at least one domain ranking in the organic top 10, and 63.19% of the time they pull from pages in the top 10 for that query (SE Ranking).
The 2026 nuance: Ahrefs analyzed 863K SERPs in March 2026 and found that only 37.9% of the individual URLs cited in AI Overviews rank in the top 10 for that exact query, down from roughly 76% a year earlier (Ahrefs). The cause is query fan-out: Google splits the search into related sub-queries and cites pages that rank for those. Ranking still matters, but Google now rewards covering the whole topic, not just the head keyword.
Our position: if your page doesn’t rank in the top 10-20 for the topic, optimizing “for AI” is starting the house from the roof. First improve your site’s SEO and fix your SEO issues. The SEO retainer you already run for clients is still 80% of the AI Overview game.
How to show up in AI Overviews, step by step
Here is the full sequence. Each step gets its own section below.
Rank the page in Google’s top 10 for the query.
Answer the question in the first one or two sentences.
Structure the content with clear headings, lists, and tables.
Add relevant schema markup to remove ambiguity.
Publish an llms.txt file at your domain root.
Build author bios and brand mentions that AI systems recognize.
Track your citations and reformat the pages that miss.
Steps 1 through 3 are content work. Steps 4 and 5 are the machine-readability layer. Steps 6 and 7 are what keep citations coming after the first win.
Write answers an AI can lift
AI Overviews don’t cite pages. They cite fragments: the two sentences, the list, or the table that answers a sub-question cleanly.
Your job is to leave liftable fragments on every page. For an agency running 10+ client sites, this isn’t a page-by-page tweak. It’s an editorial standard you apply to every new piece and retrofit onto the pages that already rank.
Answer the question in the first two sentences
The pattern is answer-first: state the answer in the first one or two sentences under the heading, then expand. Definition sections that follow a “What is X” heading with an immediate answer are among the most-cited fragments in AI Overviews.
Compare the two openings for a client’s service page section titled “How much does lawn aeration cost?”:
Liftable: “Lawn aeration costs $75 to $200 for most residential yards. Price scales with lot size and soil condition.”
Not liftable: “Every lawn is different. Before we talk numbers, it’s worth understanding what aeration does for your soil, and why the timing matters…”
The second version is how most service pages are written. Three paragraphs of context, then the answer. An AI summarizer skips it and lifts the competitor’s version instead.
Structure content for extraction: headings, lists, tables
Formatting is extraction engineering. The standard to impose across every client site:
Paragraphs of 2-3 sentences, one idea each
A clean H2/H3 hierarchy that mirrors real sub-questions
Numbered lists for steps and processes
Tables for anything with two or more attributes
A key takeaways section on long pieces
This is the same formatting that wins featured snippets, and the overlap is not a coincidence. AI Overviews appear next to People Also Ask 98.54% of the time (SE Ranking), so optimizing for PAA and snippets is optimizing for AI Overviews with the same hour of work.
Target long-tail, question-based queries
Long queries are AI Overview territory. Searches of four or more words trigger an AI Overview in 60.85% of cases (SE Ranking), and question queries are their natural habitat.
The tactic: mine People Also Ask and the real questions in each client’s niche, then give each question its own H2 or H3 with a direct answer underneath. Match the phrasing to the search intent behind the question, not to the keyword tool’s phrasing. An e-commerce client’s questions (“does X fit Y”) look nothing like a local service client’s (“how much does X cost near me”), so the mining is per niche, not per template.
Does schema markup get you into AI Overviews?
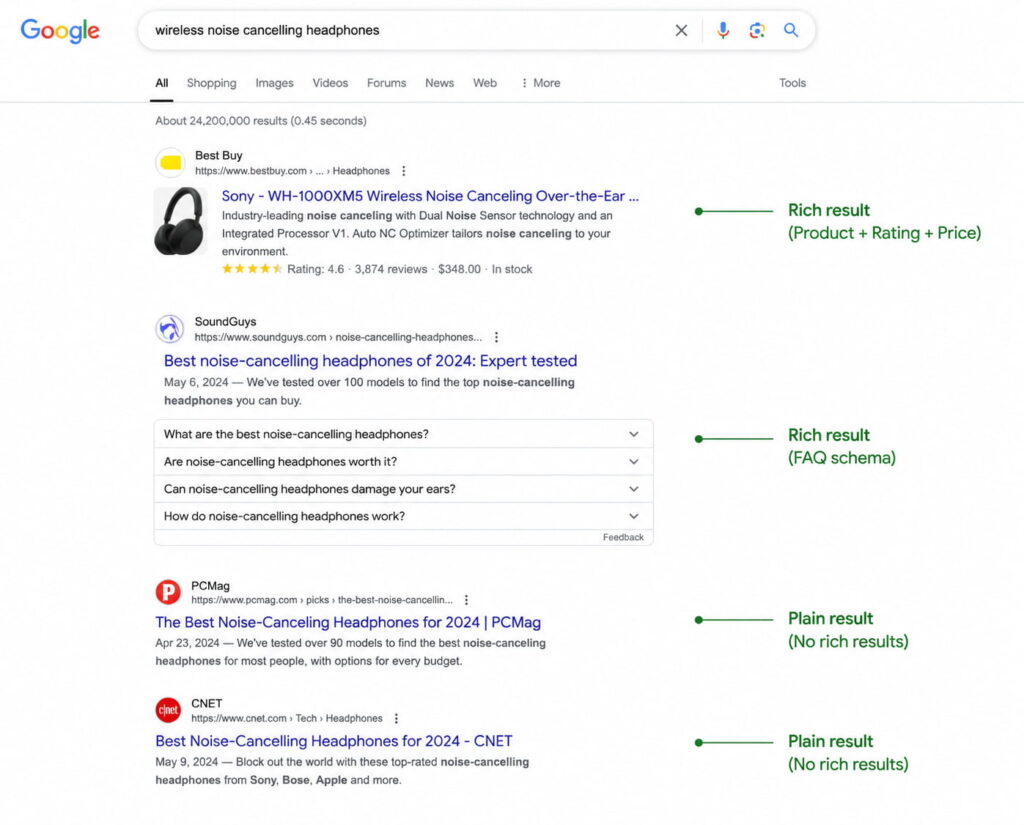
Most of the pages ranking for this question say yes, and most of them sell schema tools. The honest answer has more nuance: schema is not a ticket into AI Overviews, but it is the machine-readability layer that removes ambiguity about what your content is.
We build a schema plugin, so read the evidence yourself before taking our word for it. Both directions of it.
What the data actually says
The experimental evidence is sobering. A 2026 Ahrefs test tracked 1,885 pages that added JSON-LD between August 2025 and March 2026 against 4,000 control pages, and found no meaningful citation lift on any platform: AI Overviews moved -4.6%, AI Mode +2.4%, ChatGPT +2.2% (via Search Engine Journal).
The correlational evidence points the other way. Roughly 71% of pages cited by ChatGPT and 65% of pages cited by Google AI Mode carry structured data (Stackmatix), and the same Ahrefs analysis found across 6 million URLs that AI-cited pages are about three times more likely to include JSON-LD.
Study
What it measured
What it found
What it means
Ahrefs controlled test (2026)
Citation change after adding JSON-LD
No lift vs. control group
Schema alone doesn’t earn citations
Ahrefs correlation (6M URLs)
JSON-LD presence on AI-cited pages
Cited pages ~3x more likely to carry schema
Well-run sites tend to have schema
Stackmatix (2026)
Structured data on cited pages
~71% (ChatGPT), ~65% (AI Mode)
Machine-readability travels with citations
Google Search Central docs
Requirements for AI features
No special markup required
Schema is for clarity, not admission
Correlation is not causation. Sites that implement schema also publish stronger content, earn more links, and keep their technical setup clean. Schema won’t substitute for ranking or for liftable fragments. What it does is remove ambiguity about entities: who the author is, what the product is, which question each FAQ block answers. That clarity powers rich results and supports E-E-A-T, which is why what structured data is and how to use schema markup still belong in your technical checklist.
Our position: apply schema for the complete machine-readability layer, not for a promised citation.
Applying schema across a WordPress site without writing code
Auditing schema by hand across 10 client sites is the kind of work that eats a retainer. This is the workflow we built Schemafy for.
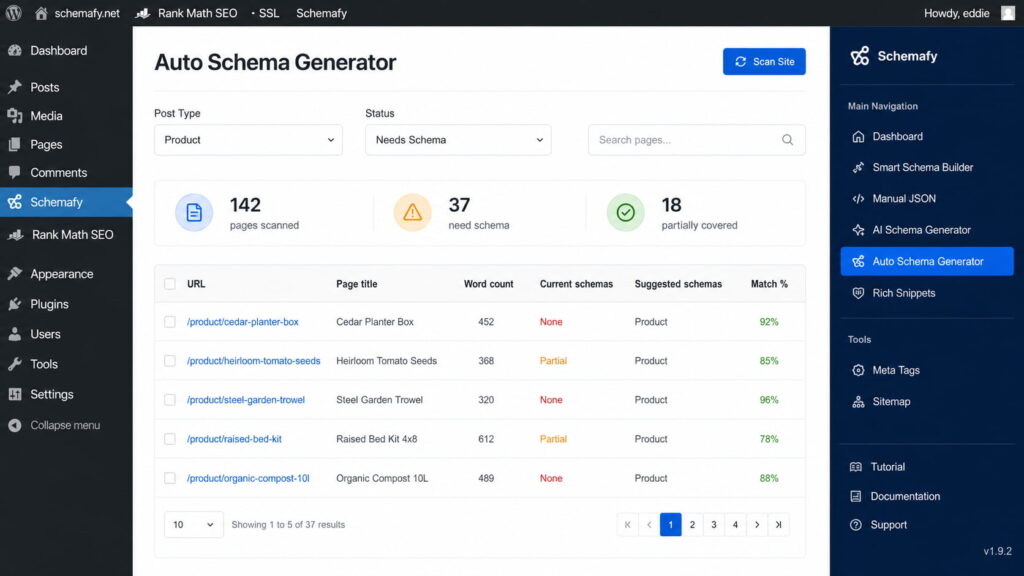
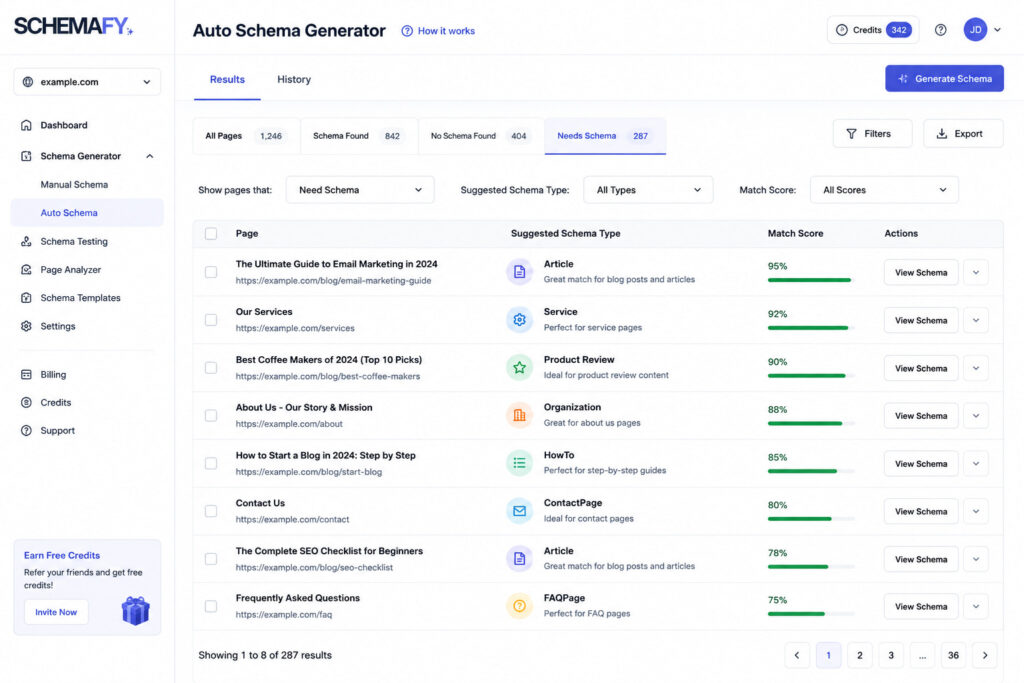
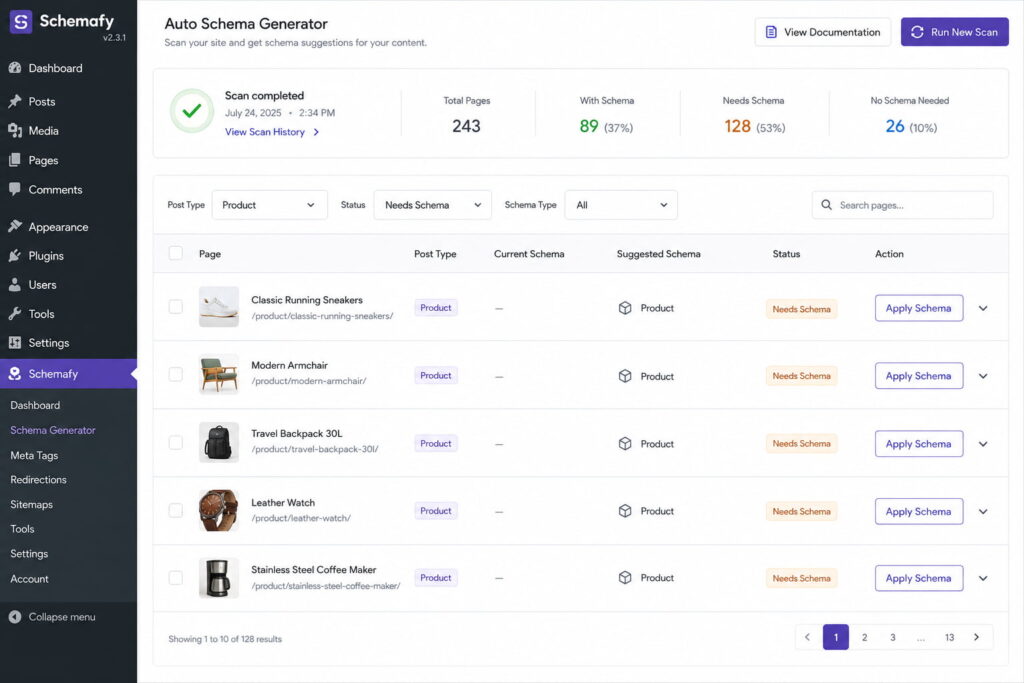
Open WP Admin → Schemafy → Auto Schema Generator and click Scan Site. The scan analyzes every page and detects schema opportunities per page. Filter by Post Type (Post, Page, Product) and Status (Needs Schema, Partially Covered, Fully Covered), then review the suggested schemas and match percentages page by page. Prioritize Article with a real author, FAQPage, Organization, and Product. No JSON-LD to write.
For complex or custom types, the AI Schema Generator builds the JSON-LD from the page content and shows a validation status before you save.
The pitch for agency operators is repeatability: the same scan, the same filters, the same priorities, on every one of your 10+ client sites.
Caption: Auto Schema Generator flags 37 product pages missing schema after one Scan Site pass, with the suggested type per page.
[CTA_DOWNLOAD]
Make your site readable to AI systems
Beyond schema, there are two technical pieces specific to AI search that the top-ranking guides barely develop: an llms.txt file and a crawler check. Both are cheap, fast, and easy to package into a technical retainer.
Add an llms.txt file
An llms.txt file is a markdown file at your domain root that summarizes what your site is and points AI systems to your most important content.
Honest status first: llms.txt is an emerging proposal, not a confirmed signal. Google states plainly that “you don’t need to create new machine readable files, AI text files, or markup” to appear in its AI features (Google Search Central). Publish one anyway, for three reasons: it costs minutes, other answer engines and LLM crawlers can read it today, and writing it forces you to define each site’s core pages.
The manual workflow: write the summary and the key URLs in markdown, save the file as llms.txt, and upload it to the domain root through your host’s file manager or FTP. Build one template and reuse it across clients. Budget 15 minutes per site.
Check which AI crawlers actually visit your site
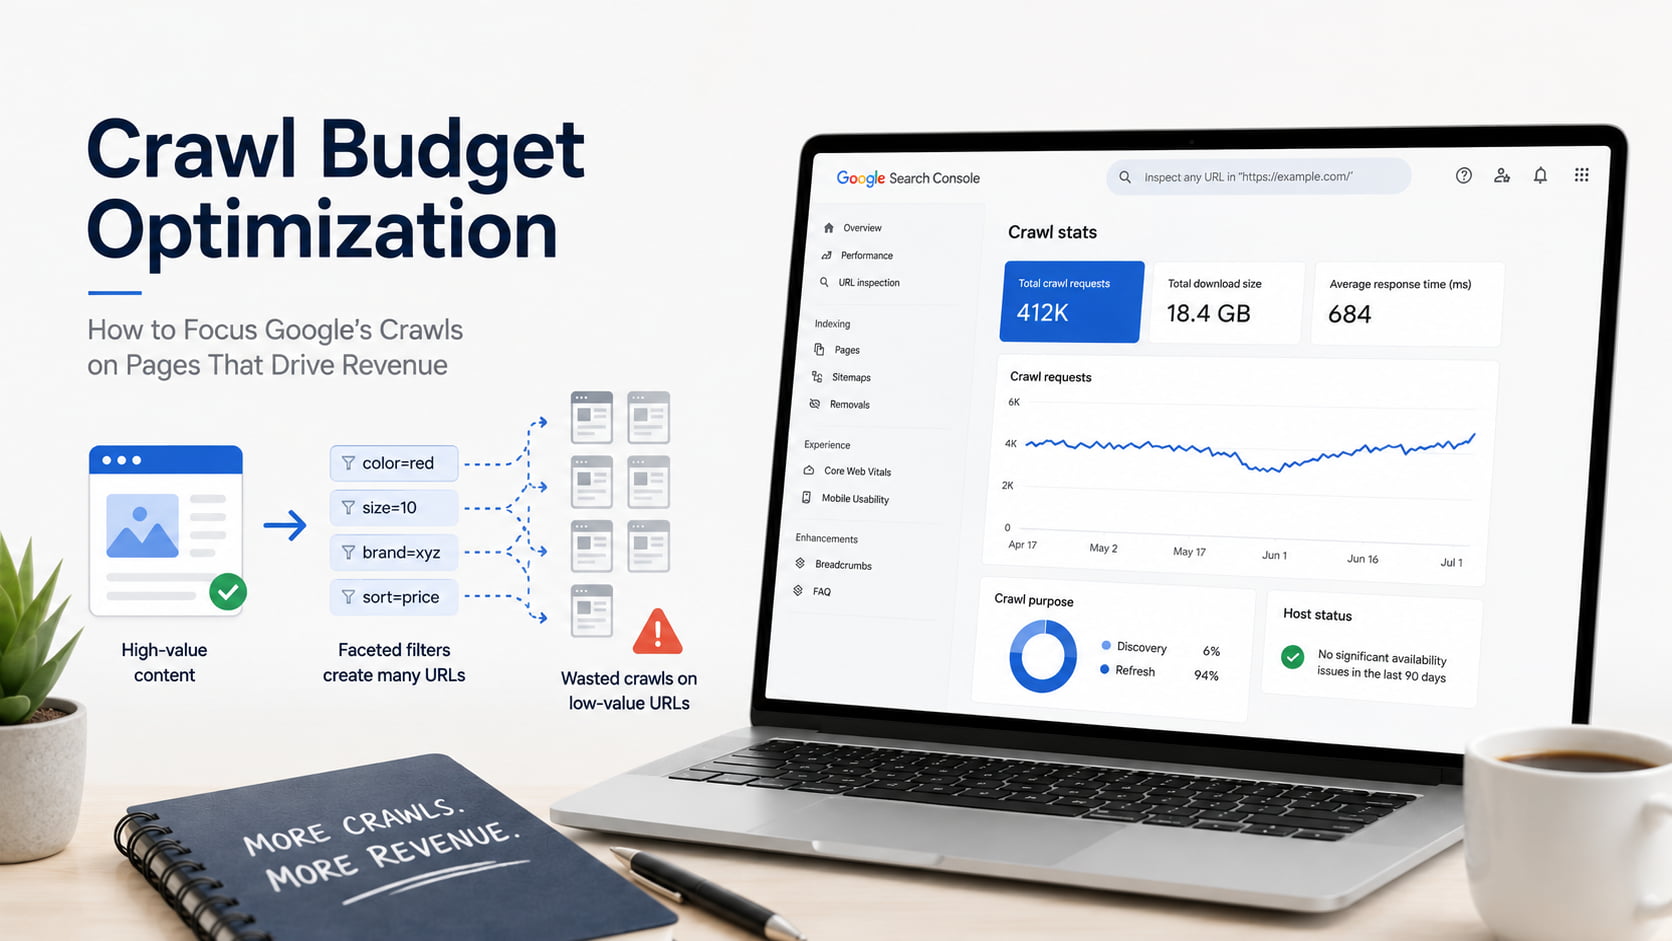
You can’t appear in AI answers if the crawlers behind them never read your pages. The check is manual but simple: open your server logs or your host’s raw access stats (AWStats or equivalent) and search for the AI user agents and their visit frequency. If the logs show bots burning visits on thin pages, optimize crawl budget before anything else.
Crawler
Operator
What it feeds
Googlebot
Google
The Search index, including AI Overviews
Google-Extended
Google
Gemini training and grounding (a robots.txt token, not a separate crawler)
GPTBot
OpenAI
ChatGPT training and search
ClaudeBot
Anthropic
Claude
PerplexityBot
Perplexity
Perplexity answers
Then read each client’s robots.txt. Sites inherited from a previous developer often block AI bots by accident, and unblocking one is a reportable quick win. Know the trade-off before you touch Google-Extended: blocking it limits Gemini training and grounding in some of Google’s other systems, but it does not remove you from AI Overviews in Search. That’s controlled by Googlebot access plus the snippet rules (Google Search Central). If a page is stuck earlier in the pipeline, start with crawling vs indexing instead.
Build the authority signals AI Overviews reward
Every section so far happens on the page. The last layer mostly happens off it.
Real authors. Replace “admin” bylines with a named author, a bio, and credentials on every client site. Person schema connects that author entity to the content, and it’s one of the types Schemafy generates.
First-hand data. Original numbers, real examples, and client-anonymized results are the fragments AI systems can’t find in the other nine posts on the SERP. One proprietary stat outworks a page of paraphrased advice.
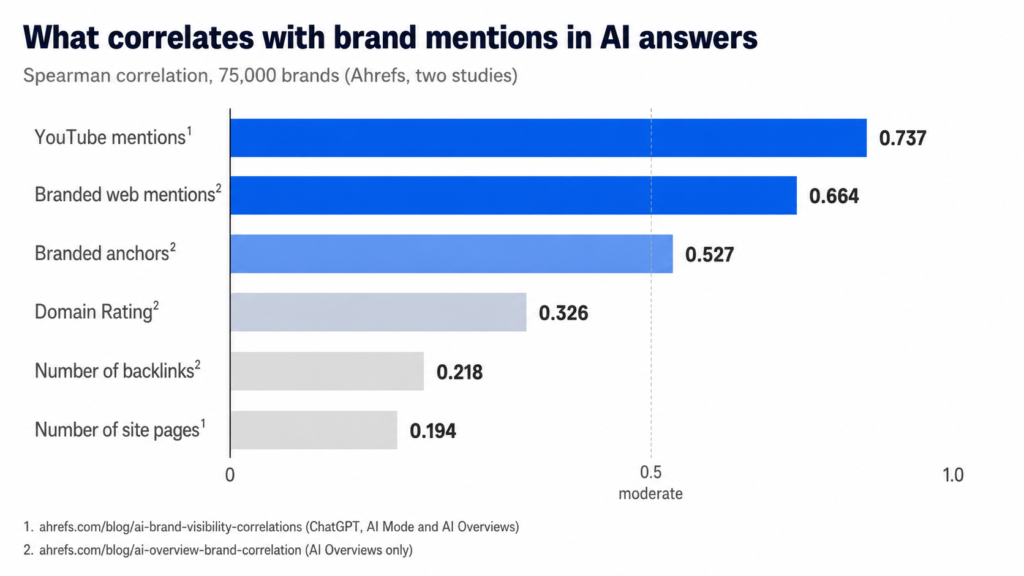
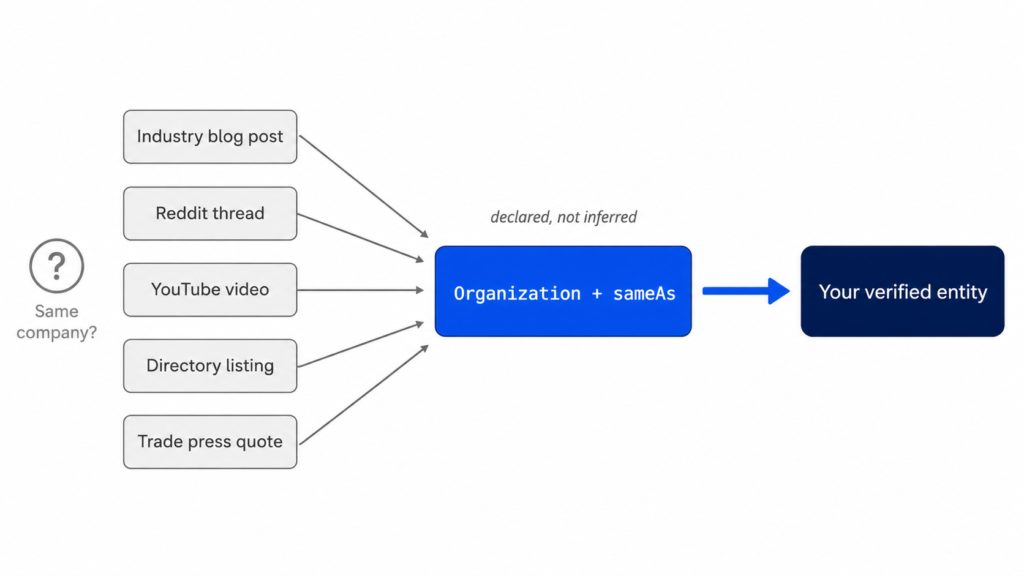
Brand mentions. In Ahrefs’ analysis of 75,000 brands, brand web mentions correlate with AI Overview visibility at 0.664, against 0.218 for backlinks, nearly three times stronger (Ahrefs). Unlinked mentions now do work that link builders used to charge for, which changes how you prioritize off-page SEO signals.
Freshness. More than half of AI Overview citations come from content published in the last two years: 28.76% from 2025 and 26.85% from 2024 (SE Ranking). A refresh calendar for each client’s top pages is now a defensible retainer line.
How to track whether you’re showing up
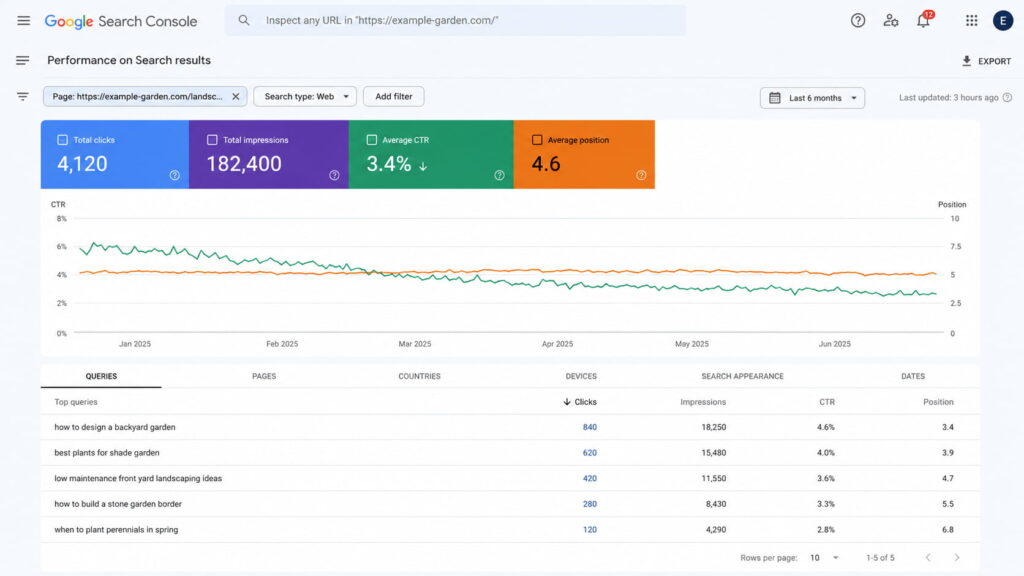
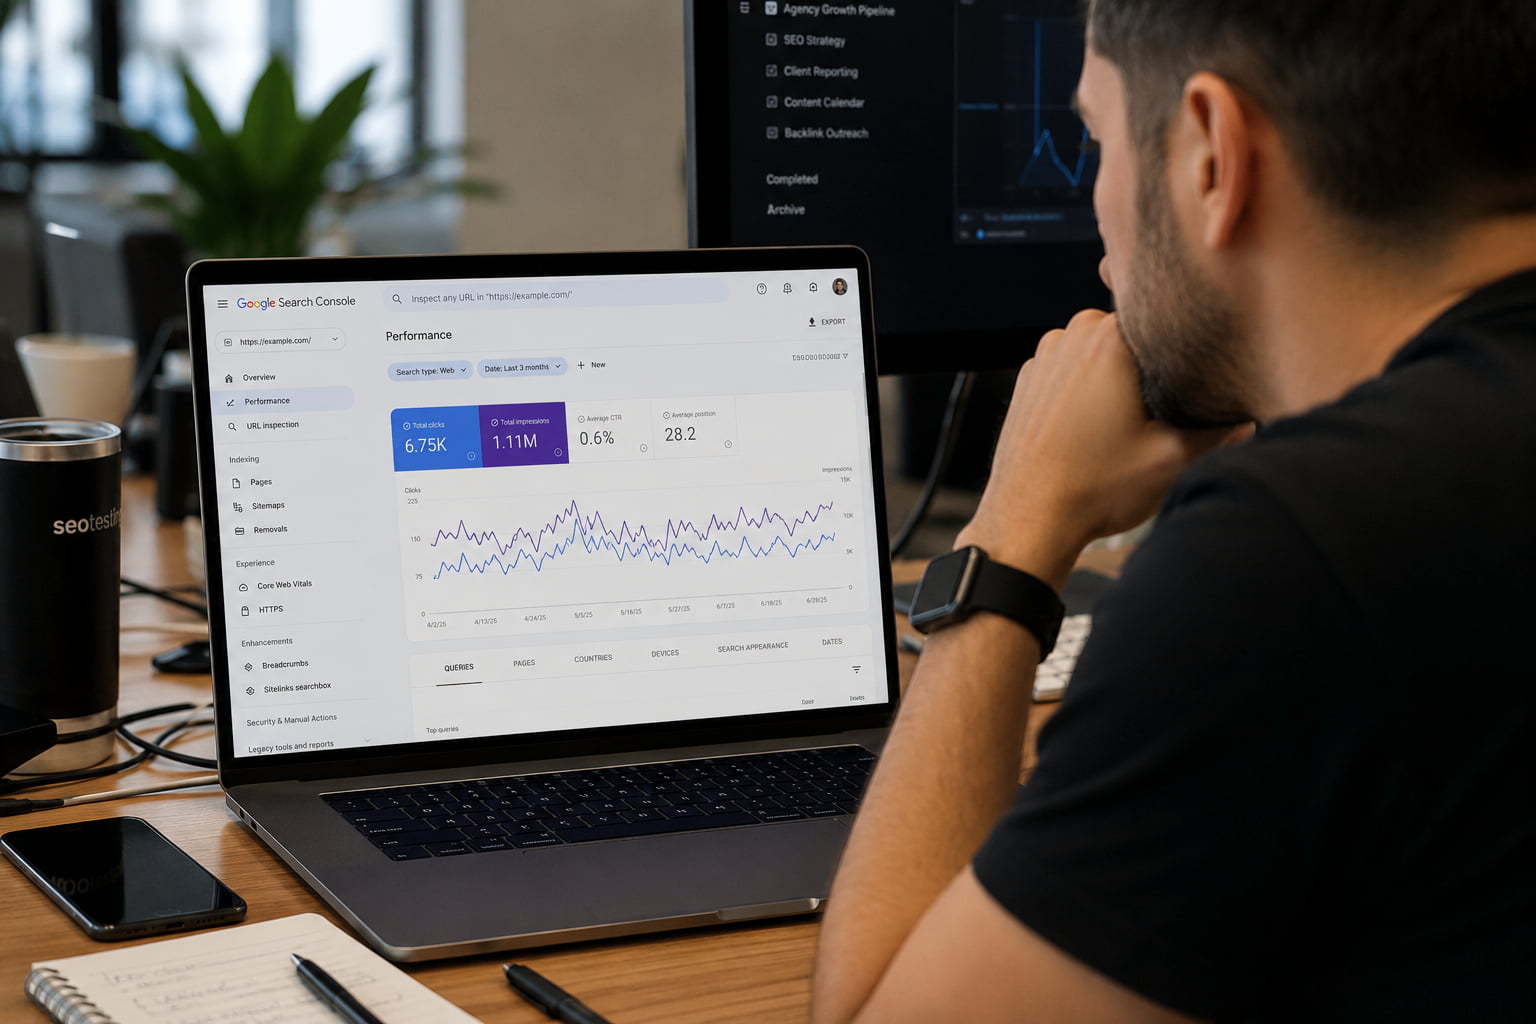
Start with the honest limitation: Search Console does not separate AI Overview traffic. Impressions and clicks from AI features are counted inside the regular “Web” search type in the Performance report (Google Search Central), so there is no filter to pull.
What works instead:
Run manual checks on the client keywords that trigger AI Overviews, and log who gets cited.
Watch CTR on pages ranking top 10 for AIO queries. Falling CTR with stable position is the signature of an AI Overview absorbing clicks, and it’s the honest way to explain a traffic dip to a client without panic.
Those three feeds answer the only question that matters operationally: which pages to reformat first. The top-10 pages losing CTR are next sprint’s work list.
Caption: Stable position, falling CTR: the page still ranks 4-5 but the AI Overview above it is taking the clicks.
Final thoughts
Showing up in AI Overviews is not a new discipline. It’s ranking, plus fragments an AI can lift, plus an honest technical layer of schema, llms.txt, and crawler access. No secret rules, no submission form.
The concrete next step: for each client, pull the five pages already ranking in the top 10 for queries that trigger an AI Overview. Reformat them answer-first, then run a Schemafy scan to close the schema gaps the audit finds. That short list is where citations come from fastest.
[CTA_DOWNLOAD]
Frequently asked questions
How do I get my website to show up in AI Overviews?
Rank the page in Google’s top 10 for the query, answer the question directly in the first sentences, and structure the content with clear headings and lists. Google links at least one top-10 domain in over 92% of AI Overviews, so traditional SEO remains the foundation. Schema markup and llms.txt add machine-readability on top.
Does schema markup help you appear in AI Overviews?
Not on its own. A 2026 Ahrefs test found no citation lift from adding schema alone, yet most pages cited by AI systems do carry structured data. Schema removes ambiguity about your content and authors and powers rich results, so treat it as a readability layer, not a shortcut.
What triggers an AI Overview in Google?
Google shows AI Overviews when it predicts a generated summary will help, most often on informational, question-style, and long-tail queries. Searches of four or more words trigger them in roughly 61% of cases. Transactional and simple navigational queries trigger them far less often.
How long does it take to show up in AI Overviews?
There is no fixed timeline. If a page already ranks in the top 10, formatting changes like answer-first paragraphs can get it cited once Google recrawls and processes the page. If the page does not rank yet, expect the normal SEO timeline of months before AI Overview visibility follows.
Can I see AI Overview traffic in Google Search Console?
Not separately. Google counts AI Overview impressions and clicks inside the regular Web search data, with no dedicated filter. To estimate impact, track your keywords that trigger AI Overviews, monitor CTR changes on stable rankings, and use an AI visibility tool to log where your pages get cited.
Can I opt out of AI Overviews?
You cannot opt out of AI Overviews appearing on queries, but you can control how your content is used. The nosnippet and max-snippet rules limit or block what Google shows from your pages, and blocking Google-Extended affects Gemini training rather than AI Overviews in Search.
Every SEO audit template repeats the same rule: keep every page within 3 clicks of the homepage. The rule is real. The way most guides apply it is not.
Depth has a measurable cost: the deeper a page sits, the less often bots crawl it and the later it gets indexed. But “everything at 3 clicks” is not the fix. Flattening the right pages is. Here’s how to tell the difference.
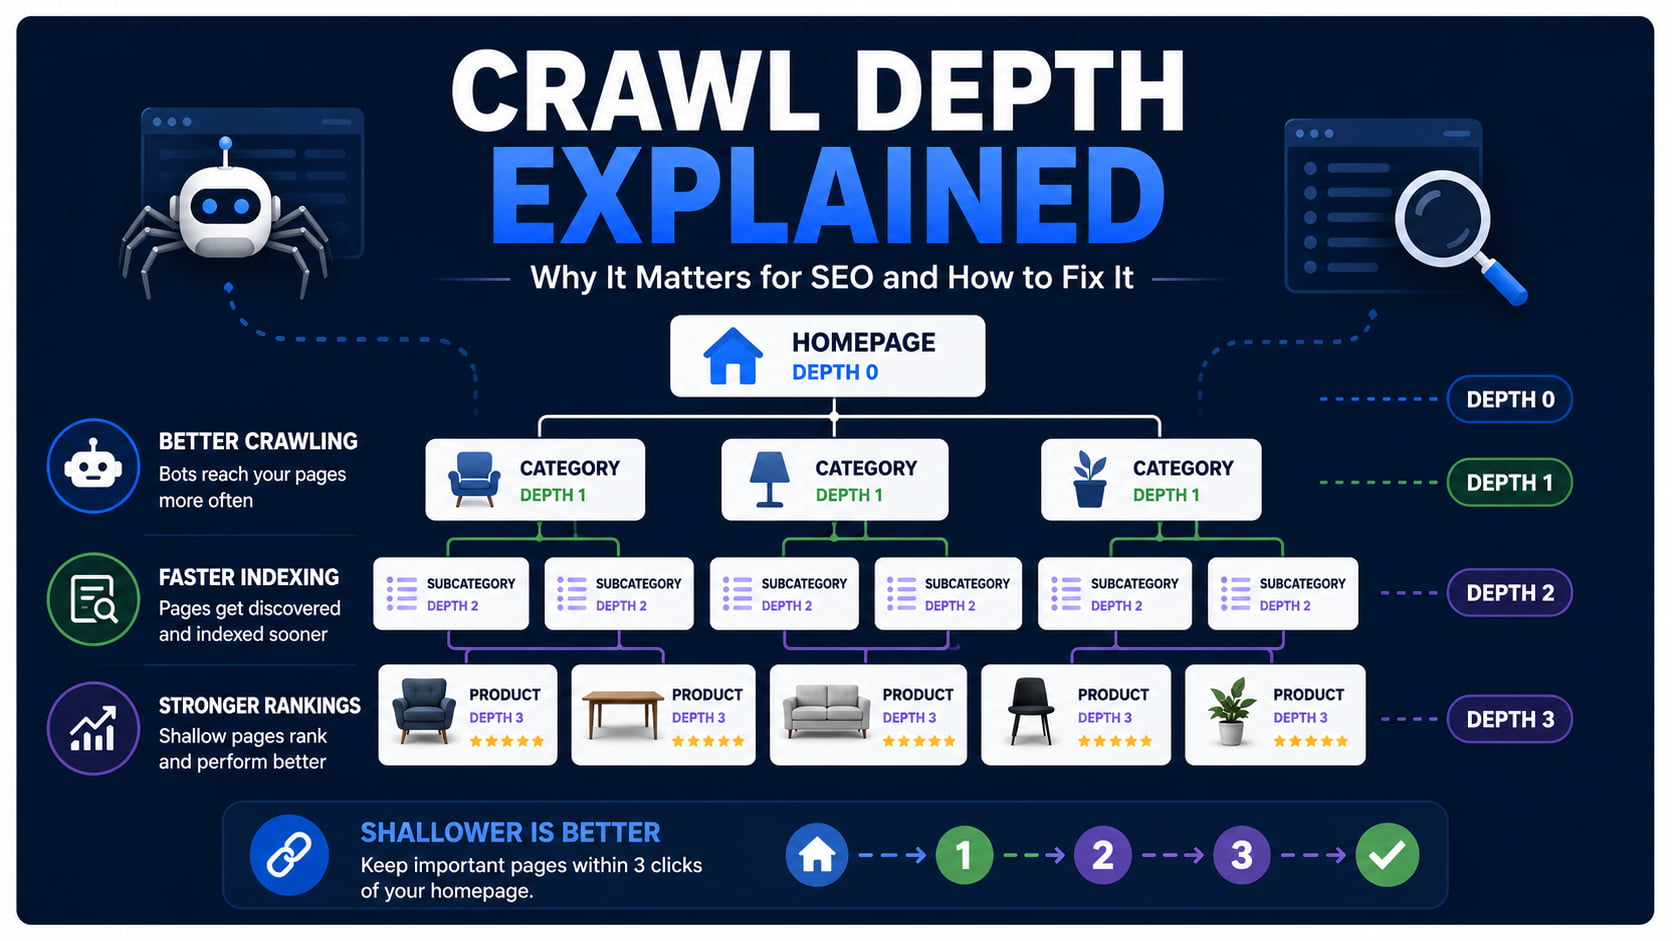
Crawl depth is the number of clicks it takes a search engine bot to reach a page from your homepage. The homepage is depth 0, pages linked from it are depth 1, and so on. The deeper the page, the less often bots crawl it.
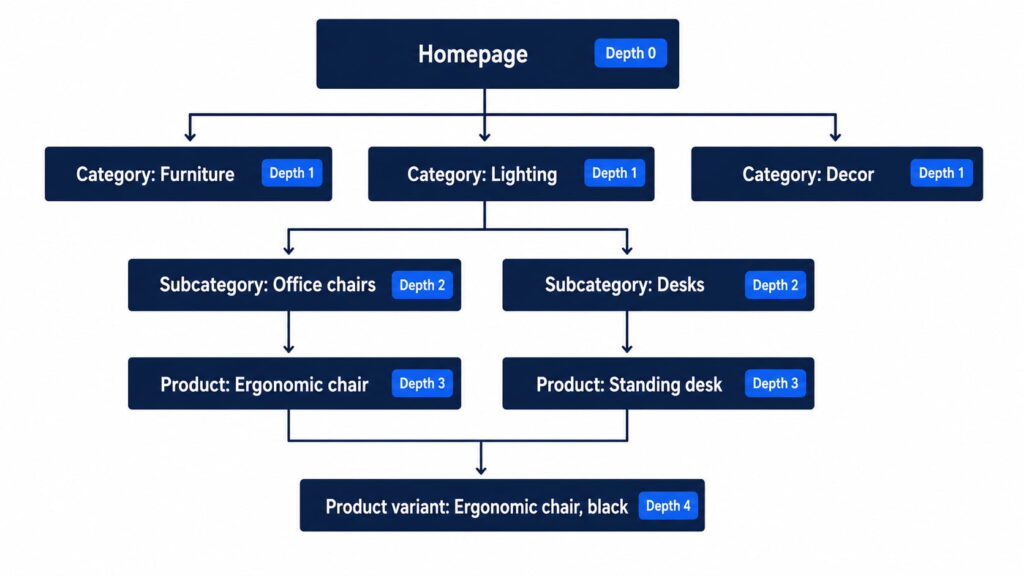
Picture a typical client store. The homepage links to a category page (depth 1), the category links to a subcategory (depth 2), and the subcategory finally links to a product (depth 3). That product needed three hops of discovery before any bot could even know it exists. Add a color variant or a paginated product grid, and you’re at depth 4 before anyone has done anything wrong.
A typical store hierarchy puts products at depth 3 before a single filter or pagination link is added.
Crawl depth vs click depth vs page depth
You’ll see three terms used as if they were one. The difference is perspective, not math.
Term
Perspective
Who uses it
Click depth
The user: minimum clicks to reach a page from the homepage
UX teams, most SEO tools
Crawl depth
The bot: link hops a crawler follows from its entry point
Log-file tools, crawl documentation
Page depth
Umbrella term for either
Casual usage in audits
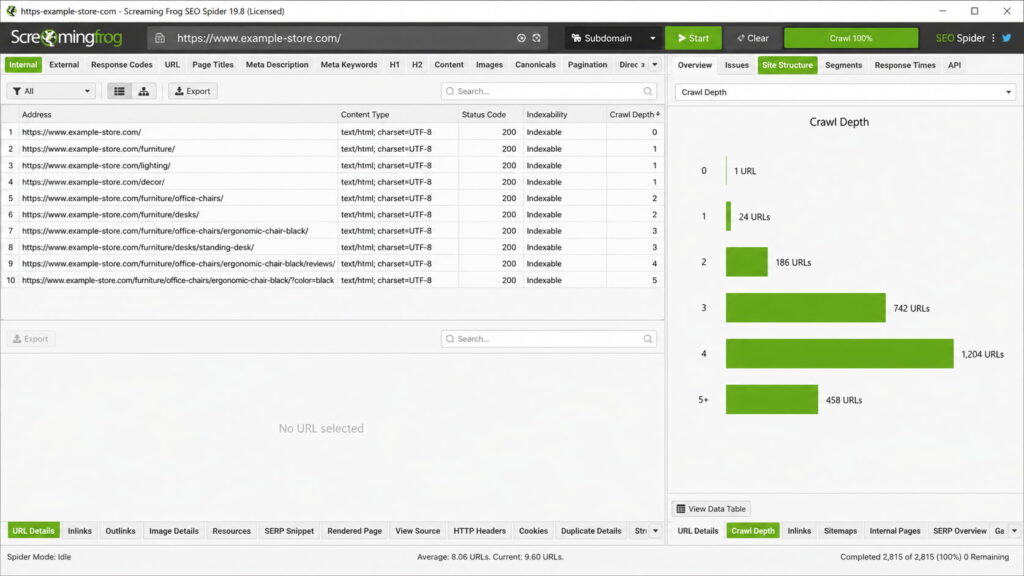
In practice, tools like Screaming Frog and Sitebulb measure click depth and label it “Crawl Depth” in their reports. Operationally, the distinction changes almost nothing: you flatten architecture the same way regardless. Knowing it exists mainly saves you from confusion when a report from your team or a client’s previous agency uses the terms differently.
Why crawl depth matters for SEO
Depth hits three things in a chain: crawl frequency, then indexing speed, then rankings and traffic. Each extra level weakens the first link, and the rest follow.
It’s also a UX problem wearing an SEO costume. If a bot needs five clicks to find a page, so does a human. Buried pages don’t just get crawled less. They get visited less, linked less, and bought from less.
How depth eats your crawl budget
Googlebot enters through your homepage and sitemap, then discovers everything else by following links. Google describes its crawl capacity as crawl budget: a combination of how much it can crawl (rate limit) and how much it wants to (demand). Deep URLs are last in that queue. The budget often runs out before the crawler gets to them.
Before you panic: Google’s own guidance says crawl budget concerns sites with 1 million+ pages that change weekly, or 10,000+ pages that change daily, or sites where much of the inventory sits in “Discovered – currently not indexed”. Most client stores are under those thresholds. Their real problem is discovery: pages so deep that Googlebot rarely reaches them at all.
If budget itself is your bottleneck, that’s a separate job. We cover it in our guide to optimizing crawl budget.
Deep pages get crawled less, indexed later, and ranked worse
Botify’s log-file analyses show that Googlebot’s crawl rate drops mechanically with each level of depth (Botify). The pattern is consistent: depth 1–2 pages absorb most of the crawl activity, and everything below gets a fraction of it.
Even the shallow layers don’t get full coverage. Across 413 million pages and 6 billion Googlebot requests, Botify measured crawl ratios between 31% and 73% of indexable pages crawled in a 30-day window, depending on site type. Deep pages compete for whatever is left of that.
The consequence chain is predictable. Less crawl means Google takes weeks to see your content updates. Slow discovery means pages pile up in “Crawled – currently not indexed”.
None of this makes depth a direct ranking factor. It doesn’t need to be: a page Google rarely visits and slowly indexes underperforms either way. The mechanics of that pipeline are worth understanding, and we break them down in crawling vs indexing.
Crawl depth and AI crawlers: the %currentyear% wrinkle
Here’s the part the classic guides skip. AI crawlers like GPTBot, ClaudeBot, and PerplexityBot discover content the same way Googlebot does: by following links. They just do it with far less capacity.
The gap is not subtle. A Botify analysis of 7 billion+ log files found 18.2 billion Google crawl events against 887 million from OpenAI’s bots in the most recent measured month, roughly 4% of Google’s volume, even after OpenAI tripled its crawling since August 2025 (Botify × Chris Long, 2026). A crawler operating at 4% of Googlebot’s scale reaches far less of your deep inventory. Depth punishes you twice.
The response is the same discipline, applied harder: keep the content you want cited in AI answers at shallow levels, and expose it through discovery files that skip the click chain entirely, like your XML sitemap and the emerging llms.txt convention. Once a bot arrives, structured data helps AI systems understand what the page actually is, which is where a schema plugin like Schemafy earns its place in the stack. If AI visibility is on your roadmap, start with generative engine optimization and the answer engine optimization tools that measure it.
What is a good crawl depth?
Keep your important pages within 3 clicks of the homepage. Google has never published an official depth limit; the 3-click threshold is practitioner consensus, built on the observation that crawl activity drops sharply with each level. Important pages means the ones that earn traffic or revenue, not every URL you own.
That last sentence is the whole trick. “Important” is the load-bearing word, and it’s the one most audits ignore. A 3,000-URL store does not need 3,000 URLs at depth 3.
When deep pages are actually fine
Some pages can sit at depth 4+ without costing you anything: old blog archives, legal pages, seasonal content in the off-season, and product variants that carry a canonical tag pointing at the main product.
The operational rule for a portfolio of client stores: rank each site’s URLs by traffic and conversion potential, then flatten only the top of that list. Money pages (services, top categories, best-selling products) belong at depth 1–3. The rest can stay deep, and nobody, bot or human, will miss them. Trying to flatten everything across 10+ stores burns hours you don’t have on pages that don’t pay.
How to measure crawl depth on your site
Crawl the site with a desktop crawler. In Screaming Frog, every URL gets a Crawl Depth value, and the Site Structure view shows the distribution of URLs per level. Sitebulb draws the same picture as a crawl map. One caveat so nobody asks: Schemafy is not a crawler; this step runs on the tools above.
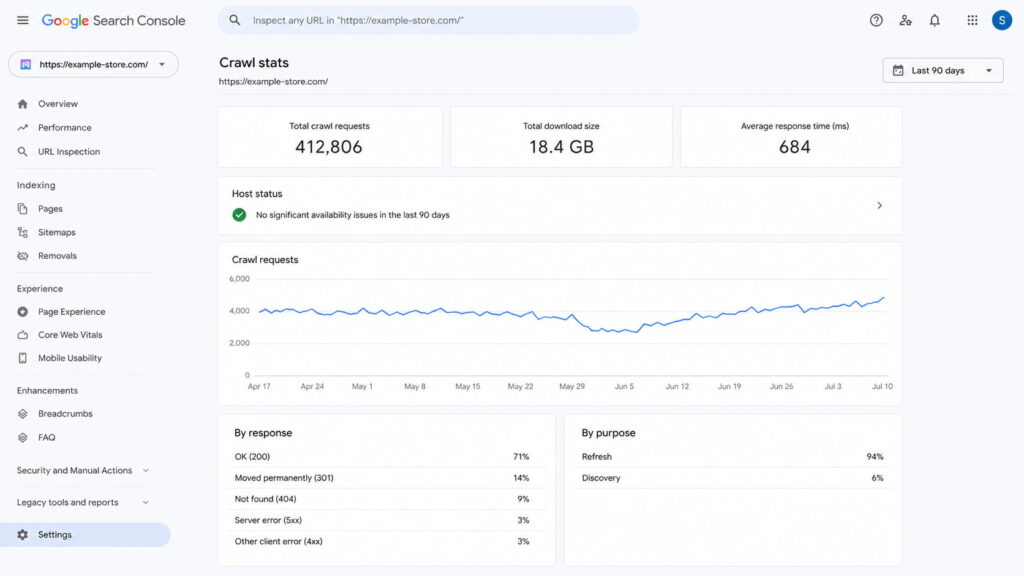
Then validate against reality in Google Search Console: Crawl Stats shows how Googlebot actually spends its visits, and the indexing report tells you whether deep pages are landing in “Discovered – currently not indexed”. If they are, depth is no longer a theory. It’s your diagnosis, and it usually travels with other fixable SEO issues.
The practical move: export URLs per depth level, cross them with traffic or revenue data, and flag every money page sitting at level 4+. That crossed list is your work queue.
The depth distribution is the first export to pull: anything money-page-shaped at level 4+ is a discovery problem, not a content problem.
How to reduce crawl depth: 7 fixes that flatten your architecture
Flattening architecture is mostly linking work. Here are the seven fixes, in the order most stores should apply them:
Link key pages from the homepage.
Add hub or category pages that group related content.
Fix internal links from your highest-authority pages.
Add breadcrumbs across the site.
Flatten long pagination chains.
Fix orphan pages.
Keep your XML sitemap fresh.
Fixes 1 and 2 are pure discovery shortcuts: a homepage link makes any page depth 1, and a well-built hub pulls a whole cluster up a level. Fix 7 is the safety net: a fresh sitemap gives crawlers a second door, though it never replaces internal links. The three fixes that move depth the most get their own sections below.
Fix internal linking from high-authority pages
This is the fix with the most impact on the list. Identify the pages with the most authority (backlinks and traffic; on client stores that’s almost always the homepage plus two or three categories) and link from them to the deep pages you want lifted. The math is immediate: one link from a depth 1 page makes any target depth 2.
The mechanisms are boring and effective: related-product and related-post modules, plus contextual links inside evergreen content that already ranks. Internal linking is step one of most site-wide improvements anyway, and it slots into the broader sequence in improving SEO on your website.
Use breadcrumbs (and BreadcrumbList schema)
Breadcrumbs do two jobs at once. Every page gets an upward link path (home → category → product), which gives crawlers alternative routes through the site and cuts effective depth across thousands of pages with one template change. And users get visible hierarchy, which matters on a 1,000-product store.
Add BreadcrumbList schema and Google can show the breadcrumb trail in the search result instead of a raw URL. BreadcrumbList is one of the schema types a plugin like Schemafy generates and applies in WordPress, so this fix rarely requires touching code. Implement it once per theme, and it pays across every client store running that theme.
Tame pagination, filters, and orphan pages
These are the three classic depth generators.
Long pagination first: page 14 of a blog archive sits at enormous depth by construction. Use “load more” patterns with crawlable links, or route discovery through category archives instead of endless page chains.
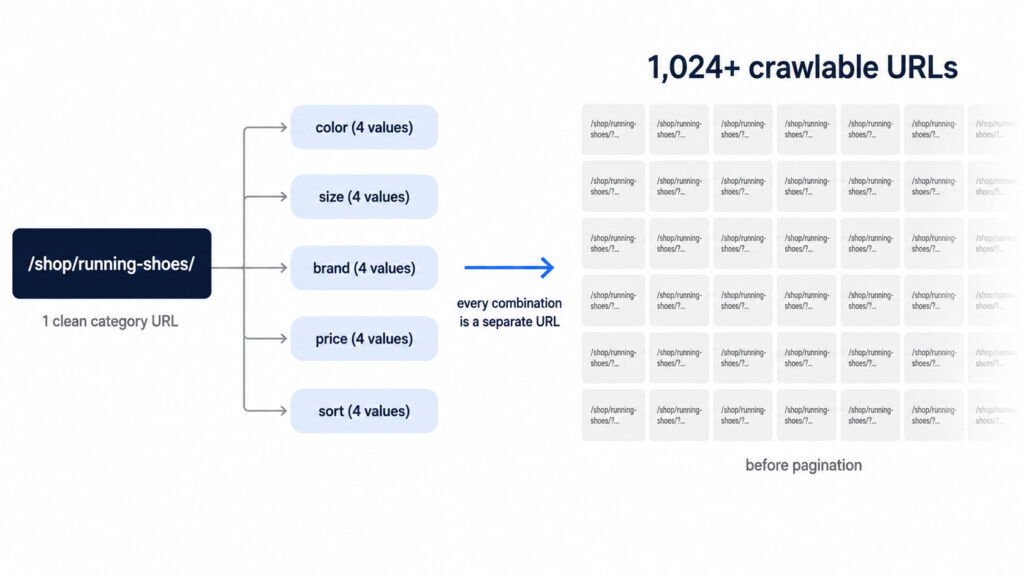
Faceted filters are the WooCommerce special: color × size × price combinations can mint near-infinite URL chains. Contain them with noindex or robots rules based on which facets deserve to rank. There is no absolute recipe here; the right call depends on whether the facet has real search intent behind it.
Orphan pages are the terminal case: no internal links pointing in means infinite depth for practical purposes. Detect them by crossing your crawl export against your sitemap. Anything in the sitemap that the crawler never found is orphaned.
Final thoughts
The 3-click rule survives because it’s half right. Depth genuinely suppresses crawling and indexing, and Botify’s data and Google’s own docs back that up. But the rule applies to your important pages, not your whole site. Flattening everything is effort spent on URLs nobody searches for; ranking pages by value and lifting only the top is the version of the rule that scales across a client portfolio.
The next step takes one afternoon: crawl your highest-revenue store today, export URLs by depth, cross with traffic, and flatten whatever money pages you find at level 4+. Then repeat on store number two.
[CTA_DOWNLOAD]
Frequently asked questions
What is crawl depth in SEO?
Crawl depth is the number of clicks it takes a search engine bot to reach a page starting from your homepage. The homepage sits at depth 0, pages linked directly from it are depth 1, and so on. Deeper pages get crawled less often and indexed more slowly.
What is a good crawl depth?
Keep your important pages within 3 clicks of the homepage. Google has never published an official limit, but crawl frequency drops sharply with each level of depth. Pages that drive traffic or revenue belong at depth 1–3; archives and low-priority pages can sit deeper without much harm.
Does crawl depth affect rankings?
Not directly, but the chain is real: deep pages are crawled less often, indexed later, and refreshed more slowly, which suppresses their organic visibility. Log-file analyses of large sites by Botify show pages at depth 4 and beyond receive a fraction of the crawl activity that depth 1–2 pages get.
What is the difference between crawl depth and click depth?
Click depth counts the minimum clicks a user needs to reach a page from the homepage. Crawl depth is the same distance from a bot’s perspective as it follows links. In practice, most SEO tools measure click depth and label it crawl depth, so the terms overlap.
How do I check the crawl depth of my website?
Crawl your site with a tool like Screaming Frog or Sitebulb and check the crawl depth column or visualization. Then cross-check Google Search Console’s Crawl Stats and the “Discovered – currently not indexed” report to see whether deep pages are actually being missed by Googlebot.
How do I reduce crawl depth?
Link important pages from your homepage or top-level category pages, add breadcrumbs, fix orphan pages, and flatten long pagination. Internal links from your highest-authority pages do the most work: each new link path can pull a buried page several levels closer to the homepage.
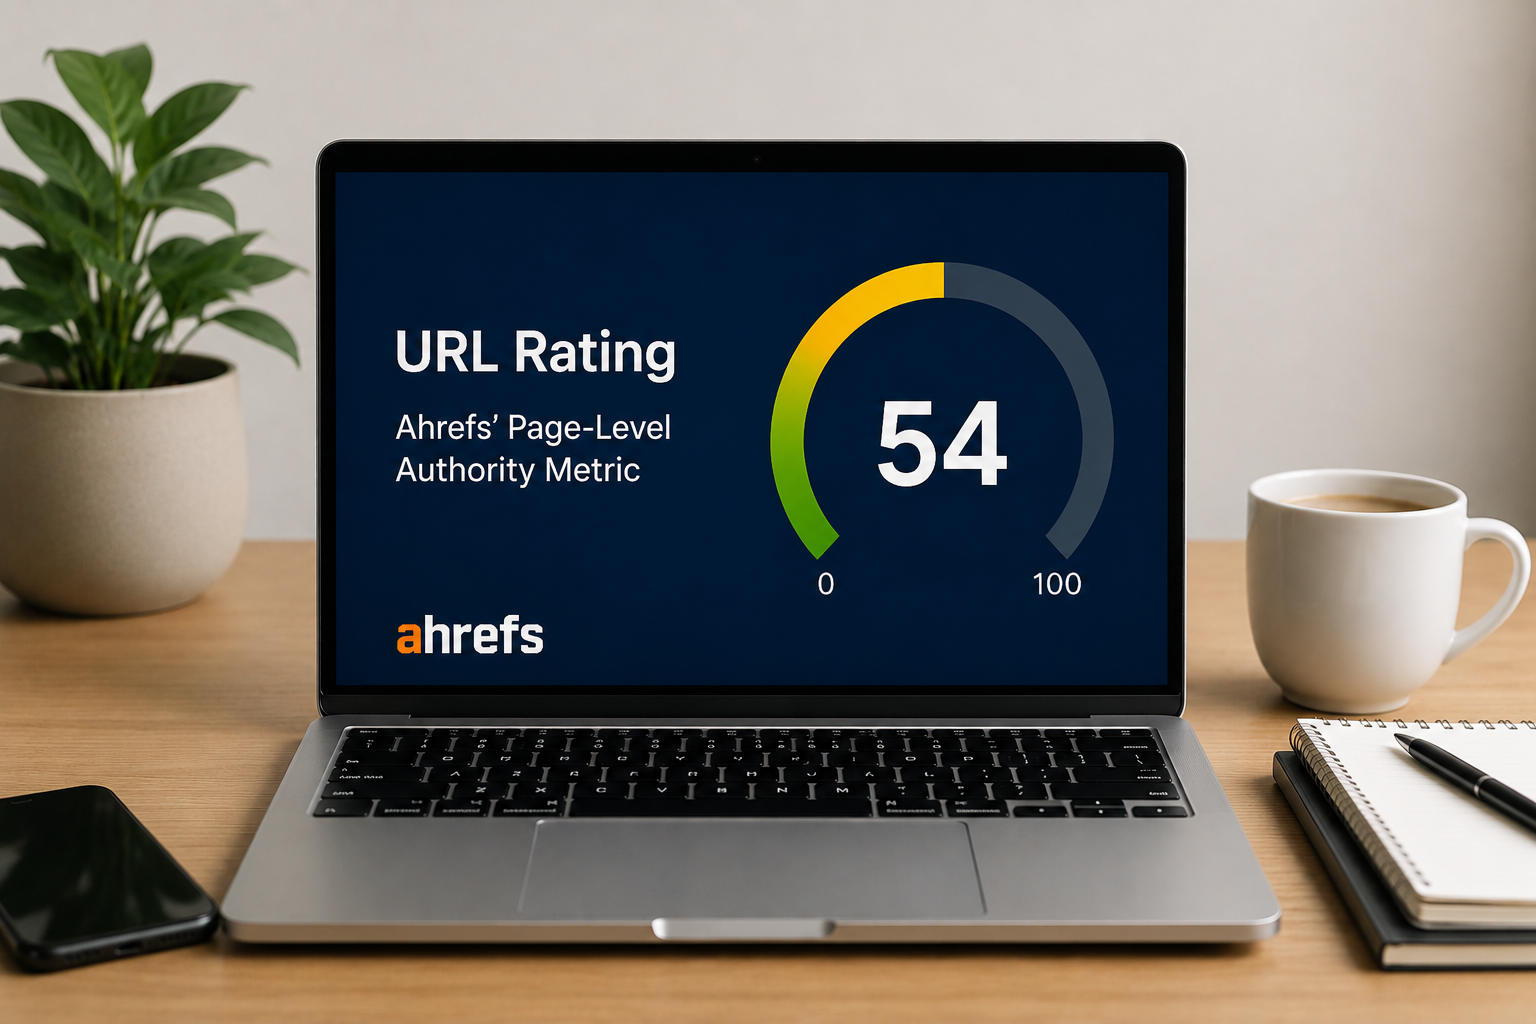
URL Rating (UR) is the 0 to 100 score Ahrefs attaches to every page, and it gets misread more than any other metric in the tool. This guide covers what UR actually measures, the three calculation rules Ahrefs documents publicly, and the one lever that raises it for free: internal links.
URL Rating (UR) is an Ahrefs metric that measures the strength of a single page’s backlink profile on a logarithmic scale from 0 to 100. It is a third-party metric, not a Google ranking factor, and it works on principles similar to Google’s PageRank (Ahrefs SEO Glossary).
Two clarifications before anything else. Google does not use UR, or any Ahrefs metric, to rank pages. And UR is strictly page-level: it scores one URL, not the domain it lives on.
That page-level focus is what makes it useful. When you need a fast read on how much link equity a competing URL has earned, through backlinks and other off-page SEO signals, UR is the quickest proxy available.
How Ahrefs calculates UR
Ahrefs doesn’t publish the exact UR formula. It does document the rules, and the calculation follows the same principles as PageRank: counting links between pages, weighting them differently, and applying a damping factor (Ahrefs’ SEO metrics glossary).
Three of those rules change how you should act on the metric.
Only dofollow links pass UR
Ahrefs states it plainly: “Only ‘dofollow’ links pass UR” (Ahrefs). Links tagged nofollow, sponsored, or UGC transfer nothing.
The practical implication: 100 nofollow mentions from press coverage won’t move your UR. Five dofollow links from strong pages will.
That doesn’t make nofollow links worthless. They still send referral traffic and help discovery. They just don’t feed this metric.
Internal links count too
Ahrefs confirms that “both internal and external backlinks are taken into account when calculating URL Rating (although ‘weighted’ differently)” (Ahrefs).
Half the articles ranking for this topic mention that in passing. Almost none draw the conclusion: internal links affect UR but do not affect DR, which makes them the only UR lever you control 100%, at zero cost.
Link from your highest-UR page to the page you want to push, and that page’s UR benefits. No outreach, no budget, no waiting on a journalist. The step-by-step is in the how to increase section below.
The scale is logarithmic
Moving from UR 10 to 20 takes far less link equity than moving from 60 to 70. Each step up the scale gets progressively harder.
The benchmarking consequence: never compare absolute deltas across different ranges. A competitor jumping from UR 55 to 60 gained far more equity than your page moving from 15 to 20, even though both moved 5 points.
URL Rating vs Domain Rating: what’s the difference?
Both metrics run on a 0 to 100 logarithmic scale. The difference is scope, and it changes what each one is for.
Aspect
URL Rating (UR)
Domain Rating (DR)
Scope
One page’s backlink profile
The whole domain’s backlink profile
Internal links
Count toward UR
Don’t count toward DR
Typical use
Sizing up a competing URL in the SERP
Vetting a domain for link building
Speed of change
Faster: page-level links and internal linking move it
Slower: needs new referring domains
Can one exceed the other?
A viral page’s UR can top its domain’s DR
A DR 80 site can host UR 0 pages
The table’s last row deserves emphasis because it trips people up in both directions. A DR 80 domain routinely publishes new pages that start at UR 0 to 5: domain authority is not inherited per page.
The inverse also happens. A page that goes viral and attracts dozens of dofollow links of its own can carry a UR higher than its domain’s DR. Free tools and data studies do this constantly.
In practice, SEOs use UR to evaluate specific competing URLs in a SERP and DR to qualify domains during link prospecting. Different questions, different metric.
What is a good UR score?
As a rough rule: UR 20+ is decent, and UR 40+ indicates a strong page-level backlink profile.
Treat those numbers as loose calibration, not targets. The only benchmark that matters is the UR of the pages ranking in the top 5 for your keyword. If the top 5 sits at UR 8 to 15, a UR 25 page is heavily armed. If the top 5 sits at UR 60+, UR 40 is underpowered.
No UR value guarantees a ranking. The metric is relative by design, the same argument Ahrefs makes about judging DR in its own documentation. Check your SERP first, then decide whether the page needs more equity.
Does URL Rating affect Google rankings?
No. UR is not a ranking factor. Google doesn’t consume Ahrefs metrics, and no third-party score sits in the algorithm.
But the correlation is real and documented:
“Our studies show that the URL Rating has a clear positive correlation with Google rankings.” (Ahrefs SEO Glossary)
The explanation is unglamorous. UR approximates what PageRank measures, so pages with strong link equity tend to score high on both. Ahrefs is careful with the same nuance on its authority studies, noting its 218,713-domain correlation study “does not prove causation.” Even Google’s John Mueller, while denying “domain authority” as a factor, has acknowledged a sitewide score that “maps to similar things” (via Ahrefs).
So read it this way: links are the cause, UR is the summary. Build the links, and both UR and your organic traffic tend to follow.
How to check the UR of any page
If you pay for Ahrefs, paste any URL into Site Explorer and UR appears at the top of the Overview. For competitor spying, the SERP overview inside Keywords Explorer lists the UR of every top-ranking result for a keyword, which turns benchmarking the top 5 into a ten-second job.
Without a subscription, the Ahrefs SEO Toolbar browser extension paired with a free Ahrefs account shows DR and UR for any page you visit. Note that Ahrefs’ free Website Authority Checker returns domain-level DR, not page-level UR.
How to increase your URL Rating
There are two levers: one free (internal links) and one that costs time or money (backlinks). Internal linking comes first here deliberately, because it’s the one you can pull this afternoon, ideally as part of a broader plan to improve SEO on your website.
Strengthen your internal linking
Since internal links pass UR, the most actionable fix is redistributing equity you already own:
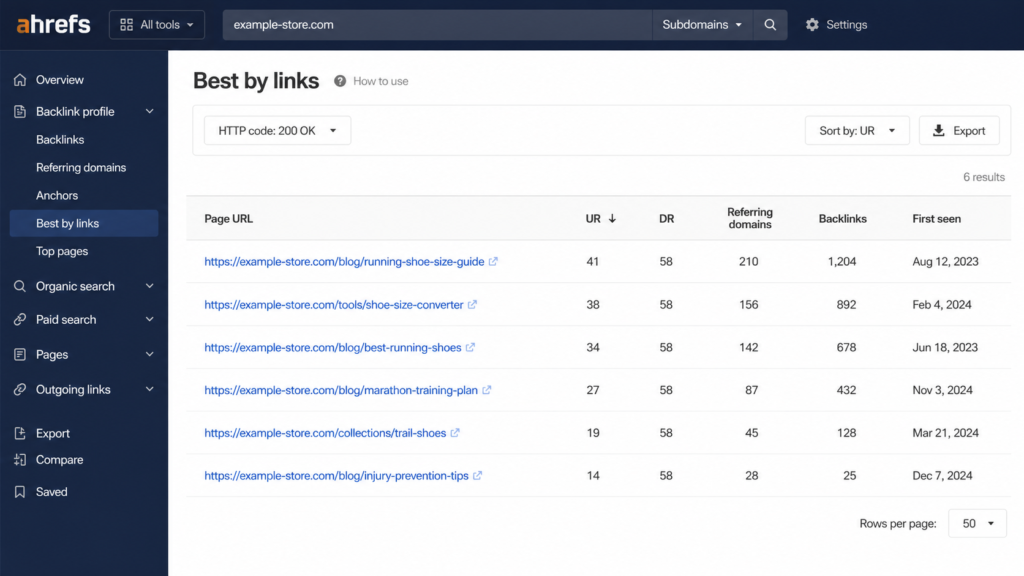
Open the Best by links report in Ahrefs Site Explorer, sorted by UR, to find your strongest pages.
Add contextual dofollow links from those pages to the page you want to push.
Keep the target page within 3 clicks of the homepage.
Re-check UR after the next Ahrefs crawl update.
Pages buried 4+ clicks deep receive little internal equity and are slower to get discovered, a problem that overlaps with crawling and indexing issues. Contextual links from body copy beat footer or sidebar links, which is exactly the pattern the weighting rewards.
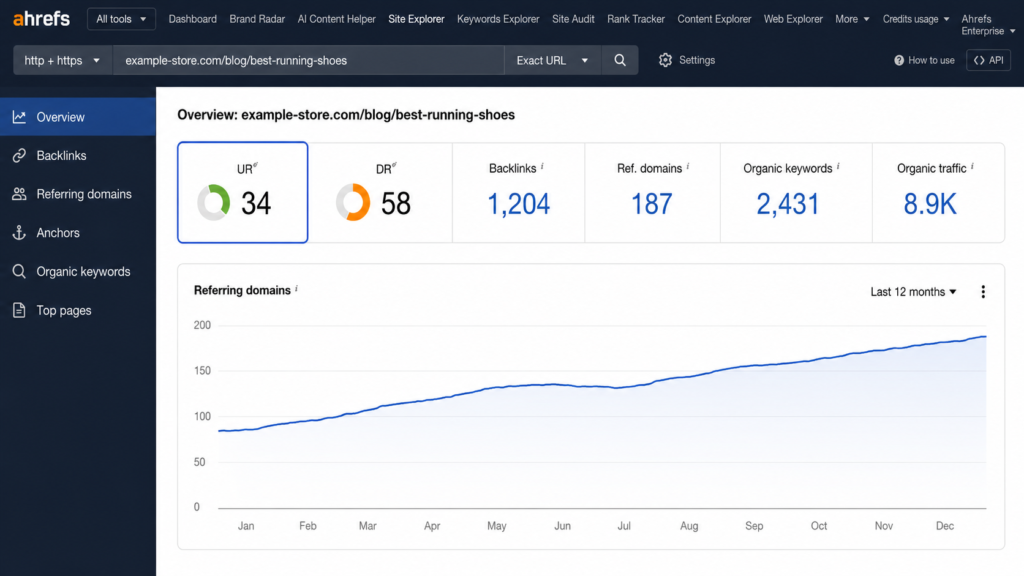
Caption: Best by links sorted by UR reveals which pages have equity to spare: the top three here are the donor pages for internal links.
Earn quality backlinks to the page
The paid-in-effort lever. The tactics that reliably earn dofollow links to a specific page are the unglamorous ones: linkable assets (original data, free tools, reference guides), digital PR, and broken link building.
The evidence favors focusing here: across roughly 920 million pages studied, Ahrefs found the number of referring domains to a page is the strongest correlating backlink factor for rankings (Ahrefs).
One filter before you celebrate any placement: only dofollow links pass UR. A nofollow mention in a major publication may be great for the brand, but it won’t move this metric. No tactic here works on a predictable timeline, and anyone promising one is selling something.
Fix broken links and redirect chains
Equity leaks. When links point at 404s, or pass through chains of redirects before reaching the destination, part of the value never arrives at the page.
Crawl the site with Ahrefs Site Audit (or your crawler of choice), consolidate redirect chains into single 301s, and repoint internal links straight at final URLs. It’s the same hygiene that helps you fix common SEO issues and optimize crawl budget, and it protects the equity you already earned.
High UR is only half the battle: make Google understand the page
UR tells you how much authority a page has accumulated. It says nothing about whether search engines understand what the page is. That job belongs to structured data: the JSON-LD markup that tells Google and AI engines whether your URL is a product, a review, an FAQ, or a how-to, and makes it eligible for rich results and AI citations.
A page with UR 45 and no schema competes as one more blue link.
If your pages run on WordPress, Schemafy generates valid JSON-LD across 16 schema types without writing code, and you can verify the output with Google’s Rich Results Test. Pair the authority you’ve built with markup that machines can parse; how to use schema markup covers the implementation side. Learn more at schemafy.net.
FAQs about URL Rating
Is URL Rating a Google ranking factor?
No. URL Rating is a third-party metric created by Ahrefs, and Google doesn’t use it. However, UR approximates the same link signals Google’s PageRank measures, which is why Ahrefs’ studies show a clear positive correlation between higher UR and better organic rankings.
What is the difference between UR and DR?
UR (URL Rating) measures the backlink strength of a single page, while DR (Domain Rating) measures the strength of an entire domain’s backlink profile. Internal links affect UR but not DR, so a strong site can still have individual pages with very low UR.
What is a good URL Rating?
As a rough benchmark, a UR of 20+ is decent and 40+ indicates a strong page-level backlink profile. The more useful benchmark is competitive: check the UR of the pages ranking in the top 5 for your target keyword and aim for that range.
Why is my page’s UR higher than my site’s DR?
Because they measure different things. A single page can attract many strong dofollow backlinks (a viral post, a free tool) while the rest of the domain has few. Internal links also boost UR without touching DR, widening the gap further.
How can I increase URL Rating for free?
Through internal linking. Find your highest-UR pages in Ahrefs (Best by links), then add contextual internal links from them to the page you want to strengthen. Only followed links pass UR, and internal links are the one lever you fully control at zero cost.
Final thoughts
UR is a thermometer for page-level link equity: read it against the top 5 for your keyword, never as an absolute number, and remember that the cheapest way to raise it is the internal linking lever most sites ignore.
The next step takes ten minutes. Pull the UR of the pages outranking you, compare, and if the gap is closable, start moving internal links from your strongest pages this week. And once the authority is there, make sure Google actually understands the page: with a tool like Schemafy, adding the structured data layer takes minutes, not a sprint.
Most guides treat a Google Merchant Center account as a form you fill once. Create it, upload a feed, done in 20 minutes.
The account is the easy part. Keeping products approved is the real work, because Google crawls your product pages and checks that your feed, your landing page, and your structured data all say the same thing. That check is where most new WooCommerce stores fail. This guide covers both halves.
What is a Google Merchant Center account?
A Google Merchant Center account is a free account where you upload and manage the product data Google shows across Search, Shopping, Maps, and YouTube. It is the data source behind both free product listings and paid Shopping ads, not an advertising channel by itself.
Think of it as the layer between your store and every Google surface that displays products. Your WooCommerce catalog feeds Merchant Center, and Merchant Center feeds Google. It is also where Google checks that your prices, availability, and images match what shoppers actually see on your site. Google’s own Get started with Merchant Center doc covers the basics; this guide covers the WooCommerce specifics it skips.
Is Google Merchant Center free?
Yes. Creating the account, uploading products, and appearing in free listings costs $0, per Google’s documentation.
You only pay if you run Shopping ads, and that billing happens in a linked Google Ads account, not in Merchant Center. The two get confused constantly: Merchant Center holds your product data, Google Ads spends your budget. You can use the first without ever touching the second.
Free listings vs Shopping ads: what the account actually gets you
One account powers two very different distribution channels. Here is how they compare:
Free listings
Shopping ads
Where they appear
Shopping tab, Search, Maps, YouTube
Shopping tab, Search results, partner sites
Cost
$0
Pay-per-click budget
Feed requirements
Same product data spec
Same product data spec
Google Ads account
Not required
Required (linked)
For a WooCommerce store with 100 to 1,000 products, free listings alone justify the account. Your products become eligible to appear in the Shopping tab with zero ad spend, and you can add paid campaigns later for the products that earn impressions. If you manage stores for clients, this is also the cleanest pitch for setting up Merchant Center on day one, before there is any ad budget to argue about.
What you need before creating your account
Have these five things ready before you start. Missing any of them causes rejections later:
A Google account (one Merchant Center account per Google account)
An active website with product pages shoppers can buy from online
A visible returns policy and contact information
A working checkout with SSL
Product data on the site that matches what you plan to submit
One warning from Google’s setup documentation deserves bold type: the country you select during account setup cannot be changed later. If you sell across markets, or you are setting up accounts for clients in different countries, choose deliberately. Fixing a wrong country means creating a new account from scratch.
How to create a Google Merchant Center account, step by step
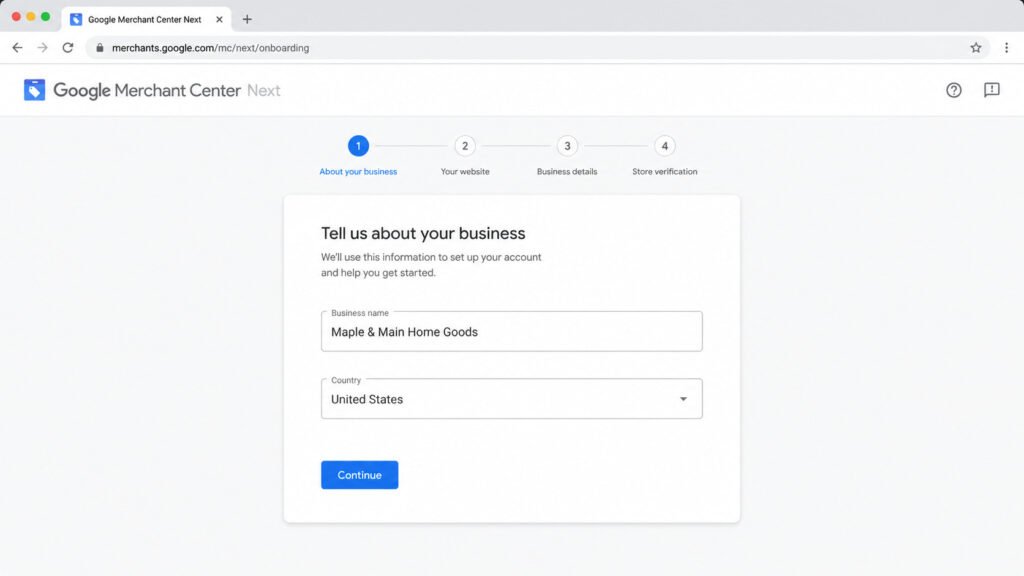
The four steps below take roughly 20 minutes in the current interface (Merchant Center Next). If you run an agency, budget that 20 minutes per client store: the process repeats identically for every domain.
Caption: Merchant Center Next onboarding asks for business details first. The name you enter here appears on your listings.
Step 1: Sign in and add your business details
Go to merchants.google.com and sign in with the Google account that should own the store’s data. One Google account can create one Merchant Center account, per Google’s documentation, so agencies should use the client’s account rather than their own. You will enter a business name, country, and time zone.
The business name is not cosmetic. It appears on your listings, and Google cross-references it against your website. Use your brand name exactly as it appears on your site. A store called “Maple & Main” on the site and “MM Retail LLC” in Merchant Center reads as an inconsistency, and inconsistencies feed the misrepresentation checks covered later in this guide.
Step 2: Verify and claim your website
Verification proves you control the domain. Google’s Configure your accounts doc lists four methods: an HTML tag added to your homepage, Google Tag or Google Analytics if already installed, Google Search Console, or an HTML file upload.
For WordPress stores, Search Console is the shortcut. If your site is already verified there, Merchant Center picks up the verification with one click and nothing new touches your theme. Otherwise, the HTML tag goes in your site’s head section.
Two details trip people up. First, verifying and claiming are separate actions: verification proves control, claiming binds the domain to this specific Merchant Center account. Complete both. Second, only one account can claim a domain at a time, which matters the moment an agency and a client both create accounts.
Step 3: Configure shipping, returns, and tax
These are the settings that silently block listings when they are missing or wrong. Configure shipping with the rates you actually charge, not optimistic estimates. Add your return policy and link it to the policy page on your site. United States sellers also configure tax settings here.
Google compares the shipping cost a shopper sees at your checkout with the cost you declared in Merchant Center, as part of its landing page requirements. A $4.99 declared rate against a $7.99 checkout rate is a mismatch, and mismatches become disapprovals. When in doubt, declare the higher rate.
Step 4: Add your WooCommerce products
This is where the generic guides go Shopify-first and leave WooCommerce owners guessing. You have three ways to get products into Merchant Center:
A file or Google Sheets feed built to the product data specification, maintained by hand or by a feed plugin.
Manual entry in the Merchant Center interface, viable only for catalogs under a couple dozen products.
For a store with 100 to 1,000 products, use the extension. Then audit the attributes Google requires before you sync: id, title, description, link, image_link, price, availability, brand, and GTIN or MPN. The extension maps most of these from WooCommerce fields automatically, but only if those fields are filled. Empty brand and GTIN fields are the single most common gap, and they matter enough to get their own section below.
How Google verifies your product data (and where stores fail)
Submitting a feed is not the finish line. After you sync, Google crawls your product landing pages and compares what it finds against what you submitted. Price, availability, images, all of it. If you want the background on how that crawling works, we cover it in how Google crawls your pages. Large catalogs should also make sure those recrawls aren’t wasting crawl budget on duplicate or filtered URLs.
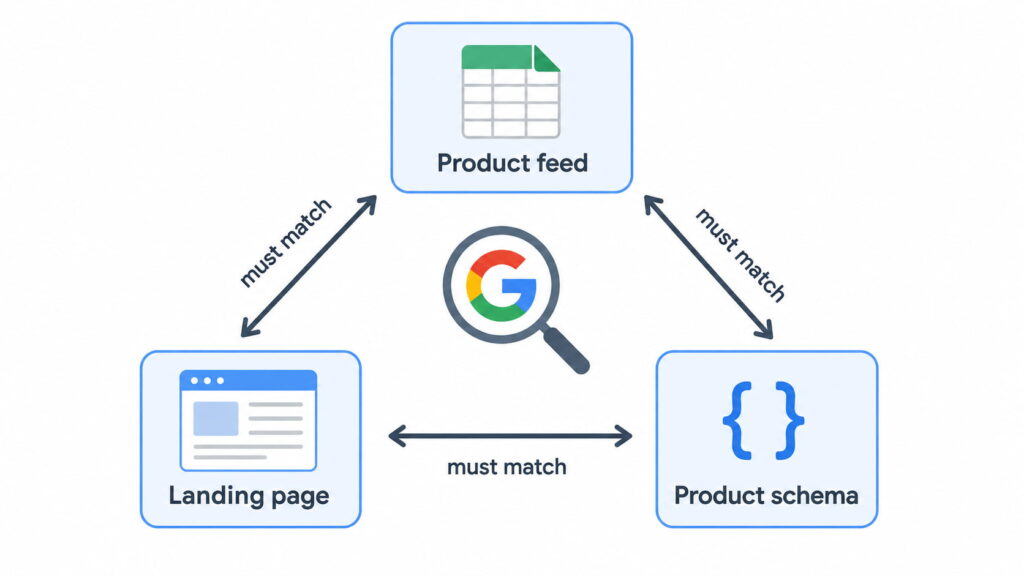
This creates a triangle that has to stay consistent: the feed, the visible page, and the page’s structured data. Most disapprovals for new stores trace back to one corner of that triangle drifting from the other two.
Caption: Google checks all three corners. A price change that reaches one corner but not the other two becomes a disapproval.
Feed, landing page, and Product schema must tell the same story
Google does not only read your page visually. Its structured data documentation for Merchant Center states that markup must be present in the HTML returned by the server, cannot be generated by JavaScript after the page loads, and must match the values shown to the user. Google recommends JSON-LD and uses schema.org markup to read price, availability, and product identifiers directly from your pages.
The technical requirements are specific. Your product page should carry one Offer, or, if it lists several, each offer needs a SKU or GTIN that matches the feed. The Offer itself must include price, priceCurrency, and availability. If you are new to this layer, start with what structured data is. You can also build a valid Product block by hand with a free schema markup generator.
This is where a schema plugin earns its place in an e-commerce stack. A plugin like Schemafy generates the Product schema with its offers by reading price, stock, and ratings directly from your WooCommerce fields, so the markup updates when the product updates and never tells Google a different story than your feed. You can monitor how Google reads that markup in Search Console’s Merchant Listings report.
GTIN, MPN, and Brand: the identifiers that gate your listings
Three identifiers decide how well Google matches your products. GTIN (the global barcode number), MPN (the manufacturer’s part number), and Brand. The rule from Google’s supported attributes documentation: submit the GTIN if the product has one; if it does not, submit MPN plus Brand as the fallback.
Skip them and you pay three times. Matching gets worse, so your products land next to the wrong competitors. You lose eligibility for enriched listings. And in strict categories, missing identifiers become outright disapprovals.
The WooCommerce-specific failure is quieter: WooCommerce has shipped a native “GTIN, UPC, EAN, or ISBN” field on the product Inventory tab since version 9.2, supported by the Google for WooCommerce extension, for both simple products and variations. Most stores never fill it. Those same fields are what your Product schema should expose, and Schemafy maps them into the markup without manual editing. For the broader context on markup strategy, see our schema markup guide.
Common Merchant Center account problems and how to fix them
Three problems cover most of what goes wrong with a new account: item disapprovals, misrepresentation suspensions, and lost website claims. Each has a distinct symptom, cause, and fix. The debugging mindset is the same one you would use to fix common SEO issues: find the mismatch, correct the source, request re-review.
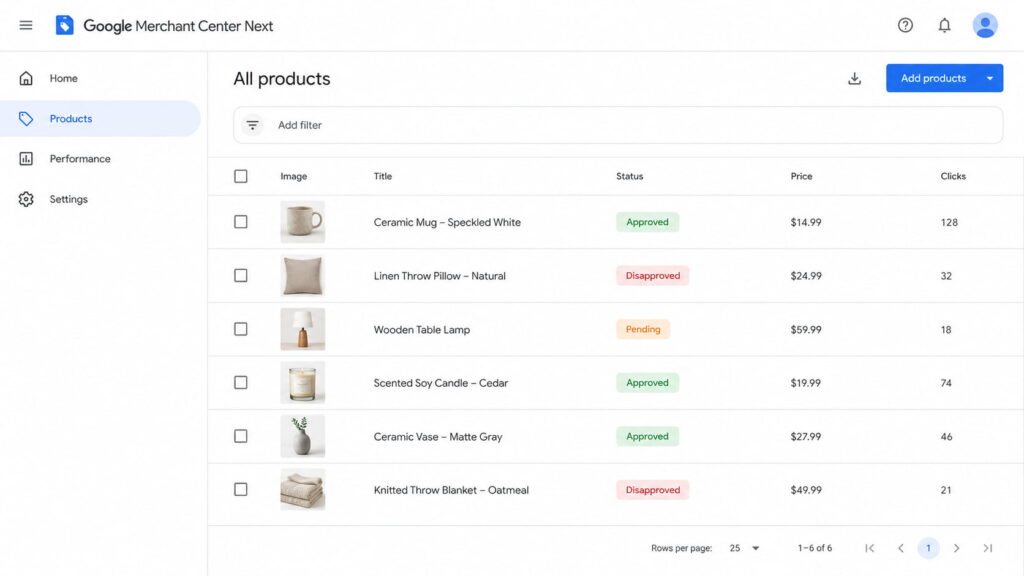
Caption: Products > All products is the first place to look. Disapproved items list the specific policy reason when clicked.
Item disapprovals: price and availability mismatch
Symptom: products flip to “Disapproved” in Products > All products, usually citing a price or availability mismatch. Per Google’s product status documentation, reviews take 3 to 5 business days for Shopping ads and can take weeks for free listings, so each disapproval-fix cycle is expensive.
Cause: in WooCommerce stores, the usual suspect is a page that no longer matches the feed. A cache or CDN serving yesterday’s price. A sale that started in WooCommerce but has not reached the crawled page. Variations whose prices differ from what the schema reports.
Fix: let the extension handle feed sync (it re-syncs on product edits automatically), purge your cache every time prices change, and run the affected URL through Google’s Rich Results Test to confirm the schema on the live page shows the same price and availability as the feed.
Misrepresentation suspensions
This is the account-level suspension that scares store owners most, partly because Google explains it least.
Cause: Google cannot verify the business is what it claims. Common triggers are missing contact information, missing or thin policy pages, a new domain with no external signals, and inconsistencies between feed, site, and checkout. Google’s guidance on keeping products approved points repeatedly at data consistency and transparency.
Fix: complete your business identity in Merchant Center, make contact details and policies visible on the site, and align your branding across feed, storefront, and checkout. Then request review and wait it out. Be realistic: reviews are slow, repeated failed reviews make things worse, and nobody can honestly promise fast reinstatement. Agencies onboarding brand-new client domains should set that expectation before the first sync, because new domains with no history trip these checks most often.
Website claim lost or verification failed
Symptom: Merchant Center reports the website is no longer verified or claimed, and listings stop.
Cause: the HTML verification tag was deleted during a redesign or theme change, a redirect chain broke the homepage check, or another Merchant Center account claimed the domain.
Fix: re-verify through Search Console, which survives theme changes because it is tied to the property rather than a tag in your template. If another account holds the claim, resolve ownership before fighting Google about it. For agencies this is a contract question as much as a technical one: decide up front whether the agency’s account or the client’s account owns the claim, and document it.
What changed in Merchant Center in 2026
The product data spec gets an annual update, and the 2026 round, published by Google, has three changes worth acting on.
Image quality became enforceable policy. The minimum resolution for image_link and additional_image_link rose to 500×500 pixels across all categories, with warnings running since April 14, 2026 and enforcement starting January 31, 2027. Audit your thumbnails now, before warnings become disapprovals.
Video became a real feed asset. Since June 30,2026, videos submitted through video_link are eligible to serve, and Google validates them for policy and quality. A failed video blocks the video, not the offer.
Shipping got product-level controls, including a handling cutoff time and a minimum order value attribute.
The direction is consistent: Google keeps tightening how product data is validated while Shopping surfaces expand into AI experiences. Consistent, machine-readable product data stops being a nice-to-have and becomes the entry ticket.
Final thoughts
Creating a Google Merchant Center account takes 20 minutes. What keeps your products live afterward is consistency: the feed, the landing page, and the Product schema telling Google the same price, the same stock, the same brand, every day.
If you are starting today, the order matters. Create the account, verify through Search Console, connect the Google for WooCommerce extension, and fill in GTIN and Brand on your products before you sync anything. Stores that do the identifier work first skip most of the disapproval cycle entirely. If you manage multiple client stores, turn that order into your standard onboarding checklist, because every shortcut taken during setup resurfaces later as a policy flag.
[CTA_DOWNLOAD]
Frequently asked questions
What is a Google Merchant Center account?
A Google Merchant Center account is a free account where you upload and manage the product data Google shows across Search, Shopping, Maps, and YouTube. It feeds both free product listings and paid Shopping ads, and it is where Google checks that your prices, availability, and images match your website.
Is a Google Merchant Center account free?
Yes. Creating the account, uploading products, and appearing in free listings cost nothing. You only pay when you run Shopping ads through a linked Google Ads account. For many WooCommerce stores, free listings alone justify setting up Merchant Center even with no ad budget.
Do I need a website to use Google Merchant Center?
Yes, in practice. Google requires an active website with product pages you verify and claim during setup, and it crawls those pages to confirm your feed data matches. Your site also needs visible contact information, a returns policy, and a secure checkout to stay in good standing.
Do I need Google Ads to use Merchant Center?
No. Free product listings work through Merchant Center alone. You only need a linked Google Ads account if you want to run paid Shopping campaigns. Many stores start with free listings, measure which products get impressions, and add paid campaigns later for the winners.
How long does Merchant Center verification take?
Website verification is usually instant if you use Google Search Console or a tag already on your site. Product review takes 3 to 5 business days for Shopping ads and can take a few weeks for free listings, and account-level reviews such as a misrepresentation check can take longer still.
Can I change my Merchant Center account country later?
No. The country you select during account setup cannot be changed afterward, so choose carefully if you sell across markets. You can add additional target countries for your feeds, but the account’s base country is permanent; changing it means creating a new account.
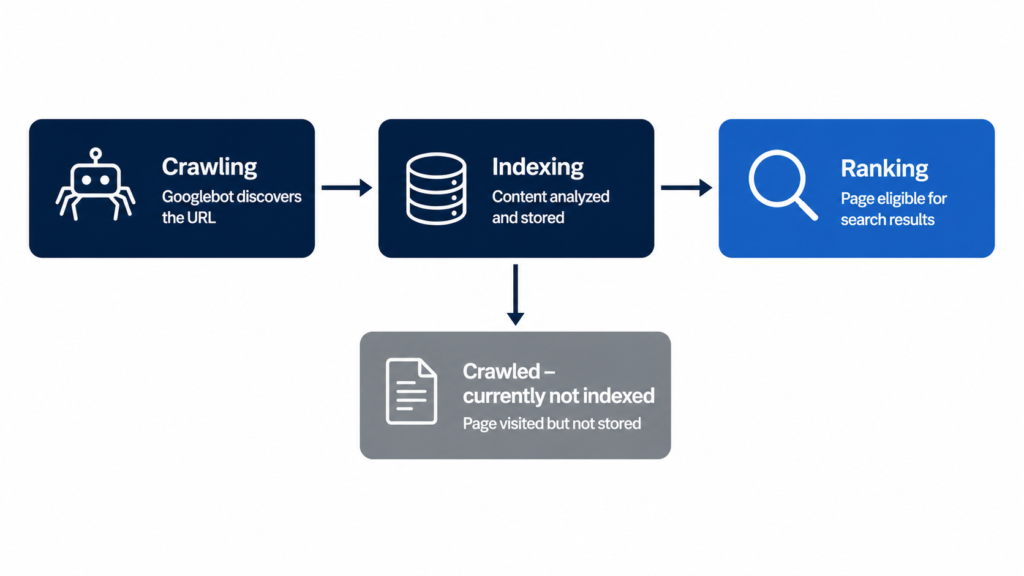
Crawling is how Google discovers your pages; indexing is how it stores them and decides whether to show them in search results. A page can be crawled and still never get indexed, and that gap is exactly where traffic dies. This guide covers the difference in about 2 minutes, then gets to the useful part: diagnosing and unsticking pages that Google visited but refused to index.
Crawling is the discovery process. Bots like Googlebot and Bingbot (also called crawlers or spiders) follow links and read sitemaps to find new or updated URLs. Think of a librarian walking the aisles noting which books exist: nothing is evaluated yet, only discovered.
Google’s own documentation describes this as the first of three stages, crawling, indexing, and serving, and warns that not every page makes it past each stage (source: How Google Search Works).
One more constraint worth a line: crawl budget. On large sites, Google doesn’t crawl everything. If you run thousands of programmatic URLs, some of them simply wait their turn.
What Is Indexing in SEO?
Indexing is what happens after the visit. Google analyzes the crawled content, the text, the title, alt attributes, structured data, then decides whether to store the page in its index.
Treat indexing as a quality filter, not a formality. Only indexed pages can rank. During this stage Google also determines whether a page is a duplicate or the canonical version, and only the canonical is eligible to appear in results (source: How Google Search Works).
Indexing is also where Google processes your structured data and your meta description in WordPress, along with the rendered HTML and the site’s quality signals. Everything the indexer can’t parse cleanly counts against clarity.
Crawling vs Indexing: The Key Differences at a Glance
Here is the whole distinction in one table:
Aspect
Crawling
Indexing
Purpose
Discovering new and updated URLs
Storing and evaluating content
Done by
Crawlers (Googlebot, Bingbot)
Google’s indexing systems
Order
First step
Second step, after crawling
Frequency
Continuous
Re-evaluated after each crawl
What improves it
Internal links, clean sitemaps
Content quality, uniqueness, clarity
Result
URL known to Google
Page eligible to rank
The practical takeaway: crawling problems are architecture problems. Indexing problems are quality problems. Fixing the wrong one wastes your sprint.
“Crawled – Currently Not Indexed”: Why Google Skips Pages
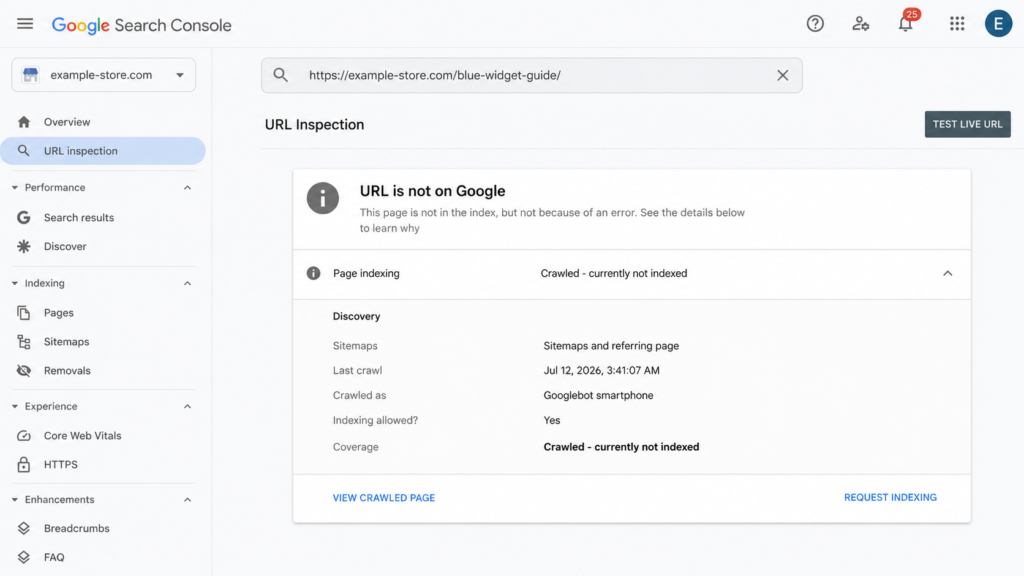
Crawled – currently not indexed is the Google Search Console status behind most “why isn’t my page ranking” questions. It means exactly what it says: Googlebot visited the page, evaluated it, and decided it wasn’t worth a spot in the index. For now.
The status is not permanent and it is not a bug. It’s a documented, massive-scale quality decision, covered in depth by Onely and SEOTesting. Improve the page and Google can re-evaluate it on a future crawl.
The most common causes
Five patterns account for most of these exclusions:
Thin or duplicate content: pages that add nothing the index doesn’t already have.
Barely-edited AI content at scale: the number one trigger in 2026; volume without editing reads as noise.
Orphan pages: no internal links pointing at them, so nothing signals they matter.
Low site-wide quality perception: weak sections drag down Google’s appetite for the rest.
Rendering problems: content that never appears in the rendered HTML can’t be evaluated.
Two more patterns show up in the documented cases: conflicting indexing signals (a canonical tag pointing one way while internal links point another) and pages that were indexed in the past and then quietly dropped when Google re-evaluated them.
None of these are edge cases. They are the standard failure modes documented across the industry guides linked above. Each one has a visible symptom in Search Console, which is why the next step is always the same: inspect the exact URL and read what Google actually saw.
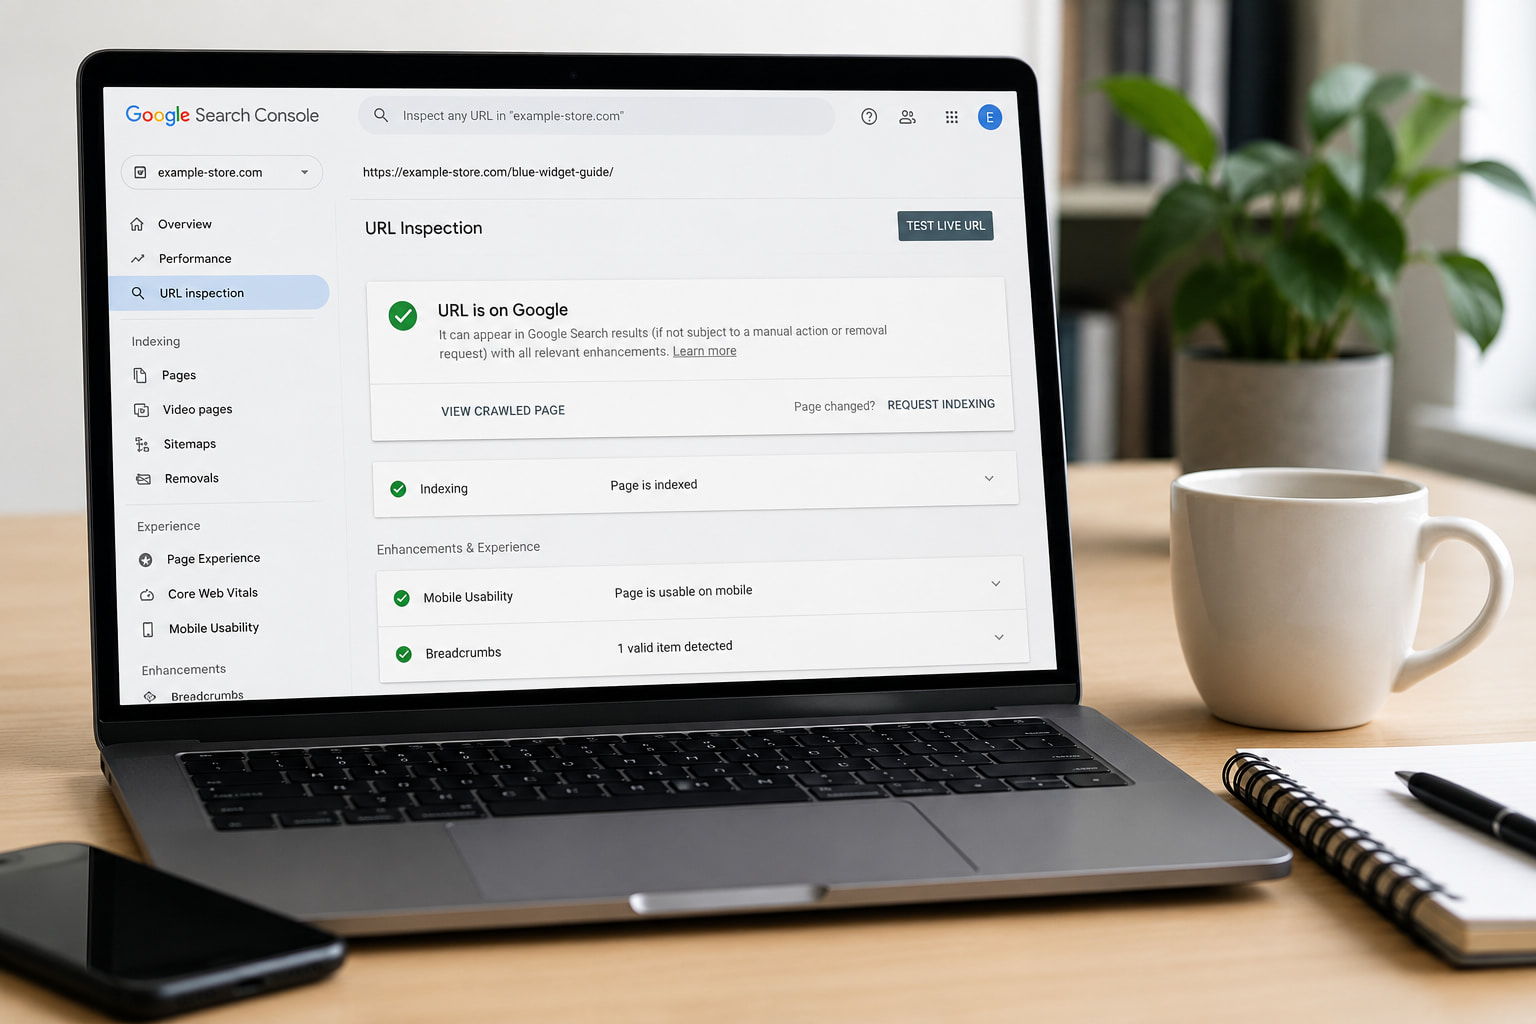
How to check any page in Google Search Console
Paste the full URL into URL Inspection.
Read the verdict: indexed, or one of the “not indexed” statuses.
Click View Crawled Page and compare the rendered HTML against what you see in the browser. Missing content here means a rendering problem, not a quality problem.
Improve the page first, then click Request Indexing (see Google’s guide to asking for a recrawl). Requesting indexing without changing anything does nothing.
How to Get Your Pages Crawled and Indexed Faster
Two levers, and they are different levers. Crawling is fixed with architecture. Indexing is fixed with quality plus clarity. The four fixes below split cleanly along that line.
Match the fix to the status you’re seeing. “Discovered, currently not indexed” and slow first crawls point at the architecture side: links and sitemaps. “Crawled, currently not indexed” points at the quality side: content and clarity. Working the wrong lever is the most common way to lose a month on this.
Fix your internal linking
Internal links from strong pages do two jobs at once: they give crawlers a discovery path and they signal that the linked page matters. “Strong” means pages that already rank or attract links: your homepage, your top guides, your category hubs. A practical rule: no page more than 3 clicks from the homepage, and zero orphans.
Programmatic sites deserve a special warning. Templates generate orphan pages in bulk, and a clean SEO slug won’t rescue a page nothing links to. Breadcrumbs help too: they hand crawlers your architecture on a plate.
Submit and clean your XML sitemap
Your sitemap is a priority list for the crawler, so treat it like one. Only indexable URLs belong in it: no redirects, no 404s, no noindexed pages. Submit it in Search Console.
One tactic worth knowing: a temporary sitemap containing only your stuck URLs. It concentrates crawler attention on exactly the pages you want re-evaluated.
Cut thin and duplicate content
Consolidate near-identical pages: add a canonical tag or merge them outright. Delete pages with no search value at all.
The honest version of this advice: if a page doesn’t deserve to be in Google, Google already decided that for you. The status report is the receipt.
Add structured data so Google understands the page
Schema markup doesn’t force indexing. Nobody can promise that. What it does is remove ambiguity: it tells the indexer exactly what the page is (a Product, an Article, a FAQPage, a LocalBusiness) and makes it eligible for rich results. Google states directly that it “uses structured data that it finds on the web to understand the content of the page” (source: Google Search Central), and its own case studies on that page report results like Rotten Tomatoes measuring a 25% higher click-through rate on pages with structured data, and Nestlé measuring an 82% higher click-through rate on pages showing as rich results.
If you’d rather not hand-write JSON-LD, Schemafy generates it for 16 schema types and verifies the output with Google’s Rich Results Test; the full walkthrough is in our guide on how to use schema markup, and there’s a free schema markup generator if you want to test a page right now.
Do AI Crawlers Work the Same Way? (GPTBot, ClaudeBot & Friends)
AI answer engines run their own crawlers, and they inherit the same two-step problem: first discover the page, then understand what it is.
OpenAI operates 3 separate crawlers, each with its own job: GPTBot for model training, OAI-SearchBot for ChatGPT search, and ChatGPT-User for live fetches during a conversation (source: OpenAI crawler documentation). Anthropic’s ClaudeBot honors robots.txt and is controlled with its own User-agent: ClaudeBot directive (source: Anthropic); Anthropic also runs separate search and user-request bots, and each one needs its own robots.txt line (via Search Engine Journal). Perplexity’s PerplexityBot rounds out the list you’ll see most often in server logs.
The separation matters in practice. You can allow OAI-SearchBot so your pages can show up in ChatGPT’s search answers while disallowing GPTBot to keep your content out of training data, and OpenAI notes that robots.txt changes take roughly 24 hours to propagate to its systems (source: OpenAI crawler documentation). The same logic applies to Anthropic’s three bots: allowing ClaudeBot does nothing for Claude-SearchBot or Claude-User.
There’s no classic Google-style index behind these engines, but there is retrieval, and an ambiguous page gets skipped either way. A page these bots can fetch but can’t classify is in the same position as a page Google crawls but doesn’t index: technically visible, practically invisible. This is the core idea behind generative engine optimization: the same clarity that earns you indexing earns you citations.
The efficient part: the JSON-LD you write for Google is the same signal these engines parse. You build it once and it covers both. Two practical checks: confirm your robots.txt isn’t blocking these user agents by accident, and remember that allowing one bot from a vendor does nothing for its siblings.
Make Every Page Machine-Readable Before Google Decides
Crawling is getting found. Indexing is getting understood and stored. The first is fixed with links and a sitemap; the second, with clear, machine-readable content.
That second half is what Schemafy does: it generates valid schema across your whole site (from a template, with AI, or in bulk), verifies it with Google’s Rich Results Test, and runs alongside Yoast and Rank Math. Can we promise indexing? No. But a page Google can’t understand is a page Google can skip.
[CTA_DOWNLOAD]
FAQs About Crawling and Indexing
What happens first, crawling or indexing?
Crawling always happens first. Googlebot has to discover a URL, through links or your sitemap, before Google can analyze and store it. Indexing is the second step, where Google evaluates the crawled content and decides whether it’s worth adding to its index. No crawl, no index.
Can a page be crawled but not indexed?
Yes, and it’s common. Google Search Console reports it as “Crawled – currently not indexed”: Googlebot visited the page but decided it didn’t add enough value to store. Thin content, duplicates, and weak internal linking are the usual causes. It’s not permanent. Improve the page and Google can re-evaluate it.
How long does it take Google to index a new page?
Anywhere from a few hours to several weeks. Sites with strong authority and frequent updates get crawled and indexed faster. You can speed things up by linking to the new page from important pages, including it in your sitemap, and requesting indexing via URL Inspection in Search Console.
How do I check if my page is indexed?
Paste the full URL into the URL Inspection tool in Google Search Console. It tells you whether the page is indexed and why not if it isn’t. For a quick check without Search Console, search site:yourdomain.com/your-page on Google: if it appears, it’s indexed.
Does schema markup help with indexing?
Schema markup doesn’t force Google to index a page, but it removes ambiguity: it tells the indexer exactly what the page is, a product, an article, a local business. Google confirms it uses structured data to understand pages, and clearly understood pages are eligible for rich results.
Five numbers written down before any changes are made. That snapshot is what turns the traffic went upinto this change worked.
You have probably read five different lists of SEO tips. The problem was never the tips. It was that nobody told you what order to do them in.
This guide on how to improve SEO on your website is sequenced by dependency, not popularity. Publishing new content does nothing if Google cannot index the site.
In 2026 that sequence ends somewhere new: not just ranking, but getting cited by AI systems. A copyable checklist waits at the end.
How to Improve SEO on a Website (Short Answer)
To improve SEO on a website: fix crawling and indexing issues, match each page to search intent, optimize titles, headings and internal links, refresh existing content, add schema markup, earn authority signals, and track results in Search Console. Work in that order, because later steps depend on earlier ones.
Each step assumes the one before it is done. Skipping ahead is how sites end up with beautifully optimized pages that Google never indexed.
Step 1: Get an SEO Baseline Before You Change Anything
Before you touch a single title tag, write down five numbers:
Clicks over the last 28 days (Search Console)
Impressions over the last 28 days (Search Console)
Average position across the whole property
Pages indexed versus pages not indexed
Core Web Vitals status: how many URLs are Good, Needs Improvement, and Poor
This takes about fifteen minutes and it saves months of guessing.
Without a snapshot you cannot prove a gain was yours, and you cannot tell a drop you caused from a drop that came with a core update. When a client asks why traffic fell in week six, “here is what the site looked like in week one” is the only answer that holds up.
Everything you need is free: Google Search Console, Google Analytics 4, and PageSpeed Insights. Save the five numbers in a dated row in a spreadsheet. You will compare against that same row in step 12.
Step 2: Fix Your Technical SEO Foundation
The best page on the internet does not rank if Google cannot crawl it, index it, or load it. Technical SEO is not the part that wins you rankings. It is the part that makes every other step possible.
Three checks handle most of it: what Google has actually indexed, how fast the site loads, and whether duplicate URLs are splitting your signals.
Check What Google Actually Has Indexed
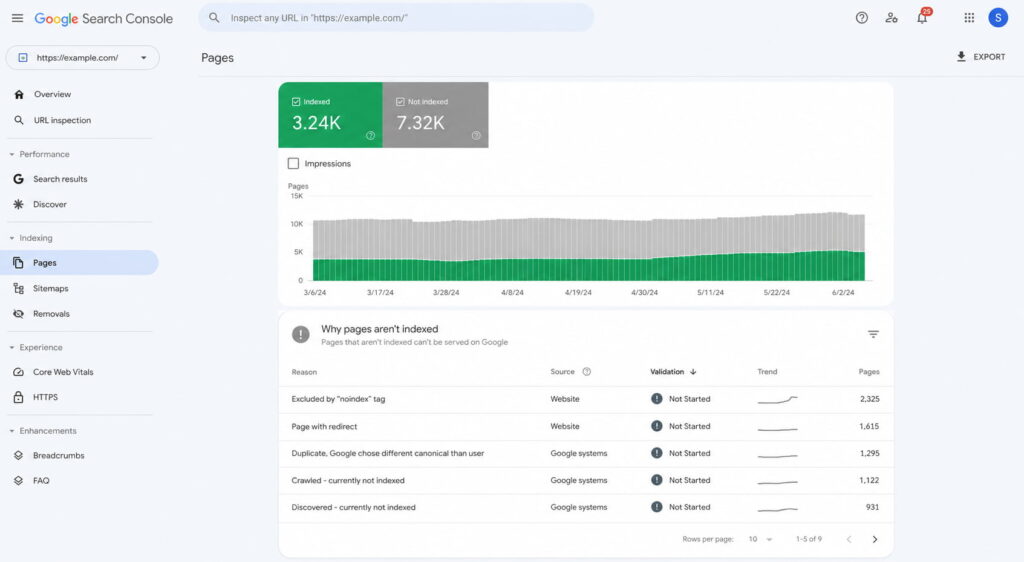
Open Search Console and go to Indexing > Pages. The first number to read is not clicks. It is indexed versus not indexed.
Having excluded pages is normal. Not knowing why is the problem. Open each exclusion reason and match it to an action.
Exclusion reason
What it means
What to do
Crawled, currently not indexed
Google saw the page and chose not to index it
Deepen the content or fix the intent match, or consolidate it into a stronger page
Discovered, currently not indexed
Google knows the URL exists but has not crawled it
Add internal links and reduce how many clicks it sits from the home page
Duplicate without user-selected canonical
Equivalent versions exist and Google picked one for you
Add a self-referencing canonical tag (next section)
Excluded by ‘noindex’ tag
A noindex directive is on the page
Confirm it is intentional; if not, remove it
Redirect error
The redirect chain fails or loops
Fix the chain and leave a single hop
Blocked by robots.txt
A robots.txt rule stops the crawl
Review the rules and unblock anything Google needs to render the page
Two housekeeping tasks close this out. Submit your XML sitemap in Search Console so Google has a clean list of the URLs you care about. Then open robots.txt and confirm it is not blocking CSS or JavaScript, because Google renders pages the way a browser does. This is the same diagnostic order Semrush recommends before touching content.
The exclusion reasons matter more than the totals. Each one maps to a different fix.
Improve Page Speed and Core Web Vitals
Three metrics carry the weight, and each one is simpler than its acronym suggests. LCP measures how long the main element takes to appear. INP measures how long the page takes to respond when someone interacts with it. CLS measures how much the layout jumps around while loading.
Fix them in this order, because that is roughly the order of impact:
Compress images and serve them in WebP with lazy loading.
Delete plugins you are not actively using.
Turn on caching.
Minify CSS and JavaScript.
Put a CDN in front of the site.
Check how heavy your WordPress theme is before you blame anything else.
Run PageSpeed Insights on the mobile tab, not desktop. Google indexes the mobile version of your site first, so the desktop score is the one that does not count.
One honest note, because most guides skip it. Speed is a tiebreaker, not a multiplier. Fixing Core Web Vitals will not move you ten positions on its own.
What it does do is stop you losing to an equally good page that loads faster, and stop visitors leaving before they read anything. Both are worth having. Neither is a ranking strategy.
Clean Up Duplicates With Canonical Tags
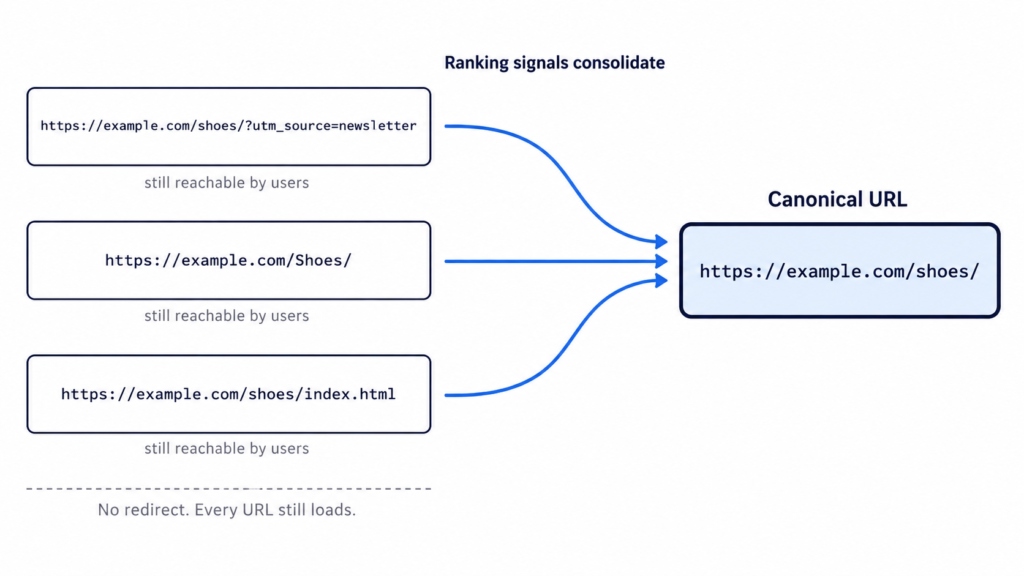
The same content is usually reachable at more URLs than you think. With and without a trailing slash. With UTM parameters attached from a paid campaign. Across paginated versions. On http and https.
Google sees each variation as a candidate and picks one. It does not always pick the one you wanted.
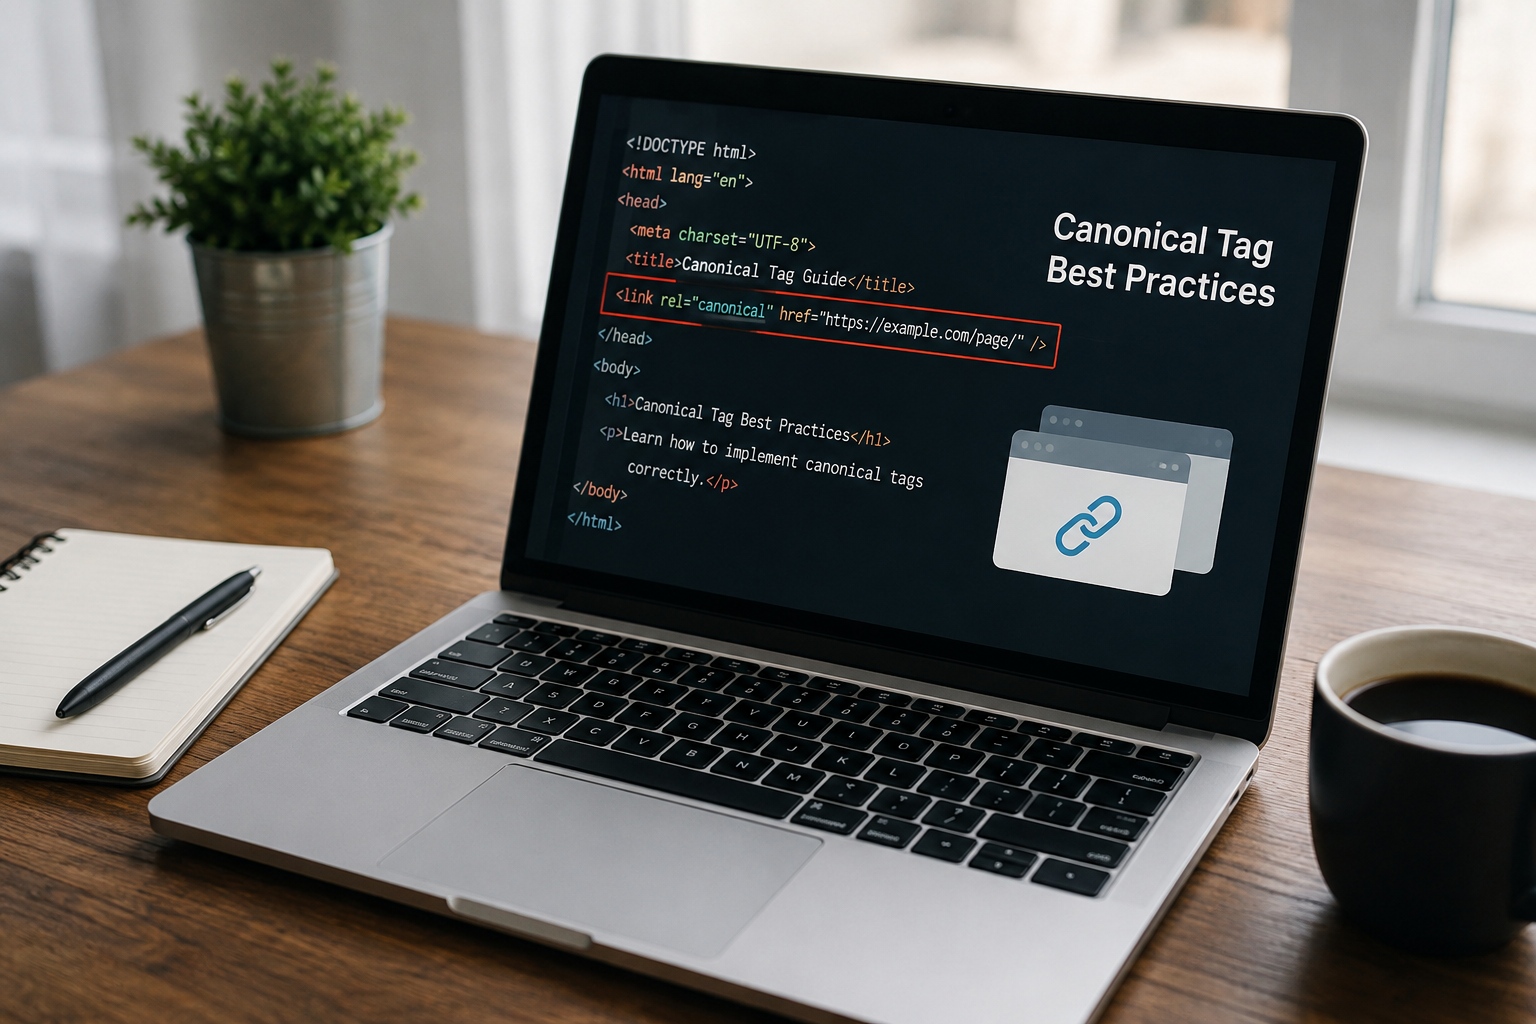
That is a self-referencing canonical: the page names itself as the version to index. For the full syntax and the CMS-specific steps, see how to add a canonical tag.
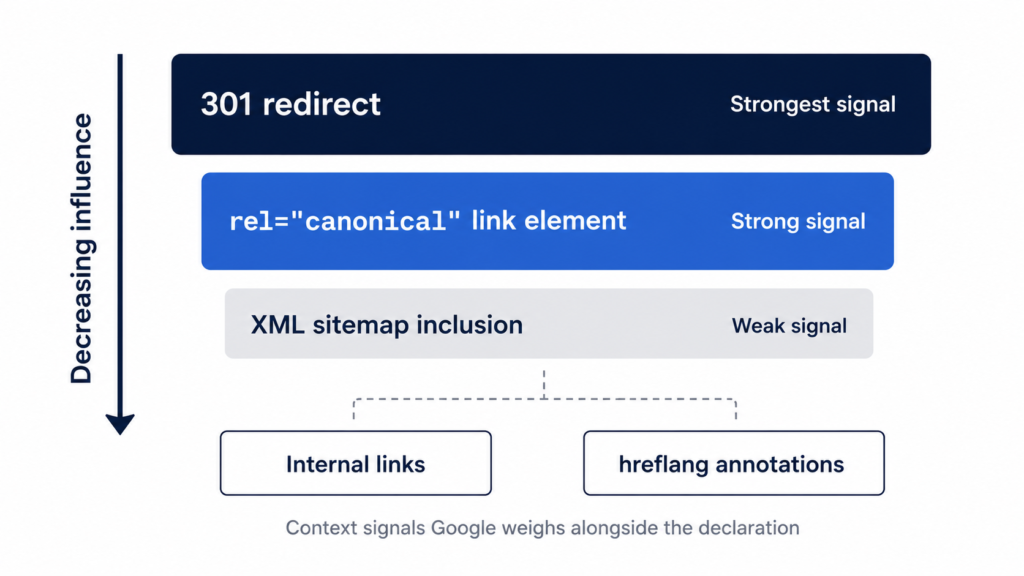
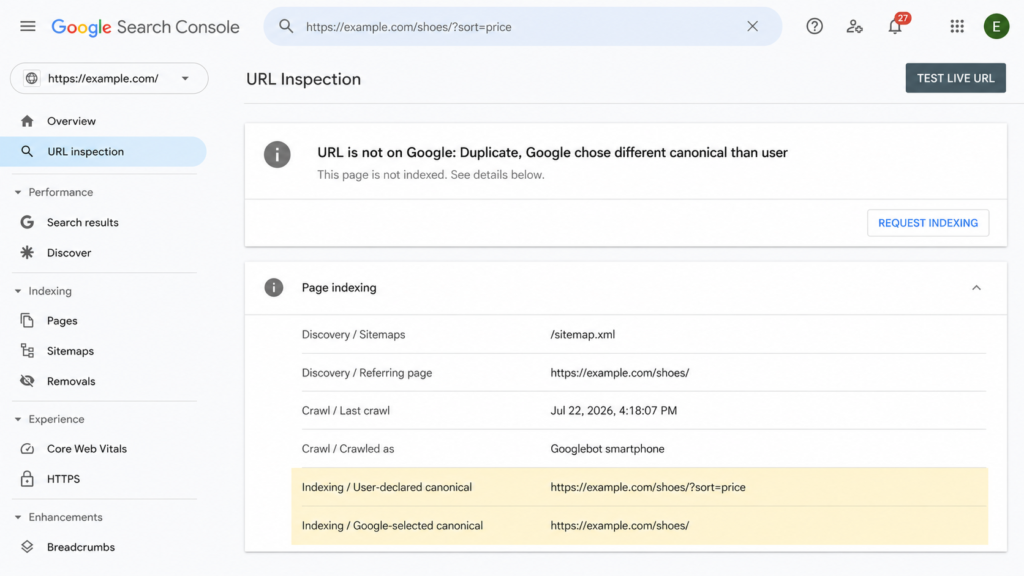
Two things to know. A canonical is a signal, not a command, so Google can override it. And you can check whether it did: if Search Console reports “Duplicate, Google chose different canonical than user” for a URL, your tag was read and ignored, which usually means the two pages are more similar than you assumed.
Step 3: Match Every Page to Search Intent
The most common reason an optimized page does not rank has nothing to do with optimization. The page answers a different question than the one the search results reward.
There are four intents behind any query:
Informational: the searcher wants to understand something. “what is schema markup”
Navigational: the searcher wants a specific site or page. “search console login”
Commercial: the searcher is comparing options before buying. “best crm software”
Transactional: the searcher is ready to act. “buy standing desk”
Diagnosing intent takes two minutes and no tools. Search your keyword in an incognito window and look at what format dominates the top ten: a long guide, a listicle, a product page, a comparison, a video. That format is Google telling you what it has already decided the query deserves.
Then match it before a single word gets written.
“Best crm software” is the clearest example. The intent is commercial, and every result on page one is a comparison of multiple tools. A product landing page for one CRM will not rank there no matter how well it is written, because it answers a question nobody asked. If you want the full breakdown of the four types of search intent with more examples, that is covered separately.
For anyone briefing writers, this check belongs before the brief, not after the draft. Format decisions made after the writing are expensive.
Step 4: Tighten Your On-Page SEO
On-page is the only group of signals you control completely, and it is the fastest to fix. No third party has to agree, no algorithm has to recrawl a link graph.
Three areas cover almost all of it: what shows in the search result, how the page is structured, and how its URLs and images are named.
Title Tags and Meta Descriptions
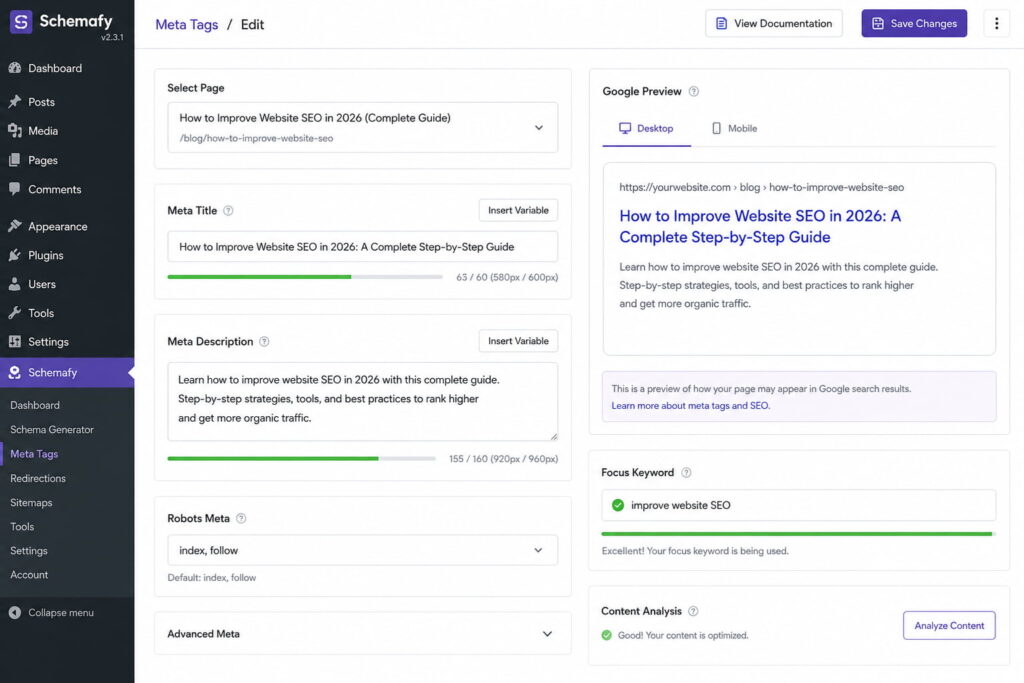
The title tag rules are short. Keep it to 60 characters or fewer so it does not get truncated. Put the keyword near the front. Make it unique across the site.
And write it for the person deciding whether to click, not for the crawler.
Meta descriptions follow the same logic at 155 characters or fewer: state the benefit, then give a reason to click.
Here is the nuance almost nobody spells out. The meta description is not a ranking factor, and Google rewrites it most of the time anyway. Neither fact is a reason to skip it.
When Google keeps yours, it is the only sentence of sales copy you get in the search results. When it rewrites yours, it pulls from your page copy, so a page written with a clear benefit still wins.
Write it, then check how it renders before publishing. A free SERP simulator shows you the truncation point on both mobile and desktop, which is faster than publishing and squinting at the live result. If you are implementing these on WordPress, the mechanics of adding meta descriptions in WordPress are covered step by step.
Across a portfolio of client sites, this is also the one on-page task that batches well. Titles and descriptions can be rewritten in bulk without touching a single page’s content.
Heading Hierarchy (H1, H2, H3)
The rules fit in four lines. One H1 per page, containing the primary keyword. H2s for sections. H3s for subsections inside them.
Never skip a level.
The rule people break most often is using headings for styling. If a line is bold and large because it looks good, it should be styled, not marked up as an H3.
This matters more now than it did three years ago. AI systems extract answers block by block, and a clean hierarchy is what makes a single section quotable on its own. A page with a broken heading structure forces the model to guess where an idea starts and stops, and a guess is easy to skip in favor of a competitor who made it obvious.
Correct:
H1: How to Improve SEO on Your Website
  H2: Fix Your Technical Foundation
    H3: Check What Google Has Indexed
    H3: Improve Page Speed
  H2: Match Every Page to Search Intent
Broken:
H1: How to Improve SEO on Your Website
  H3: Check What Google Has Indexed
  H2: Fix Your Technical Foundation
    H4: Improve Page Speed
The second version says the same things. It just makes the relationships unreadable.
URL Slugs and Image Alt Text
Slugs should be short, lowercase, hyphenated, and built around the keyword. Drop stop words. Drop dates, because a slug with 2024 in it ages badly and gives you a reason to break a URL later.
The warning that matters: never change the slug of a page that already ranks without putting a 301 redirect in place. You reset the signals that URL accumulated, and rebuilding them takes months. If you want the full set of rules, we covered what an SEO slug is and how to change one safely.
Alt text has one job: describe the image for someone who cannot see it. That is it. Keyword stuffing alt attributes is a habit left over from 2012 and it helps nothing.
Every informative image needs alt text. Decorative images, the ones that carry no information, take an empty alt attribute so screen readers skip them instead of reading a filename aloud.
While you are in there, name the file before uploading. blue-cotton-tshirt-front.jpg is worth more than IMG_4471.jpg, and it costs three seconds.
Step 5: Update and Consolidate Your Existing SEO Content
This is the highest-return step in the guide, and it is the one most people skip in favor of publishing something new. The reason it works is simple: you are improving pages Google has already crawled, already indexed, and already assigned some level of trust.
Part A: refresh what is close.
In Search Console, filter your queries to positions 8 through 20. These are the queries one push away from the part of page one people actually click. Find the page receiving each one, then do four things to it:
Update figures, screenshots and references that have gone stale.
Add the subtopics the current top five cover and you do not.
Fix the intent match if the format is wrong for the query.
Change the publish date only if the content genuinely changed.
That last one is not a formality. Updating a date without updating the content is a well-known trick and it does not work.
Part B: consolidate what competes.
Keyword cannibalization is when several of your own URLs compete for the same query, and it is more common on older sites than anyone expects. To find it, open Search Console, filter by a specific query, then check the Pages tab. If more than one of your URLs is pulling impressions and clicks for that query, you have cannibalization.
The fix is uncomfortable but mechanical. Pick the strongest page, merge whatever is genuinely useful from the others into it, and 301 the rest.
Two mediocre pages competing for one query split every signal they have earned, internal links included. One consolidated page concentrates them. You are not deleting work, you are stopping it from competing with itself.
Step 6: Target Low-Competition Keywords and Build Topic Clusters
Two ideas that only work together.
Low-competition keywords first. Google Keyword Planner is free and gets you started. If you have Ahrefs or Semrush, filter for keyword difficulty under 30 with volume at or above 100. Those thresholds are not magic numbers, they are a starting filter that keeps you out of fights you cannot win yet.
A young site should not attack head terms. The pages ranking there have years of accumulated links and topical history behind them, and you will spend six months learning that. Long-tail queries convert better anyway, because the searcher has already narrowed what they want.
Topic clusters second. A cluster is one broad pillar page plus 10 to 30 subtopic pieces, where every subtopic links up to the pillar and across to its siblings. The structure is what builds topical authority, and topical authority is what separates a site that ranks from a site that publishes.
For a WordPress site selling a WooCommerce theme, a cluster might look like this. Pillar: a complete guide to WooCommerce product pages. Subtopics: product schema markup, product image optimization, variation handling, category page structure, and product page speed.
Each one is a real query someone searches. Together they tell Google you are not guessing about WooCommerce product pages.
Publishing five connected pieces on one subject beats publishing five disconnected pieces on five subjects, and the gap widens over time. More strategies for increasing organic traffic build on the same principle.
Step 7: Strengthen Your Internal Linking for SEO
Internal linking is the only authority lever you fully control. Backlinks depend on someone else saying yes. Internal links depend on you opening an editor.
Five rules cover it:
Link from your highest-authority pages to the pages you want to lift, not the other way around.
Use descriptive anchor text that names the destination. Never “click here” or “read more.”
Give every important page at least 3 to 5 internal links pointing at it.
Find your orphan pages, the ones with no internal links at all. Google barely crawls them and users never find them.
Keep key pages within three clicks of the home page.
You can audit this without paying for anything. Search Console has a Links report that lists your internally most-linked pages in descending order. The pages you consider important that do not appear near the top of that list are the ones your site structure is quietly ignoring.
Fixing internal links costs an afternoon and no approvals. That combination is rare enough in SEO that it deserves to be higher on most people’s list than it is.
Step 8: Add Schema Markup So Search Engines and AI Can Read Your Pages
Schema markup, written in a format called JSON-LD, is a layer of structured data that tells Google and AI models what each thing on your page actually is.
This is a product. This is its price. This is the author. This is a review, and this is its rating.
Without that layer, machines infer all of it from your text. They are decent at inferring, and “decent” is not what you want deciding whether your product’s price shows up in a search result.
Three reasons it earns a place in this list, and one honest caveat.
It makes you eligible for rich results. Star ratings, FAQ dropdowns, prices, breadcrumbs. These raise click-through rate without your position changing at all. It is the only lever in this guide that improves the outcome without moving the ranking.
It makes you readable to AI search. AI Overviews are no longer an experiment. How often they appear depends heavily on who is measuring: Conductor’s analysis of 21.9 million searches in the first quarter of 2026 put the figure at 25.11%, while trackers measuring through March 2026 report figures approaching 48%. The spread comes from different keyword sets, different geographies, different sample sizes and different measurement dates, which is why a single number is the wrong thing to quote.
What is consistent is the gap between being cited and not being cited. Seer Interactive, analyzing 5.47 million queries across 53 brands between January 2025 and February 2026, found that pages cited in AI Overviews get 120% more clicks per impression than uncited pages, though they still trail pages on AI-free result pages by 38%.
It disambiguates entities. A model needs to know that “Apple” in your article is the company, that the review belongs to the product and not the page, that the author is a person with credentials. Structured data states all of that explicitly. Explicit is what a model needs before it cites you with confidence instead of citing someone clearer.
Now the caveat, because it gets overstated constantly. Schema markup is not a direct ranking factor. It improves understanding, it makes you eligible for rich results, and it makes you easier to cite. It does not move you up the page by itself.
For agencies, schema has one property nothing else in this guide has: it standardizes at the template level. One correct Article template applies to every post on a site, and the same template can be replicated across a portfolio without rewriting a word of content. Our full guide on how to use schema markup goes deeper on each type.
The top two results are not ranked higher because of schema. They just take up more of the screen and answer more of the question before the click.
Which Schema Types to Add First
This list is ordered by return, not alphabetically. If you only get to three, do the first three.
Schema type
When it applies
What it can earn you
Organization (or LocalBusiness)
On the home page of any site. Use LocalBusiness instead if there is a physical address
Knowledge panel eligibility, logo and contact details in search
Article
On every blog post
News and article carousel eligibility, author attribution
Product + Review
On every ecommerce product page
Price, availability and star ratings in the result
FAQPage
On pages with real questions visible to the reader
Expandable questions under your result
BreadcrumbList
Site-wide
A readable navigation path instead of a raw URL
Person
On author pages and bios
Reinforces the authorship signals covered in step 11
One rule overrides all of them: only mark up what is visibly on the page. Google’s structured data guidelines are direct about it. Do not add structured data about information that is not visible to the user, even if the information is accurate, and violating a quality guideline can stop syntactically correct markup from producing a rich result or get it flagged as spam.
The temptation is real, especially with reviews and prices. It is also the fastest way to lose rich result eligibility across an entire site.
How to Add Schema in WordPress Without Code
Three routes, with honest trade-offs.
Route
Control
Effort per page
Scales to a whole site?
Hand-written JSON-LD in the <head>
Total
High
No
Your SEO plugin’s schema module
Low
Low
Partially
A dedicated schema plugin
High
Low
Yes
Route 1, writing JSON-LD by hand. Total control, and a good exercise once. It also breaks the moment someone edits a template, and nobody maintains it across 400 product pages.
Route 2, your SEO plugin’s schema module. Yoast, Rank Math and AIOSEO all ship one. They cover the basics competently. They also support a small number of types and give you limited control over individual fields, which is fine until you need Product with variations or a Person with real credentials.
Route 3, a dedicated schema plugin. This is the category built for the problem: generate JSON-LD per template, inject it automatically, manage it in one place.
Schemafy is one option in that category. It includes a visual builder covering 16 Schema.org types, AI-assisted generation that runs on your own ChatGPT or Claude API key, a manual JSON editor for the edge cases the builder does not cover, a site scan that finds pages missing schema with filters by content type and bulk selection, automatic handling of WooCommerce products, and a single screen where every applied schema can be reviewed and edited.
The objection worth answering directly, because it stops most agencies from testing anything: you do not have to uninstall your current SEO plugin. Compatibility is declared with Yoast SEO, Rank Math, AIOSEO and WooCommerce, which means this is a change you can trial on one client site without renegotiating the stack on the other eleven.
A site scan turns “we should probably add schema” into a list of 412 specific pages and the type each one needs.
Validate Before You Move On
Run every template through two validators: Google’s Rich Results Test and the Schema Markup Validator at schema.org. Templates, not pages. If the Article template is correct, all 300 posts using it are correct.
Then wait. One to two weeks after deployment, open the Enhancements section in Search Console. That is when Google has reprocessed enough of the site to tell you what it actually accepted, which is not always what the validator approved.
Fix errors before warnings. Errors block the rich result entirely. Warnings are recommended fields you left empty, which reduce your chances without eliminating them.
The most common failure has nothing to do with syntax. It is duplicate schema: your SEO plugin and your schema plugin both emit an Article block for the same page, and Google gets two conflicting descriptions of one thing. If a validator shows two of the same type on one URL, turn one of them off before you debug anything else.
Step 9: Win Featured Snippets and AI Overview Citations
Featured snippets look like luck. They are closer to a format-matching exercise, and the process repeats across every client you have.
Find the queries where you already rank in the top 10 but do not hold the snippet. Search Console gives you the ranking queries; a manual search tells you who holds position zero.
Read the format of the current snippet. Paragraph, numbered list, bulleted list, or table. Google has already decided which one this query deserves.
Rebuild that format on your page. A question-form heading, followed immediately by a direct answer of 40 to 60 words, with no warm-up sentence in between.
The reason this works is worth understanding. Google is not picking the best page on the internet and quoting it. It is extracting the block that best fits a format it already chose. Your job is to hand it a clean block.
The same discipline carries over to AI systems, with one addition. Models pull self-contained passages, so every section needs to survive being read in isolation. That means explicit definitions instead of pronouns pointing back three paragraphs, numbers with a citable source attached, and consistent structure from section to section. The generative engine optimization playbook goes deeper on this.
Set expectations honestly while you do it. Being cited in an AI Overview does not return the traffic a blue link produced in 2019. The Seer data above shows the gap between cited and uncited pages is large, and the gap between AI result pages and clean ones is also real. Both facts are true at once.
Step 10: Build SEO Authority Off Your Site
Off-site authority is where most SEO advice gets either vague or reckless. Five approaches are worth your time, and none of them involve buying anything.
Convert unlinked mentions. Someone already wrote your brand name without linking it. A polite email asking for the link converts a meaningful share of these, and it is the cheapest link acquisition that exists.
Be a source. Journalist request platforms like Qwoted and Help a B2B Writer send daily queries from writers who need an expert quote. Answering three a week from a real practitioner earns placements that no outreach sequence will.
Build linkable assets. Original data, a calculator, a template someone can use. People link to things they need again.
Guest post on real sites in your niche. Real means it has its own audience and would exist without link sellers.
Fix your directory profiles. For local clients, identical name, address and phone across every listing. Inconsistent NAP is a slow leak that nobody notices until a rankings audit.
One update for 2026: in AI search, unlinked brand mentions carry weight as an entity signal, not just linked ones. That changes the economics of outreach. Getting mentioned is cheaper than getting linked, and it is no longer worth nothing. The full breakdown of off-page signals that count covers how to measure them.
And the obvious warning, stated once: buying links violates Google’s spam policies. The upside is temporary and the downside lands on a client’s site, not yours.
Step 11: Make E-E-A-T Visible on the Page
Start with the correction, because this is one of the most misrepresented ideas in SEO. E-E-A-T, meaning Experience, Expertise, Authoritativeness and Trust, is not a measurable ranking factor. It is the framework human evaluators at Google apply when they rate results, and those ratings do not directly affect rankings. They feed back into algorithm refinement.
That does not make it useless. It makes it indirect. The signals that communicate E-E-A-T are entirely implementable, and most sites implement none of them:
Real author bios with actual credentials and a link to a full profile page
Person markup on those profiles, and a populated author field inside the Article schema
Publish and last-updated dates visible to readers, not buried in metadata
Sources cited with working links, especially for any claim carrying a number
Complete About and Contact pages with a real address and a real human named
A published editorial policy explaining who reviews content and how
Look at that list again and notice how much of it is structured data. An author bio at the bottom of a post is a paragraph. The same bio with Person markup and an author reference from the article is a machine-readable statement that this named individual with these credentials wrote this specific piece.
That is the link between this step and step 8. Trust signals a human can read are worth something. Trust signals a machine can parse are worth something in a search result.
Step 12: Track the SEO Metrics That Tell You It’s Working
Different signals move at different speeds, so checking everything weekly just generates noise.
Cadence
What to check
Where
Weekly
Impressions, clicks, and queries you have not ranked for before
Search Console, Performance report
Monthly
Average position for target pages, CTR per page, indexed page count, conversions from organic
Search Console plus your analytics
Quarterly
Referring domains, authority metrics, visibility in AI answers
A third-party SEO tool
Two vanity metrics deserve to be ignored. The rank of one isolated keyword moves daily for reasons unrelated to your work. Total traffic without segmentation can rise on a viral piece that converts nobody while your commercial pages quietly decline.
Then close the loop. Open the spreadsheet row from step 1 and compare the same five numbers. Not similar numbers, the same ones, measured the same way, over the same 28-day window. That comparison is the only thing that tells you whether the last three months of work did anything, and it is why the baseline came first.
For tracking visibility inside AI answers specifically, the tooling is still young and uneven. We tested AI SEO tools by use case to sort out which ones measure something real.
The average hides a lot of variance, and the variance is mostly about what you changed.
Technical fixes and title tag rewrites can show up within days or weeks, because Google only has to recrawl a page it already trusts. New content takes months, because it has to be discovered, indexed, evaluated and then compared against pages that have been there for years. Authority takes longest of all, because it depends on other people acting.
One number is worth showing any client who thinks six months is slow. Ahrefs studied 2 million random keywords and found the average top 10 page was over 2 years old, with pages in position one averaging close to 3 years. Only 5.7% of the pages studied reached the top 10 within a year for even one keyword. A later Ahrefs update put the figures higher still.
You are not competing against pages published last month. You are competing against pages that have been compounding since 2022. WebFX reaches similar conclusions on typical timelines.
Your Website SEO Improvement Checklist
Copy this into a project ticket and work down it.
This week
Record the five baseline numbers in a dated spreadsheet row
Review indexed versus not indexed in Search Console and open every exclusion reason
Submit the XML sitemap
Confirm robots.txt is not blocking CSS or JavaScript
Add self-referencing canonical tags
Run PageSpeed Insights on mobile
This month
Check search intent against the live SERP for every target page
Rewrite title tags and meta descriptions
Fix broken heading hierarchy
Clean up slugs and add real alt text
Add internal links pointing at the pages you want to lift
Add schema markup to the home page and every post
This quarter
Refresh the pages ranking in positions 8 to 20
Consolidate cannibalizing URLs and 301 the losers
Publish one new topic cluster
Chase featured snippets on queries where you already rank top 10
Convert unlinked brand mentions and pitch two source requests a week
Make E-E-A-T signals visible: bios, dates, sources, editorial policy
Ongoing
Compare against the baseline monthly
Revalidate schema after every template change
Update figures and screenshots before they go stale
Start With the Layer Most Sites Skip
Most sites work through steps 1 to 7 and stop there. The content is good, the technical foundation is clean, and Google and every AI model are still inferring what each page means from raw text.
Structured data is the cheap step that makes everything above it legible. Try the free schema generator on one page to see what valid markup looks like, or install Schemafy to generate, validate and inject JSON-LD across WordPress without writing code.
[CTA_DOWNLOAD]
Frequently Asked Questions About Improving SEO
These answers are marked up with FAQPage schema, which is exactly what step 8 recommends doing on any page with real questions on it.
How can I improve my website’s SEO for free?
Most high-impact SEO work costs nothing. Use Google Search Console to find indexing errors and pages ranking 8–20, rewrite title tags and meta descriptions, fix internal links, refresh outdated content, compress images, and add schema markup with a free generator. Paid tools speed up research, not results.
What is the fastest way to improve SEO?
Updating pages that already rank on page two. Find queries in positions 8–20 in Search Console, improve the matching page’s intent alignment, title tag and depth, then request reindexing. These pages already have authority, so gains often show in weeks instead of months.
How long does it take to improve SEO?
Most sites see measurable movement in three to six months, and six to twelve months in competitive niches. Google states meaningful results typically take four to twelve months. Technical fixes and title tag changes can show within days; new content and authority building take considerably longer.
Does schema markup improve SEO rankings?
Schema markup is not a direct ranking factor. It helps search engines and AI systems understand what your page contains, which makes you eligible for rich results like star ratings, FAQs and breadcrumbs. Those richer listings raise click-through rate and improve your odds of being cited in AI answers.
How often should I update my website for SEO?
Audit technical health monthly, review top-performing content quarterly, and refresh pages with outdated statistics or declining traffic at least once a year. Update only when you’re adding real value. Changing a publish date without changing the content does nothing for rankings.
Can I improve my website’s SEO myself without an agency?
Yes. Steps one through eight of this guide, from the baseline and technical fixes through intent matching, on-page optimization, content refreshes, internal linking and schema markup, are all DIY with free tools. Agencies mainly add speed, link building capacity and strategy at scale, not secret techniques.
Does page speed affect SEO?
Yes, but as a tiebreaker rather than a main driver. Google uses Core Web Vitals as a page experience signal, and slow pages lose visitors before they read anything. Test on mobile with PageSpeed Insights, since Google indexes the mobile version of your site first.
Most crawl budget guides assume you already have a crawl budget problem. Across ten client stores, maybe two actually do.
Crawl budget is the set of URLs Google can and wants to crawl on your site. Optimizing it means Google spends those requests on the pages that make money instead of on filter URLs nobody searches for.
This guide starts by telling you honestly whether it applies to you, then gives you the eight fixes that matter.
Caption: Three Search Console checks tell you which client sites deserve a crawl budget audit and which do not.
What is crawl budget?
Crawl budget is the set of URLs Google can and wants to crawl on your site over a given period. Google sets it with two things: how much your server can handle, and how much Google wants your content. Google treats each unique hostname as its own site with its own budget.
That last detail catches people managing portfolios. Your store and your blog subdomain do not share a budget, so a bloated subdomain is not stealing crawls from the money pages (Google Search Central).
Here is the rough arithmetic worth running before you do anything else. Take your indexable URLs and divide them by the average daily requests in your Crawl Stats report. If the answer is close to ten, Google needs more than a week to walk your site once. That is a field heuristic, not official guidance, but it is the fastest way to decide whether the rest of this guide is worth your afternoon.
Crawl capacity vs. crawl demand
Crawl capacity is how many simultaneous connections Googlebot will hold open without hurting your server. It goes up when your responses stay fast and stable, and it comes down when latency climbs or you return server errors and rate-limiting codes. This is the hosting lever.
Crawl demand is how much Google wants to crawl you. It is driven by how many URLs Google thinks you have, how popular those URLs are, and how stale they look. Google is direct about which part you own: perceived inventory is “the factor that you can positively control the most.” This is the URL inventory lever, and it is where seven of the eight fixes below live.
One detail almost nobody writes down: the crawl capacity limit is shared across all of Google’s crawlers, while crawl demand is calculated per crawler. If AdsBot is hammering a client store, it is taking capacity away from Googlebot.
Does crawl budget actually matter for your site?
For most sites, no. Google says so plainly at the top of its own guide: if your pages get crawled the same day you publish them, you do not need to read it.
The guide is written for two profiles. Large sites with 1 million or more unique pages that change roughly weekly, and medium or larger sites with 10,000 or more unique pages that change daily. Search Console is blunter still: “if you have a site with fewer than a thousand pages, you should not need to use this report or worry about this level of crawling detail” (Search Console Help).
This is not new. When Gary Illyes published Google’s canonical explanation back in 2017, the first thing he did was warn that crawl budget is not something most publishers need to worry about, and that sites with up to a few thousand URLs get crawled efficiently. Nine years later the message has not moved.
Site profile
Typical crawlable URLs
Change frequency
Does crawl budget matter?
Brochure or service site
Under 100
Rarely
No
Blog or small store
100 to 1,000
Weekly
No
Mid-size WooCommerce store
1,000 to 10,000
Weekly
Rarely, unless facets are crawlable
Large store with open faceted navigation
10,000+
Daily
Yes
Marketplace or programmatic site
1M+
Weekly or faster
Yes
Read the second column carefully, because it says crawlable URLs, not products. A WooCommerce store with 800 products and five open filters is not an 800-page site. It is a site with tens of thousands of crawlable URLs wearing an 800-product costume. That is how a portfolio of ten clients produces two or three real cases.
If none of your clients qualify, the principles still earn their keep. The same URL sprawl that burns budget on a large site delays indexing on a small one.
How to check if you have a crawl budget problem
Four checks, ordered by what they cost you in minutes. With ten accounts, the order matters more than the thoroughness.
Open the Crawl Stats report. It lives under property settings and only works on root-level properties. Read three numbers: total crawl requests, average response time, and host status. The report covers the last 90 days.
Run the ratio. Compare average daily requests against your indexable URL count. Then check the Crawl purpose breakdown, which splits requests into Discovery (a URL Google has never crawled) and Refresh (a recrawl of something known). If Refresh eats almost everything while Discovery sits near zero and you are publishing new products weekly, you have found your symptom.
Check the Pages report. “Discovered – currently not indexed” and “Crawled – currently not indexed” are normal in small numbers. Thousands of them, with product URLs inside, is the clearest signal Search Console will give you.
Read the server logs. Log-file analysis is the gold standard because it is the only method that tells you what share of Googlebot’s requests went to junk. It is also the only one that needs hosting access, a parser and a couple of hours per account. The red flag is unmistakable: most requests landing on URLs with filter and sort parameters instead of on product and category pages.
The first three checks take about fifteen minutes per property. Across ten clients that is one morning, and you finish it knowing exactly which two accounts deserve the log analysis.
Caption: Refresh at 94% and Discovery at 6% on a store publishing weekly is what a crawl budget symptom looks like.
How to optimize your crawl budget: 8 steps
The fixes below are ordered by impact and follow the principle Google puts first in its own guide: manage your URL inventory before you touch anything else.
Block low-value URLs in robots.txt.
Consolidate duplicate content onto one canonical URL.
Tame faceted navigation and URL parameters.
Flatten redirect chains to a single hop.
Fix soft 404s and return proper status codes.
Clean and update your XML sitemap.
Link internally to your priority pages.
Speed up server response and rendering.
1. Block low-value URLs in robots.txt
This is the highest-impact move because it removes entire URL spaces from consideration instead of fixing URLs one at a time. On WordPress those spaces are predictable: admin paths, cart and checkout, internal site search, staging subdirectories and sort parameters.
One clarification that trips up half the industry: robots.txt controls crawling, not indexing. Blocking a URL does not remove it from the index if Google already has it. Google does note that blocking “significantly decreases the chance the URLs will be processed by other Google systems,” so it is not useless for index hygiene, but it is not a deindexing tool.
Two warnings. Do not block CSS or JavaScript that Google needs to render your pages, which on a WooCommerce theme usually means leaving /wp-content/ alone. And do not reach for crawl-delay: the non-standard rule is not processed by Google’s crawlers at all.
In a portfolio, this file is the one fix that replicates almost unchanged across clients running the same stack.
2. Consolidate duplicate content
Duplicates make Google spend several requests on the same content. Google lists consolidation as the first item under URL inventory management for exactly that reason: the goal is to focus crawling on unique content rather than unique URLs.
On WordPress the usual sources are http and https or www and non-www resolving in parallel, inconsistent trailing slashes, session IDs appended by a plugin, and above all the tag and category archives your theme generates automatically. A WooCommerce store with 40 product tags is quietly publishing 40 near-identical listing pages.
Fix it in this order: canonical tags pointing at the version you want, 301 redirects for versions that should not exist at all, and internal links that consistently use the chosen URL. A clean URL structure makes the third step much cheaper.
The nuance that separates a technical SEO from the average guide: canonical is a signal, not a directive. Google may choose a different URL, and it will keep crawling the non-canonical versions for a while before the volume drops.
3. Tame faceted navigation and URL parameters
Do the arithmetic once and this section sells itself. Five filters with four values each, combinable in any order, produce over a thousand URL combinations before you count sorting and pagination. Google’s own term for the result is an infinite URL space, and it causes two specific harms: overcrawling of useless URLs, and slower discovery of the new ones you care about.
Fix it in Google’s recommended order.
Start by disallowing the filter parameters in robots.txt if you do not need those URLs indexed. Google’s own example blocks each parameter and whitelists the unfiltered listing:
If your theme allows it, switch filters to URL fragments instead of parameters. Google generally does not crawl fragments, so the filtering stops affecting crawling entirely.
Canonical tags to the clean category and rel="nofollow" on facet links are the second-line options, and Google is explicit that both are less effective long term. nofollow in particular only works if every anchor pointing at that URL carries it, anywhere on the web.
Two details worth writing on a sticky note. The URL Parameters tool in Search Console is gone, so any process that still expects it needs updating. And when a filter combination returns nothing, serve a 404 at that URL rather than redirecting to a shared error page.
Caption: Five filters with four values each generate over a thousand URLs from a single category page.
4. Flatten redirect chains and fix broken links
Google counts every hop in a redirect chain as a separate request. If page1 redirects to page2 which redirects to page3, Search Console records three requests to deliver one page. A migrated client site with three-hop chains is spending triple to serve the same catalog.
Point internal links straight at the final URL, flatten inherited chains to a single hop, and crawl the site with Screaming Frog, Sitebulb or Ahrefs to find them, and if you are still assembling that stack there is a breakdown of SEO tools by use case. On sites you inherit after a migration, chains are the default finding rather than the exception.
Now the correction, because most guides on this topic get it backwards. Google states that pages serving 4xx status codes, except 429, do not waste crawl budget. Google attempted the request, got a status code and no content, and moved on. Broken internal links are still worth fixing for user experience and internal link equity, but they are not a crawl budget line item. If you want the full treatment of those, fix the underlying SEO issues as a separate pass.
What genuinely hurts is 5xx errors and timeouts. They do not spend your budget, they shrink it: a meaningful volume of server errors signals poor health and Google slows crawling in response.
5. Fix soft 404s and error pages
A soft 404 is a page that returns HTTP 200 while being effectively empty or missing. On WooCommerce the classic case is a category page whose products all went out of stock and which now returns a successful response with zero results.
These are expensive because the status code tells Google there is content worth revisiting. In Google’s words, “soft 404 pages will continue to be crawled, and waste your budget.”
Return a 404 or 410 for pages that are genuinely gone, 301 the ones with a real replacement, and watch the soft 404 rows in the Search Console Pages report. The contrast is worth internalizing: a 404 is a strong signal not to crawl that URL again, while a blocked URL stays in the crawl queue much longer and gets recrawled once the block lifts.
6. Keep your XML sitemap clean and current
Your sitemap is the list of URLs you are declaring important, and Google reads it regularly. That only works if the list is honest.
A sitemap stuffed with noindexed, redirected and 404ing URLs does two kinds of damage. It spends crawl requests on URLs you did not want crawled, and it erodes the file’s usefulness as a priority signal.
Four rules cover it. Include only canonical, indexable, 200-status URLs. Keep <lastmod> accurate rather than stamping it with your last deploy date, which is what most WordPress sitemap plugins do by default. Split large sitemaps into a sitemap index. Submit the file in Search Console.
One myth dies here too: compressing your sitemap does not increase your crawl budget, because the server still has to serve the file either way.
7. Strengthen internal linking to priority pages
Internal links are how Googlebot discovers pages and how it infers which ones matter. A page with no internal links pointing at it gets crawled rarely, if at all.
On WooCommerce, orphans are usually products reachable only through internal search or through facet URLs you just blocked in step 1. That is the side effect worth auditing right after you touch robots.txt: check that blocking the facets did not orphan the products behind them.
Deciding which pages are priority is a search intent question before it is a crawling one. Link those pages from your highest-authority pages, keep them within a few clicks of the home page, and find orphans by crawling the site and diffing the result against your sitemap.
The honest caveat, in Google’s own framing: pages linked from the home page “may be seen as more important, and therefore crawled more often. However, this doesn’t mean that these pages will be ranked more highly.” Internal linking buys crawl frequency, not position.
8. Improve server response time and page speed
Faster responses let Googlebot fetch more pages per session, because the constraint is time and bot count rather than a fixed page quota. Serve more pages in the same window and Google crawls more of them.
Here is the part generic speed advice leaves out: time spent rendering counts as much as time spent requesting. A JavaScript-heavy WooCommerce theme burns budget even when your TTFB looks fine, because rendering the page is part of the crawl.
Reduce TTFB, put caching and a CDN in front of the site, support 304 responses so Google can reuse its cached copy of unchanged pages, and keep host status green in Crawl Stats. Across a portfolio, shared hosting is the most common root cause and the most uncomfortable conversation to have with the client.
Calibrate your expectations, though. Google may spend more time on a slower site that holds more important information, and it says outright that making your site faster for users matters more than making it faster for crawl coverage.
Mistakes that waste crawl budget (and myths to ignore)
Half the work in this section is stopping you from spending an afternoon on the wrong fix.
Myth
What actually happens
What to do instead
noindex saves crawl budget
Google must crawl the page to see the tag, so the request is spent anyway
Use noindex to deindex, robots.txt to stop crawling
robots.txt removes pages from the index
It blocks crawling; a known URL can stay indexed
Allow the crawl and serve noindex, or remove the URL
More crawling means better rankings
Crawling is required for indexing but is not a ranking signal
Optimize which pages get crawled, not how many
Broken 404 links waste crawl budget
Pages returning 4xx, except 429, do not waste budget
Fix them for UX and link equity, not for crawl budget
Compressing your sitemap increases crawl budget
The file still has to be fetched from your server
Keep the sitemap accurate instead of small
crawl-delay controls Googlebot
Google’s crawlers do not process the rule
Return 503 or 429 temporarily if you need relief
Two of those deserve more than a table cell.
On noindex, Google’s position is more precise than the internet’s version of it. Google tells you not to use it as a crawl budget tool, because it “will still request, but then drop the page when it sees a noindex meta tag.” At the same time, Google acknowledges that removing URLs from the index can indirectly free up budget over the long run, since crawlers can then focus elsewhere. So: noindex for index control, robots.txt for crawl control, and no expectation of an overnight effect either way.
On crawling and rankings, Google is unambiguous: improving your crawl rate will not necessarily improve your positions. Crawling is a precondition, not a signal. It is the same category of misunderstanding as believing meta descriptions are a ranking factor, which they are also not a ranking factor.
Where the budget actually goes: infinite URL spaces from facets, duplicate content across parallel URLs, multi-hop redirect chains, and soft 404s that never stop looking alive. Add one nobody counts, alternate URLs and embedded resources. Your CSS, JavaScript and XHR fetches consume crawl budget too.
How structured data and clean metadata help crawlers
Everything above decides which pages Google visits. None of it decides what Google understands once it arrives. That is a separate problem with separate tools.
Valid JSON-LD gives a crawler the entity type, the price, the availability and the rating without making it infer any of that from your HTML, and it is the entry requirement for rich results. On a store where the product template is the same across a thousand pages, that difference is the whole game. Structured data is doing the interpretation work your markup otherwise leaves ambiguous, and there is a full walkthrough of how to use schema markup if you are starting from zero.
Clean metadata does the same job at the SERP layer. Unique titles and descriptions stop hundreds of pages from introducing themselves identically, which on a templated WooCommerce catalog is the default state rather than the exception. Writing a meta description in WordPress one page at a time is fine for a blog and unworkable for a catalog, and you can preview how the snippet renders before you commit to a pattern.
Be clear on the limit: none of this increases your crawl budget. It makes each crawl more useful, which is a different claim and the only one worth making.
Optimize crawl budget with Schemafy
Schemafy does not manage your crawling. It does not edit robots.txt, generate sitemaps, set canonicals or read server logs, and any plugin that claims to solve crawl budget for you is selling you something.
What it does is the layer after the crawl. Schemafy generates valid JSON-LD across 16 schema types, through a template builder, an automatic site scan or an AI generator, so the pages Google does fetch are immediately legible. And its bulk meta editing works from a CSV import, which is how hundreds of product pages get unique titles and descriptions instead of the same boilerplate repeated across a catalog.
Caption: Character counters and a live Google preview on a single product page; the same fields import in bulk from CSV.
Final thoughts
Crawl budget is an inventory problem wearing a technical costume. You are not looking for a trick that makes Googlebot work harder, you are deciding which URLs deserve to exist and removing the rest from consideration.
The next step is fifteen minutes, not a project. Open Crawl Stats on your largest client property, run the ratio, and look at the Discovery versus Refresh split before you change a single line of robots.txt. Once the crawl is going where you want it, the follow-on work is making those pages earn their place, which is where the broader playbook to increase organic traffic picks up.
Frequently asked questions
Does crawl budget matter for small websites?
For most small sites, no. Google can easily crawl and index sites under about 1,000 pages, and Google has said crawl budget isn’t a concern for most publishers. It becomes important on large sites (1M+ pages) or medium sites (10k+) that change daily. Small sites still benefit from clean architecture.
Does noindex save crawl budget?
Not directly. Google has to crawl the page to see the tag, so the request is spent either way. Over the long run, removing URLs from the index can indirectly free up crawling for other pages. Use noindex to deindex and robots.txt to stop crawling.
How do I increase my crawl budget?
You raise crawl budget by improving crawl capacity and demand: speed up server response, fix 5xx errors, publish and update valuable content, and build internal and external links to important pages. You can’t set a number directly, but a fast, healthy, popular site gets crawled more.
How often does Google crawl my site?
It varies by site. Google crawls popular, frequently updated pages more often and low-value pages rarely. Check the Crawl Stats report in Google Search Console to see your actual crawl frequency, total requests, and average response time over the last 90 days.
Does page speed affect crawl budget?
Yes. Faster pages let Googlebot fetch more of your site in each session, effectively increasing crawl capacity. Slow responses and server errors make Googlebot slow down to avoid overloading your server, so it crawls fewer pages. Rendering time counts as much as response time.
To add a canonical tag in HTML, place a <link rel="canonical"> element inside the <head> of the page, pointing to the absolute, https version of the URL you want indexed. Google only accepts the tag when it sits in the head, and it treats the value as a strong signal, not a command.
A canonical tag consolidates signals from several duplicate or near-duplicate URLs into one preferred URL. Links, ranking signals and crawl attention get attributed to the version you nominate instead of being split across variants.
The page you didn’t nominate stays reachable. That is the difference between a canonical and a redirect: the user still lands on whatever URL they clicked, and only search engines are told which version to index.
Here is the part most guides skip. Google lists canonicalization methods “in order of how strongly they can influence canonicalization”, and describes rel="canonical" as “a strong signal that the specified URL should become canonical.” A signal, not a directive. Google can and does pick a different URL.
In %currentyear% that choice reaches further than the blue links, because the canonical URL is also the one generative engines tend to cite when they summarize your content.
Three URLs, one set of consolidated signals, and every page still loads for the user.
Canonical tag syntax
The element has three moving parts. Knowing which is which is the difference between pasting a line of code and debugging it six months later when Search Console reports something odd.
<head>
  <!-- element: link, not meta -->
  <link
    rel="canonical"
    href="https://example.com/page/" />
  <!-- rel = the relation type, href = the preferred URL, absolute -->
</head>
Anatomy of the tag
Three parts, and one naming correction worth making up front.
<link> is a link element, not a meta tag. People call it “the canonical meta tag” constantly and it is wrong. It belongs to the same family as your stylesheet and favicon declarations.
rel="canonical" is the relation type, a registered link relation defined in RFC 6596. That is the spec Google points to.
href="…" is the preferred URL, and the only part you change per page.
<link> is a void element, so it takes no closing tag. Writing /> is valid but an XHTML habit rather than a requirement. Both forms parse identically in HTML5.
Absolute vs. relative URLs
Always use an absolute URL with the protocol included.
Then the detail almost nobody covers: the URL has to match the indexable version exactly. Same protocol, same www decision, same trailing slash, same casing as the slug you actually publish.
<!-- ✅ absolute, https, matches the indexable version exactly -->
<link rel="canonical" href="https://example.com/blog/canonical-tags/" />
<!-- ❌ relative: resolves against page context, breaks on staging -->
<link rel="canonical" href="/blog/canonical-tags/" />
A canonical pointing at a URL that redirects or returns a 404 cancels the signal entirely.
How to add a canonical tag in HTML: step by step
Four steps. The fourth one decides whether the first three matter.
Step 1: Choose the canonical version of the URL
Pick the version with the most internal and external links, the most complete content, and existing rankings. When two candidates are close, the one already earning impressions wins.
Get that from data rather than memory. Search Console tells you which URL already receives impressions for the query you care about, and a crawl surfaces the duplicates you forgot existed: parameter variants, uppercase paths, /index.html leftovers, http alongside https, www alongside non-www. It also helps to preview the URL in search results first, since the canonical is the version people actually see.
One default saves you work. Google already prefers HTTPS over HTTP unless something contradicts it: an invalid certificate, insecure dependencies, an HTTPS page redirecting to HTTP, or an HTTPS page canonicalizing to its own HTTP version.
Do not canonicalize toward a page that is substantially different. Google clusters by content similarity, and if the two are not close enough it discards your declaration.
Put it before heavy scripts. A parser that hits malformed markup can close the head early, and everything after that point lands in the body where the tag is worthless.
<!DOCTYPE html>
<html lang="en">
<head>
  <meta charset="utf-8" />
  <title>How to Add a Canonical Tag in HTML</title>
  <meta name="description" content="Where the canonical tag goes and how to verify it." />
  <link rel="canonical" href="https://example.com/blog/canonical-tags/" />
  <!-- heavy scripts go after this line -->
</head>
<body>
  <!-- page content -->
</body>
</html>
On a templated site, the file to edit is the head partial or the layout, not each page. That is also where the rest of your head tags live, so one edit covers every URL the template renders.
Step 3: Add a self-referencing canonical to every indexable page
Best practice is that every indexable page points at itself, not just the ones you know are duplicated. Google lists it as a “do”: include a rel="canonical" link on the canonical page itself.
It protects against duplicates you never created on purpose: tracking parameters, uppercase variants, and scrapers republishing your HTML.
<!-- on https://example.com/blog/canonical-tags/ -->
<link rel="canonical" href="https://example.com/blog/canonical-tags/" />

<!-- the ?utm_source=newsletter variant inherits the exact same value -->
On a templated or programmatic site this is one template change, not a per-URL task. The same partial that emits the tag for 12 pages emits it for 12,000.
Google does not require it. Yoast and effectively every other SEO framework recommend it anyway, and it costs nothing.
Step 4: Keep every other signal pointing the same way
The canonical is one vote among several. Google weighs redirects, internal links, sitemap entries and hreflang alongside it, and it publishes the ranking: redirects are the strongest signal, rel="canonical" is a strong signal, sitemap inclusion is a weak one. The documentation also notes that “these methods can stack and thus become more effective when combined.”
So align them:
Link internally only to the canonical URL.
Include only canonical URLs in the XML sitemap.
Make sure redirects do not land on a different version.
Point hreflang annotations at canonical URLs.
Google is blunt about the failure mode: “Don’t specify different URLs as canonical for the same page using different canonicalization techniques.” When these signals contradict each other, Google resolves the conflict itself and Search Console reports it as “Duplicate, Google chose different canonical than user.”
Google publishes the order. A redirect outranks the tag, and the tag outranks the sitemap.
Canonical tag examples for 5 common scenarios
Five setups that cover most of what you will hit, each with the code and the one rule that matters.
Self-referencing canonical
The default state for every indexable page: the page nominates itself.
<!-- on https://example.com/blog/canonical-tags/ -->
<link rel="canonical" href="https://example.com/blog/canonical-tags/" />
Watch the homepage. The canonical is https://example.com/, not https://example.com/index.html, even when the file behind it literally is index.html.
Duplicate and near-duplicate pages
One product reachable from two category paths, both nominating the clean URL.
<!-- on /shoes/running/model-x/ and on /sale/model-x/ -->
<link rel="canonical" href="https://example.com/products/model-x/" />
Never chain canonicals. If A points to B and B points to C, Google has to guess what you meant.
URLs with tracking or filter parameters
Parameter variants that produce the same page: ?utm_source=, ?sort=price, ?color=blue.
<!-- on /shoes/?sort=price and /shoes/?utm_source=newsletter -->
<link rel="canonical" href="https://example.com/shoes/" />
The nuance almost nobody gives you: if a filtered view has genuinely different content and its own search intent, like “blue running shoes,” it may deserve to be indexable and self-canonical rather than folded into the parent.
Paginated series
Do not canonicalize pages 2, 3 and 4 back to page 1. It is the most repeated mistake in the industry and it tells Google to drop everything past the first page.
<!-- on https://example.com/blog/page/3/ -->
<link rel="canonical" href="https://example.com/blog/page/3/" />
So noindex on the republisher’s copy is the primary play, and the canonical below is the fallback for partners who will not set one.
<!-- on the republished copy, pointing back to your original -->
<link rel="canonical" href="https://example.com/blog/original-post/" />
Plenty of platforms let the republisher do neither. When that happens, an attributed link back to the original is the only lever you have left.
Other ways to declare a canonical URL
The HTML <link> is what Google prefers. Three alternatives exist for pages where you cannot touch the head, and the strength ordering from Step 4 is why they are not equivalent.
HTTP header (for PDFs and non-HTML files)
PDFs, images and other files have no <head>, so the header is the only route.
HTTP/1.1 200 OK
Link: <https://example.com/downloads/white-paper.pdf>; rel="canonical"
The syntax comes from RFC 5988, and Google supports the method for web search results only. Do not assume it carries over to Images or Discover.
Two configurations, in standard Apache and Nginx syntax rather than anything Google publishes:
<Files "white-paper.pdf">
  Header set Link '<https://example.com/downloads/white-paper.pdf>; rel="canonical"'
</Files>
location = /downloads/white-paper.pdf {
  add_header Link '<https://example.com/downloads/white-paper.pdf>; rel="canonical"';
}
XML sitemap
Google classifies sitemap inclusion as “a weak signal that helps the URLs that are included in a sitemap become canonical.” Weak, but it stacks with the <link> rather than competing with it.
Only canonical URLs belong in the sitemap. Listing both the parameter variant and the clean URL is a contradiction Google has to resolve on your behalf.
Server-rendered HTML first, in other words. Either the tag lives in the source and JavaScript leaves it alone, or it is absent from the source and JavaScript owns it. Never both.
The anti-pattern is injecting a canonical over a page that already ships a different one. Two canonicals and Google ignores both. This shows up constantly in React and Next.js builds where the framework emits one value and a client-side SEO component overwrites it with another.
How to add canonical tags in WordPress, Shopify and Webflow
Google notes that on a CMS you may not be able to edit the HTML directly, and should look for the search engine settings screen instead. What that screen is depends on the platform.
WordPress
Yoast, Rank Math and AIOSEO all insert a self-referencing canonical automatically. If you run one of them, the tag already exists. Check before adding anything.
To override it manually, open the post editor, scroll to the SEO panel, and use the Advanced tab. The canonical URL field is there.
On a custom theme with no SEO plugin, hook into wp_head from functions.php and echo the element. That puts it in the same place as adding a meta description in WordPress, which keeps the template as the single source of truth.
Editing the theme header file directly works, but survives exactly until the next theme update. Use a child theme or the hook.
Shopify
Canonicals are generated automatically, and for most stores the defaults are correct.
The known gap is the duplicate created when a product is reachable at /collections/x/products/y as well as /products/y. Fixing it means editing the canonical logic in theme.liquid, and several popular themes already handle the case.
Webflow, Wix and Squarespace
All three expose a canonical field in the per-page SEO settings, so no code is involved. Left blank, it falls back to a self-referencing canonical.
The rule that applies to all of them: if the CMS already injects a canonical, do not add a second one by hand. Two canonicals on one page invalidate each other.
How to verify your canonical tag is working
Four methods, in order of what they can actually prove.
Method
What it checks
What it can’t tell you
View Source
The raw HTML Google receives
Whether JavaScript changes it later
DevTools → Elements
The rendered DOM
Whether Google agrees with the value
URL Inspection (Search Console)
User-declared vs Google-selected canonical
Anything about URLs Google hasn’t processed
Site crawler
Every canonical on the site at once
What Google actually selected
Start with View Source and Ctrl+F for “canonical”. That is the raw HTML Google reads before rendering. Then check the same value in DevTools. If the two disagree, JavaScript is rewriting the tag and you know where the problem lives.
Neither one tells you whether Google listened. For that you need URL Inspection in Search Console, which reports User-declared canonical and Google-selected canonical as two lines. Read them together:
The two match. You are done.
They differ. Google overrode your declaration, so the problem is in the surrounding signals rather than the tag.
Search Console has no data for the URL. It has not been processed yet.
Above a few dozen URLs, run a site crawler and audit every canonical at once. It is the only way to catch chains and mismatches at scale, and the same pass surfaces missing structured data, which is where a plugin like Schemafy enters the picture.
One expectation to set first. After you fix the underlying issue, Google can hold the pages in the same duplicate cluster for up to two weeks. Do not touch the tag again on day three.
[SCREENSHOT: The URL Inspection panel in Google Search Console showing the Page indexing section, with “User-declared canonical” and “Google-selected canonical” listing two different URLs.]
The only screen that tells you whether Google honored the tag or overruled it.
8 canonical tag mistakes that make Google ignore your tag
Two or more canonicals on one page. Google ignores all of them and selects its own. Usually a plugin injects one and someone adds a second by hand.
Canonical outside the <head>. Anywhere in the body and it does nothing.
Relative URL, or the wrong domain or protocol. Relative paths resolve against page context, which breaks the moment a staging environment gets crawled.
Canonical pointing at a redirect, a 404 or a noindex page. You have declared a preference for a URL that cannot be indexed.
Combining noindex with rel="canonical". Contradictory instructions. Google does not recommend noindex “to prevent selection of a canonical page within a single site, because it will completely block the page from Search.”
Canonical chains. A points to B, B points to C. Point everything at the final URL instead.
Canonicalizing pages that are not genuinely equivalent. Google clusters by content similarity, and discards declarations between pages that are too different.
A canonical that contradicts the sitemap and the internal links. Three signals pointing three directions, and Google breaks the tie without you.
Canonical vs. 301 redirect vs. noindex vs. hreflang
Four instructions, four different outcomes for the person clicking the link.
Method
Use it when
What happens to the user
rel="canonical"
Duplicates that must stay reachable
Sees the page they clicked
301 redirect
The old URL should stop existing
Gets sent to the new URL
noindex
Page is useful to users, not to Search
Sees the page, no signals consolidated
hreflang
Same content, different language or region
Sees their language version
The decision comes down to one question: should the duplicate still be reachable? If yes, canonical. If the old URL has no reason to exist, redirect it and stop maintaining two things.
noindex is for pages that earn their keep with users and have no business ranking: thank-you pages, logins, account screens, filtered views with no search demand. It removes the page from Search without consolidating anything, so it is not a canonicalization tool.
Hreflang is a different job entirely. Every language version stays indexed, and the annotations tell Google which one to serve where. One trap worth knowing: a rel="canonical" annotation carrying hreflang, lang, media or type attributes is not used for canonicalization at all. Google ignores those, so keep the two declarations as separate elements.
Get your canonical setup audited
If Search Console keeps selecting a different canonical after you have fixed the tag, stop editing the tag. The problem is almost always the internal linking architecture pointing somewhere your declaration does not.
The practical next step is to audit what the rest of the <head> is telling Google on those same pages, since a canonical that disagrees with your schema markup and sitemap is a signal problem, not a syntax problem. Schemafy is one of the WordPress plugins that shows your schema markup and meta tags in one place.
[CTA_DOWNLOAD]
Frequently asked questions
Where do you put the canonical tag in HTML?
The canonical tag goes inside the <head> section of your HTML document, alongside your title and meta description. Placing it in the <body> makes Google ignore it entirely. On templated sites, add it to the head partial or layout file so it renders on every page.
Does every page need a canonical tag?
Google doesn’t require one, but adding a self-referencing canonical to every indexable page is standard best practice. It protects against duplicates created by tracking parameters, uppercase variants and scrapers. Pages you don’t want indexed should use noindex instead, never both on the same URL.
Can a page have two canonical tags?
No. If Google finds multiple rel="canonical" declarations on one page, it ignores all of them and picks a canonical URL itself. This usually happens when a plugin injects one automatically and someone adds a second manually, or when JavaScript overwrites the server-rendered tag.
Is a canonical tag the same as a 301 redirect?
No. A 301 redirect sends both users and crawlers to a different URL, so the original page becomes inaccessible. A canonical tag only tells search engines which version to index, and users can still reach every version. Use a redirect when the duplicate should no longer exist.
Why is Google ignoring my canonical tag?
Google treats canonical tags as strong signals, not directives, and weighs internal links, redirects and sitemap entries too. If those signals point elsewhere, Google overrides your tag and Search Console reports “Duplicate, Google chose different canonical than user.” Align every signal on one URL to fix it.
Can a canonical tag hurt SEO?
Yes, if it’s misconfigured. Canonicalizing pages that aren’t genuine duplicates, pointing to a 404 or redirected URL, or chaining canonicals can deindex pages that should rank. Audit canonicals whenever traffic drops on a section of the site after a template change.
Most WordPress SEO advice assumes that if you fix everything you control, you win. Clean titles, valid schema, fast pages, sensible internal links. Do that across every client site and the rankings follow.
They often don’t.
Google and the AI systems now summarizing it both weigh something you cannot edit: what the rest of the web says about you.
That is off-page SEO. This guide covers what it actually is, how it differs from on-page and technical work, the six signals that carry weight, the step almost every guide skips, which techniques still work, what gets you penalized, how to measure it, and a 90-day plan you can start this week.
What is off-page SEO?
Off-page SEO is everything that happens away from your own website to build its authority, trust, and relevance: backlinks, brand mentions, reviews, business listings, authorship signals, and community presence. It is the half of SEO you influence but do not directly control.
The most common mistake is treating off-page SEO and link building as the same thing. Links are one signal out of six. Reviews on third-party platforms, mentions with no link attached, directory listings, who your authors are, and where your brand shows up in video and community discussion all feed the same judgment.
You will also see this called off-site SEO or off-page optimization. Same discipline, different labels.
The idea goes back to PageRank, which treated a link as a third-party recommendation rather than a claim the site made about itself. Everything in this article is a descendant of that one assumption: a recommendation you did not write about yourself is worth more than one you did. Semrush’s guide frames it the same way.
Off-page SEO vs. on-page SEO vs. technical SEO
On-page SEO
Technical SEO
Off-page SEO
What it is
What you say about yourself
How easily you can be read
What others say about you
What you control
Full
Full
Influence only
Examples
Content, headings, internal links, meta tags, structured data
Crawlability, speed, indexation, canonicals
Backlinks, brand mentions, reviews, listings, video
How fast it moves
Days to weeks
Days to weeks
Months
That is the whole distinction in one line: on-page is what you say about yourself, technical is how easily you can be read, off-page is what others say about you.
The three do not compete. Off-page authority with no on-page substance sends visitors to a page that cannot convert them, and it gives search engines nothing specific to rank. On-page work with no off-page signal produces a well-built page that nobody vouches for.
Most operators overweight the first two because they are the ones you can finish. You can fix common SEO issues, rewrite URL slugs, and check every title in a SERP preview in an afternoon. Off-page never gets finished, which is exactly why it accumulates into a moat.
Why off-page SEO matters more in AI search
The stakes changed. Off-page signals no longer just decide where you sit in a list of ten blue links. They decide whether ChatGPT, AI Mode, and AI Overviews name you at all. In a generated answer there is no position four to fall back to. You are mentioned or you are absent.
Ahrefs studied 75,000 brands to see which factors track with being mentioned in AI answers. Across ChatGPT, AI Mode, and AI Overviews, YouTube mentions showed the strongest correlation at roughly 0.737, higher than any other factor tested. Branded web mentions came next at 0.66 to 0.71.
Two findings cut against common advice. In the cross-platform study, number of site pages correlated at about 0.194, which is close to nothing. Publishing more is not the lever. And Seer Interactive found the same pattern independently, with domain rating at 0.25 and backlinks at 0.10, so this is not one vendor’s dataset talking.
Now the part most articles quoting these numbers leave out.
Ahrefs published a caveat with both studies. “The usual disclaimer applies: correlation isn’t causation,” the cross-platform study says. “We’ve spotted patterns between search metrics and AI mentions, but that doesn’t mean improving these metrics will automatically boost your AI visibility.” That matters here more than usual, because a brand that is genuinely well known accumulates YouTube mentions, web mentions, and branded searches at the same time, without any of them causing the others. The methodology tightens the point: both studies filtered for domains with a domain rating above 40 and a top keyword doing at least 800 searches a month, which selects for brands that already arrived.
Read the numbers as a description of what visible brands look like, not as a set of dials. The practical takeaway survives either way, and it lines up with what generative engine optimization work has been pointing at: presence across other people’s properties is what these systems draw on.
Caption: Mention-based signals outrank link-based signals in every dataset published so far. Ahrefs cautions that these are correlations, not levers.
The 6 off-page SEO signals that actually count
These are ordered by how much difference they make for a site that still has to earn its authority, not one that already has a household name. A recognized brand can skip most of this list. Everyone else cannot.
1. Backlinks
A backlink is a link from another website to yours. It is the oldest off-page signal and still the most discussed, though no longer the most powerful.
Relevance and quality beat volume, and it is not close. A handful of links from sites that cover your subject will do more than hundreds from unrelated directories. What separates a good link from a bad one:
Topical relevance. The linking page covers a subject adjacent to yours.
Domain authority. The linking site has earned its own credibility.
Real traffic. The specific page linking to you has readers, not just a URL.
Natural anchor text. The visible link text reads like something a human wrote.
Editorial placement. The link sits inside the body content, not in a footer or a sidebar widget.
That fourth point has data behind it now, and it inverts what classic link building teaches. Branded anchors, meaning link text containing your brand name, correlated with AI visibility at 0.628 in AI Mode and 0.527 in AI Overviews. Number of backlinks sat at 0.218. Being linked to by name outperforms being linked to with a keyword you picked.
Three ways to earn links without a PR team: publish original data other people need to cite, offer expert commentary to trade publications covering your sector, and get listed on the resource pages your industry associations already maintain. All three are slow. None of them require buying anything.
2. Brand mentions (linked and unlinked)
A mention with no link still counts. If three industry blogs, a Reddit thread, and a YouTube video name your company, search engines and language models learn two things: that you exist, and what category you belong to.
Unlinked mentions, text written about your brand on other websites, have very little impact on SEO, but a much bigger impact on GEO. LLMs derive their understanding of a brand’s authority from words on the page, from the prevalence of particular words, the co-occurrence of different terms and topics, and the context in which those words are used.
Ryan Law, Director of Content Marketing, Ahrefs
The volume effect is steep. Brands in the top quartile for web mentions averaged 169 AI Overview mentions. The quartile below averaged 14.
The actionable version is unlinked mention reclamation: search for places your brand name appears without a link, then ask for one. Half the time the writer simply forgot. One caveat that trips people up: content on your own domain is not a third-party mention. Writing about yourself does not count, no matter how much of it you publish.
There is a gap in that logic worth noticing. For any of this to accrue to you, something has to establish that the “Acme Analytics” in that Reddit thread is your Acme Analytics. Hold that thought.
3. Reviews and third-party reputation
For most sites in this audience, this means product and vendor reviews on platforms you do not own: software comparison sites, marketplaces, and the community forums where your buyers actually ask each other for recommendations.
Four things matter. Volume, because one review is an anecdote. Average rating, obviously. Velocity, because a steady trickle reads as a real business while forty reviews in one month and silence afterward reads as a campaign. And your response pattern, because how a company answers criticism is itself evidence about the company.
Do not buy reviews. Beyond the platform bans, it fails at the thing you wanted, since purchased reviews cluster in ways that are straightforward to detect.
Google’s search quality guidance points its evaluators toward independent sources when assessing a site rather than the site’s own claims about itself. That is the entire logic of off-page SEO stated as policy.
One distinction to keep straight, because it causes real confusion: reviews collected on your own site are first-party content, and they are what Review and AggregateRating structured data describe. Reputation on third-party platforms is off-page. Marking up the first does not improve the second. They are separate jobs.
4. Business listings and citations
If any of your sites represent a business with a physical location, this one applies. If not, skip it.
A citation is a mention of a business name, address, and phone number in a directory or listing. Consistency matters more than volume here. Mismatched address data across directories is one of the most common problems in this category and one of the easiest to fix, because it is clerical work rather than strategy.
LocalBusiness structured data on the site itself helps tie those external listings back to the business as a single entity, which is the same mechanism the next section covers in full.
5. Author and publisher signals
This is the signal with the most upside and the least attention among operators running many sites.
Search systems increasingly ask who wrote a page, what else that person has published, and whether the organization publishing it is a recognizable entity. Most WordPress installations answer all three questions with “admin.”
The fix is unglamorous and takes an afternoon per site. Give every author a real bio that links to verifiable profiles elsewhere. Keep author identity consistent across the sites where the same person writes, so the profiles resolve to one human rather than five strangers with the same name. Retire the generic account.
Person and Organization structured data are the machine-readable version of the same claim. The bio tells a reader who wrote this. The schema tells a parser the same thing without requiring it to guess.
6. Video, community, and social distribution
Likes are not a ranking factor. Distribution is where the value sits, because distribution produces links, mentions, and branded searches, and those are signals. This is the same distinction that applies to meta descriptions, which are not a ranking factor but still shape whether anyone clicks.
YouTube earns its own paragraph given that 0.737 figure. The likely mechanism is not mysterious. YouTube is among the most-cited domains in AI answers, and its transcripts are also training data. The New York Times reported that OpenAI trained GPT-4 on over a million hours of YouTube transcription. Video sits on both the input and the output side of these systems.
For a small team the realistic version is one video a quarter answering the question you already field on every sales call. Reddit and niche podcasts work on the same principle. Forum spam does not, and it is the fastest way to get a brand name associated with the wrong thing.
The entity layer: connecting off-page signals to your site
Every guide on this subject stops at the moment someone mentions you. That is where the interesting problem starts.
When a search engine or a language model encounters “Acme Analytics” on a site you do not control, it has to decide what that string refers to. Your company. A different company with a similar name. A product. A person. Nothing at all. Until that question resolves, the mention is text on someone else’s page, not authority attached to your business.
Organization structured data with the sameAs property is how you answer it explicitly. sameAs takes a list of URLs that unambiguously identify the same entity: your LinkedIn page, your Crunchbase profile, your Wikipedia entry if you have one, your directory listings, your YouTube channel. You are stating, in a format a parser reads without inference, that all of these are one thing and that thing is you. Person schema does the same job on author pages.
Now the honest part, because this section is where an article like this usually oversells.
Structured data does not create authority. It is not a ranking factor on its own, and adding sameAs to a site nobody mentions accomplishes nothing. What it does is make authority that already exists legible and attributable. It converts something a search engine would otherwise have to infer into something it can read. When the inference is easy anyway, because you are Nike, this changes little. When your brand name is generic, shared, or new, the inference is harder and the declaration does more of the work.
The practical audit takes twenty minutes per site. Does the site declare Organization schema at all? Is sameAs populated with real profiles, or empty? Do author pages carry Person schema, or just a WordPress bio field? For most client sites the answer to all three is no, which makes this the rare off-page problem you can fix without asking anyone else for anything.
Generating those types across a lot of pages without hand-writing JSON-LD is what schema generators are for, Schemafy among them, though a single Organization block on one site is quick enough to write by hand in any schema markup generator. If the underlying concepts are unfamiliar, our guide to structured data covers the vocabulary.
Caption: Off-page work creates the mentions. The entity layer helps make them attributable to you rather than to a similarly named stranger.
Off-page SEO techniques that still work
Ordered by how quickly they pay back for a small team, not by how impressive they sound in a strategy deck.
Unlinked mention reclamation. Search your brand name, filter out your own domain, and email the writers who mentioned you without linking. Highest hit rate of anything on this list.
Broken link building. Find dead links on resource pages in your niche, then offer your equivalent page as the replacement. You are solving the site owner’s problem, which is why it converts.
Expert commentary for trade press. Answer journalist queries in your actual area of competence. One placement in a publication your buyers read beats ten guest posts nobody reads.
Original research or proprietary data. Publish a number nobody else has. This is the only technique that earns links passively for years, and the only one that reliably takes a month of work before it returns anything.
Resource page placement. Industry associations, alumni directories, and tool roundups maintain link lists. Ask to be on them.
Genuine guest contributions. Write for publications you would read. Skip anything that advertises guest post slots, since that market is exactly what Google’s spam policies target.
Creator collaborations. Partner with people who already have your audience’s attention. Their mention carries weight your own channel cannot manufacture.
Real community participation. Answer questions in the forums and subreddits where your buyers gather, under a real name, without pitching. Slowest of all of these, and the hardest to fake.
The first two pay within weeks because they exploit work already done. The last two compound over quarters. Original research sits in between: expensive up front, then it keeps earning. Choosing which of these to run is a search intent question as much as a link-building one, since the goal is to be present where your buyers already look.
5 off-page SEO tactics that can get you penalized
Buying links or using PBNs. Google’s spam policies name link schemes directly. Private blog networks get deindexed in batches, and you lose every link at once.
Low-quality directory farms. Hundreds of listings on sites that exist only to list. They pass no value and establish a pattern that is easy to classify.
Repeated exact-match anchor text. Two hundred links all reading “best project management software” is not a distribution any natural link profile produces. The pattern is the problem, not any single link.
Buying reviews. Platform bans aside, review velocity and language similarity are both measurable, and the penalty tends to arrive as removal of every review you paid for.
Duplicate or inconsistent listings. Less dramatic than the others, but conflicting business data creates ambiguity that suppresses you quietly rather than penalizing you loudly.
One nuance that gets lost: sponsorship is not a violation. Paying for a link becomes a problem when it passes ranking signals without disclosure, which is what rel="sponsored" and rel="nofollow" exist to prevent. Tag the link and the sponsorship is fine.
If you inherit a site with a questionable link history, audit the profile before assuming the worst. The disavow file exists for cases with a manual action or a clear pattern of purchased links, and Google has been consistent that most sites never need it. Reach for it last, not first.
How to measure off-page SEO
Six metrics, each with an obvious home:
Referring domains and month-over-month growth (Ahrefs, Semrush). Growth rate tells you more than the absolute count.
Link profile quality. Relevance and authority of what is pointing at you, not volume.
Branded search volume. The cleanest available proxy for whether awareness is actually rising.
Review volume and average rating across the third-party platforms your buyers check.
Referral traffic (GA4). Which mentions send actual humans.
Mention frequency in AI answers. How often you appear when a model answers a question in your category.
That last one needs a different mental model. In AI search, “position” barely means anything, since a generated answer is not a ranked list you can climb. You measure frequency of mention and share of voice against competitors instead. Answer engine optimization tools and AI visibility trackers exist specifically for this, and the category is young enough that methodologies still differ meaningfully between vendors.
Monthly is the right cadence. Off-page metrics move slowly enough that weekly checks produce noise and anxiety in equal measure. For a client report, three numbers carry the story: referring domains, branded search volume, and AI mention frequency.
A 90-day off-page SEO plan
Days 1 to 30: fix what you own. Roughly 8 to 12 hours. Audit the current backlink profile so you know what you inherited. Fix the entity layer: add Organization schema with a populated sameAs, give author pages Person schema, retire the “admin” byline. Correct listing inconsistencies where a site has a physical location. If you want to hand-write the markup, a JSON-LD editor is enough for a single organization block.
Days 31 to 60: claim what already exists. Roughly 12 to 16 hours. Run unlinked mention reclamation across every mention you can find. Publish one piece of original data, even a small one, drawn from something you already measure. Join one community where your buyers actually spend time and participate without pitching.
Days 61 to 90: build new surface. Roughly 10 to 14 hours. Pitch expert commentary to two trade publications. Record one video answering your most common sales question. Measure against the baseline from day one and adjust.
A word on expectations. Off-page work depends on other publishers, other platforms, and other people choosing to act, which is why it moves slower than anything you can change on your own server. It also compounds, because each mention makes the next one marginally easier to earn. This is a plan of actions, not a promise about a date.
Off-page SEO is a trust problem, not a link problem
On-page SEO is what you claim about yourself. Off-page SEO is what can be verified about you by someone else. The entity layer is what lets a machine match one to the other, and it is the piece almost nobody works on because it does not look like off-page work at all.
Before spending a quarter earning mentions, check whether your sites can even receive credit for them. If a search engine cannot tell that the company being discussed on someone else’s page is the company that owns your domain, those mentions are harder to credit to you.
[CTA_DOWNLOAD]
Off-page SEO FAQs
Is off-page SEO the same as link building?
No. Link building is one part of off-page SEO, but not all of it. Off-page SEO also includes brand mentions, customer reviews, business listings, digital PR, author signals, video presence, and community participation. Anything that builds your reputation outside your own website counts as off-page work.
How long does off-page SEO take to work?
Most sites see measurable movement in three to six months. Off-page SEO depends on other websites, publishers, and customers acting, so it moves slower than on-page changes. Entity-layer fixes are the exception, since those are on your own site and can be shipped in a day.
Can I do off-page SEO myself?
Yes, especially the fundamentals. One person can audit a backlink profile, add Organization and Person schema, fix listing inconsistencies, and set up a mention-reclamation process in about ten to twelve hours. Sustained digital PR and link acquisition are the parts that are hard without dedicated time.
Do social media signals affect SEO?
Not directly. Likes and shares are not ranking factors. But social distribution creates the things that are: links, brand mentions, and branded searches. A post that reaches the right audience can earn coverage, which is what search engines and AI systems actually weigh.
What is the difference between on-page and off-page SEO?
On-page SEO covers what you control on your own site: content, headings, internal links, and page structure. Off-page SEO covers signals that live elsewhere: backlinks, reviews, listings, and brand mentions. On-page is what you claim about yourself; off-page is what others confirm.
How many backlinks do I need to rank?
There is no fixed number. It depends on how competitive your keyword is and how strong your competitors’ link profiles are. For most keywords, a handful of genuinely relevant links plus consistent brand mentions outperforms a large volume of low-quality links.
Does off-page SEO help with ChatGPT and AI Overviews?
Yes, and it may matter more there than in classic search. Ahrefs studied 75,000 brands and found YouTube mentions correlated with AI visibility at roughly 0.737, ahead of every other factor. In a separate study of AI Overviews, backlinks trailed brand mentions 0.218 to 0.664. Ahrefs notes correlation is not causation.
{
  "@context": "https://schema.org",
  "@type": "FAQPage",
  "mainEntity": [
    {
      "@type": "Question",
      "name": "Is off-page SEO the same as link building?",
      "acceptedAnswer": {
        "@type": "Answer",
        "text": "No. Link building is one part of off-page SEO, but not all of it. Off-page SEO also includes brand mentions, customer reviews, business listings, digital PR, author signals, video presence, and community participation. Anything that builds your reputation outside your own website counts as off-page work."
      }
    },
    {
      "@type": "Question",
      "name": "How long does off-page SEO take to work?",
      "acceptedAnswer": {
        "@type": "Answer",
        "text": "Most sites see measurable movement in three to six months. Off-page SEO depends on other websites, publishers, and customers acting, so it moves slower than on-page changes. Entity-layer fixes are the exception, since those are on your own site and can be shipped in a day."
      }
    },
    {
      "@type": "Question",
      "name": "Can I do off-page SEO myself?",
      "acceptedAnswer": {
        "@type": "Answer",
        "text": "Yes, especially the fundamentals. One person can audit a backlink profile, add Organization and Person schema, fix listing inconsistencies, and set up a mention-reclamation process in about ten to twelve hours. Sustained digital PR and link acquisition are the parts that are hard without dedicated time."
      }
    },
    {
      "@type": "Question",
      "name": "Do social media signals affect SEO?",
      "acceptedAnswer": {
        "@type": "Answer",
        "text": "Not directly. Likes and shares are not ranking factors. But social distribution creates the things that are: links, brand mentions, and branded searches. A post that reaches the right audience can earn coverage, which is what search engines and AI systems actually weigh."
      }
    },
    {
      "@type": "Question",
      "name": "What is the difference between on-page and off-page SEO?",
      "acceptedAnswer": {
        "@type": "Answer",
        "text": "On-page SEO covers what you control on your own site: content, headings, internal links, and page structure. Off-page SEO covers signals that live elsewhere: backlinks, reviews, listings, and brand mentions. On-page is what you claim about yourself; off-page is what others confirm."
      }
    },
    {
      "@type": "Question",
      "name": "How many backlinks do I need to rank?",
      "acceptedAnswer": {
        "@type": "Answer",
        "text": "There is no fixed number. It depends on how competitive your keyword is and how strong your competitors' link profiles are. For most keywords, a handful of genuinely relevant links plus consistent brand mentions outperforms a large volume of low-quality links."
      }
    },
    {
      "@type": "Question",
      "name": "Does off-page SEO help with ChatGPT and AI Overviews?",
      "acceptedAnswer": {
        "@type": "Answer",
        "text": "Yes, and it may matter more there than in classic search. Ahrefs studied 75,000 brands and found YouTube mentions correlated with AI visibility at roughly 0.737, ahead of every other factor. In a separate study of AI Overviews, backlinks trailed brand mentions 0.218 to 0.664. Ahrefs notes correlation is not causation."
      }
    }
  ]
}
If your rankings stalled or your traffic slipped, the cause is rarely a mystery. Most SEO problems fall into a handful of buckets, and nearly all of them are fixable without an agency. This guide shows you how to fix SEO issues by symptom: find each one, understand why it hurts, and follow the steps to clear it. The starting point is a free crawl in Google Search Console, Ahrefs, or Screaming Frog.
In this guide:
How to Find SEO Issues Before You Fix Them
How to Fix Slow Page Speed and Poor Core Web Vitals
How to Fix Broken Links and 404 Errors
How to Fix Duplicate Content
How to Fix Pages That Aren’t Getting Indexed
How to Fix Missing or Weak Title Tags and Meta Descriptions
How to Fix Mobile Usability Problems
How to Fix Thin or Low-Value Content
How to Fix Missing or Broken Schema Markup
How to Prevent SEO Issues From Coming Back
Fix Your Schema Issues in Minutes with Schemafy
Frequently Asked Questions
How to Find SEO Issues Before You Fix Them
You can’t fix what you can’t see. Before you touch a single page, measure. Guessing wastes hours and usually fixes the wrong thing.
Three free tools surface almost every issue on this list. Google Search Console reports indexing problems and Core Web Vitals errors. A crawler like Screaming Frog or Ahrefs finds broken links and duplicate content. Google PageSpeed Insights scores speed and gives page-by-page fix instructions.
Run all three, then work down the list below. Each section is one issue your audit will flag.
Run a Google Search Console audit for indexing and Core Web Vitals errors.
Crawl your site with Screaming Frog or Ahrefs to surface broken links and duplicate content.
Test key pages in Google PageSpeed Insights for speed and Core Web Vitals.
Validate your structured data with Google’s Rich Results Test.
Work down the list below, fixing one issue type at a time.
If you run several client sites, this three-tool pass is the standard check to run before you bill a single hour of fixes. Here is the full map of what you will find and where to fix it.
Responsive theme, larger tap targets, no interstitials
Thin content
High bounce, low time-on-page
Expand with data, consolidate near-duplicates
Missing or broken schema
Rich Results Test, GSC Enhancements
Add valid JSON-LD for the right type
How to Fix Slow Page Speed and Poor Core Web Vitals
Speed is part of how Google judges a page, and mobile speed matters most. Page experience is not a single ranking signal, but Google’s core systems weigh Core Web Vitals, HTTPS, and mobile-friendliness together, according to Google’s page experience documentation.
Aim for the thresholds Google calls “good”: Largest Contentful Paint at or below 2.5 seconds, Interaction to Next Paint below 200 milliseconds, and Cumulative Layout Shift below 0.1. Interaction to Next Paint replaced First Input Delay in March 2024, so if you are still tracking FID, you are watching a retired metric (web.dev).
Work through these fixes in order:
Compress and serve next-gen images. Convert heavy JPEGs and PNGs to WebP or AVIF. Images are the most common cause of a slow Largest Contentful Paint.
Cut unused scripts and plugins. A stack of 4 or 5 overlapping SEO and marketing plugins loads scripts on every page. Deactivate what you do not use.
Enable caching and pick a lightweight theme. A bloated theme can undo every other fix.
Lazy-load below-the-fold media so images and videos load only when the reader scrolls to them.
Re-test in PageSpeed Insights after each change. It tells you exactly which resource is slowing the page, so you fix the real bottleneck instead of guessing.
How to Fix Broken Links and 404 Errors
Broken internal and external links waste crawl budget, frustrate readers, and signal a neglected site. Every dead link is a small tax on how efficiently Google crawls you.
Crawl the site with Screaming Frog or Ahrefs to list every 404 and every redirect chain. Then fix them:
301-redirect broken internal links to the closest live page.
Update or remove dead external links pointing off your site.
Fix redirect chains by pointing the original link straight to the final URL, not through two or three hops.
On a WooCommerce store, deleted and out-of-stock products are the most common source of 404s. When you retire a product, redirect its URL to the parent category or a close replacement instead of letting it 404. If you manage client sites, keep a redirect map for every migration so old URLs never dead-end.
How to Fix Duplicate Content
This is the highest-value section for any store owner. Duplicate content is where WooCommerce and WordPress sites quietly bleed rankings, and almost nobody audits for it.
Near-identical pages come from three places. Product variants for color and size can each spin up their own URL. Filtered, tag, and category archive URLs create thin variations of the same list. And a single product reachable through several category paths can exist at several addresses. Google then has to guess which version to rank.
Point Google at the right version:
Add canonical tags so every duplicate points to the primary version of the page.
301-redirect true duplicates that should not exist at all.
Use hreflang if you run regional stores in different languages or currencies.
Apply noindex to thin tag and archive pages that add no unique value.
Canonicalization matters most on stores with product variations. You set canonical tags through your existing SEO plugin, such as Yoast or Rank Math, or in your theme templates. A consistent canonical policy across client sites saves you from relitigating this on every audit.
How to Fix Pages That Aren’t Getting Indexed
Indexing is eligibility to rank. If a page is not indexed, it cannot earn a single visit, no matter how good it is.
Open the Page indexing report in Google Search Console and read the exclusion reason for each affected URL. Then work through the usual causes:
Confirm the page is not set to noindex and is not blocked in robots.txt.
Add internal links pointing to the page so Google can discover and prioritize it.
Improve thin content, since low-value pages are often left unindexed on purpose.
Once the page is worth indexing, submit it through URL Inspection and click Request Indexing.
The usual culprits are thin, low-quality content and orphan pages with no internal links. On large client sites, orphan pages pile up fast, so clean URL slugs and a sensible internal-link structure prevent most indexing gaps before they start.
How to Fix Missing or Weak Title Tags and Meta Descriptions
Title tags influence rankings. Meta descriptions influence click-through. Weak or duplicate tags leave both on the table.
Write a unique, keyword-first title tag for every page, kept to about 60 characters so it does not truncate in search. Write a compelling meta description of roughly 155 characters with a clear benefit or call to action. Front-load the primary keyword in both, and never reuse the same title across pages. If you want the background on why descriptions still matter, see whether meta descriptions are a ranking factor and the step-by-step guide to add a meta description in WordPress.
Editing tags one page at a time is fine for a homepage. It does not scale to hundreds of posts or products. In Schemafy, open WP Admin > Schemafy > Meta Tags, search for the page, and edit the Meta Title and Meta Description fields. A character counter and validation status keep you inside the limits, and the Google Preview shows the live search snippet before you save. Click Save Meta Tags to apply.
Schemafy shows the live Google Preview as you rewrite a product page’s title and description, so you catch truncation before it hits the SERP.
To rewrite tags in bulk, open Meta Tags > Bulk Import CSV, click Download Template for a file with the required url, meta_title, and meta_description columns, fill in your rows, and upload it. The import preview flags each row as Valid, Warning, or Invalid, then Import Rows applies only the valid ones. You can also test any title and description length against a live snippet with the SERP preview tool before you commit.
How to Fix Mobile Usability Problems
Google uses mobile-first indexing, which means it evaluates the mobile version of your site for ranking, as explained in Google’s page experience guidance. If your mobile experience is broken, your desktop polish will not save you.
Fix the fundamentals:
Use a responsive theme that adapts cleanly to phone screens.
Make tap targets and font sizes large enough to use without pinching or zooming.
Remove intrusive interstitials and pop-ups that cover the content on load.
Simplify navigation so the core paths work with a thumb.
Test on a real device and run Lighthouse in Chrome, since Google retired the standalone Mobile Usability report in Search Console. Because mobile Core Web Vitals feed the same page-experience signals, most speed fixes from earlier in this guide also improve mobile usability.
How to Fix Thin or Low-Value Content
Thin content underperforms, and Google may decline to index it at all. Pages that say very little give search engines very little reason to rank them.
Start by finding pages with high bounce and low time-on-page in your analytics. Then decide, page by page, whether to expand or consolidate:
Expand pages worth keeping with real data, answers to the follow-up questions readers ask, images, and internal links.
Consolidate or 301-redirect near-duplicate thin pages into one strong page.
Add unique descriptions to category and collection pages instead of leaving them bare.
The test for every page is whether it matches search intent better than what already ranks. If it does not, expand it until it does, or fold it into a page that does.
How to Fix Missing or Broken Schema Markup
Most SEO guides mention schema in passing. That is a mistake, because broken structured data is one of the few issues that changes how your listing looks in search, not just where it ranks.
Missing, invalid, or incomplete structured data means no rich results: no star ratings, no price, no FAQ, no breadcrumbs. You lose click-through even when your ranking is fine. The impact is measurable. Rotten Tomatoes added structured data to 100,000 pages and saw a 25% higher click-through rate on marked-up pages, and Nestlé measured pages shown as rich results getting an 82% higher click-through rate than non-rich pages, both reported in Google’s structured data documentation.
That makes schema a fixable, high-return SEO issue rather than a technical footnote.
A single product with valid Product and Review schema earns stars and a price in the SERP, while the plain results below compete on text alone.
How to check your structured data
Check your key pages before you change anything. Run them through Google’s Rich Results Test and the Schema Markup Validator, then open the Enhancements and Rich results reports in Search Console to see errors and warnings across the whole site. Look for missing required properties, such as a product price or a review rating, and for invalid syntax.
Most schema problems fall into four buckets:
No schema at all on pages that qualify for rich results.
The wrong @type for the page, such as Article on a product page.
Missing required fields, so the markup is present but ineligible.
Markup that does not match the visible content on the page.
That last one matters: Google does not guarantee rich results even for valid markup, and it requires your structured data to match what users actually see, per Google’s structured data guidelines. If you want to inspect or hand-edit the raw code, a JSON-LD editor validates it against the same specification. Inside Schemafy, the Rich Snippets screen lists every schema already applied across your site, so you can see coverage and gaps in one place.
How to fix it fast on WordPress
You have two paths. The first is editing JSON-LD by hand in your theme files, such as functions.php or template files. It works, but it is error-prone, usually needs a developer, and breaks when the theme updates. The second is a dedicated plugin that injects validated JSON-LD without touching your theme.
Schemafy takes the second path. To cover a whole site, open WP Admin > Schemafy > Auto Schema Generator, click Scan Site, and filter by Post Type and Status, for example Product and Needs Schema. The scan lists every page with its current and suggested schemas so you can see coverage at a glance. For a specific page or a complex type, open AI Schema Generator, select the page, choose a type such as Product or FAQPage, click Generate Schema with AI, review the generated JSON-LD and its validation status, and click Save to Website. You can also start from a template with the schema markup generator or follow the full walkthrough on how to use schema markup. Either way, you add Product, Review, BreadcrumbList, and FAQPage schema that stays valid, without writing code.
Schemafy’s Auto Schema Generator flags every product page missing schema after a single scan, so you fix coverage in bulk instead of page by page.
[CTA_DOWNLOAD]
How to Prevent SEO Issues From Coming Back
SEO is not one-and-done. Most sites fix their issues once, stop monitoring, and watch broken links, speed regressions, and missing schema creep back within months. Maintenance beats emergencies.
Build a short routine you can repeat:
Schedule a monthly crawl with your usual tool.
Watch Search Console for new coverage and Core Web Vitals errors.
Re-validate your schema after every theme or plugin update, since updates are what silently break markup. In Schemafy, the Rich Snippets screen shows what is still applied so you can spot anything that dropped.
Keep a simple audit checklist so nothing gets skipped.
If you manage client sites, turn that checklist into a repeatable monthly pass and you will grow organic traffic more steadily than any one-time cleanup ever could.
Fix Your Schema Issues in Minutes with Schemafy
Of every issue in this guide, schema is one of the fastest to fix and one of the very few that directly changes how your listing looks in search. Rich results are a click-through win you can capture this week.
Schemafy is the no-code way for WordPress sites and WooCommerce stores to add valid JSON-LD, including Product, Review, BreadcrumbList, and FAQPage, without editing theme code. It complements the SEO work you are already doing. The fastest first step is to scan your site and see exactly what schema is missing.
[CTA_DOWNLOAD]
Frequently Asked Questions
Quick answers to the questions store owners and agencies ask most about fixing SEO issues.
How do I check what SEO issues my site has?
Start with three free tools: Google Search Console for indexing and Core Web Vitals errors, a crawler like Screaming Frog or Ahrefs to find broken links and duplicate content, and Google PageSpeed Insights for speed. Together they surface almost every fixable SEO issue on your site.
How long does it take to fix SEO issues?
Individual fixes, like redirects, meta tags, or schema, take minutes to hours. Seeing ranking or traffic changes takes longer: Google must recrawl and reprocess your pages, which can be days for small fixes and several weeks for content or indexing changes across a larger site.
What are the most common SEO issues?
The most common SEO issues are slow page speed, broken links, duplicate content, pages not getting indexed, weak title tags and meta descriptions, poor mobile usability, thin content, and missing or invalid schema markup. Most sites have several at once, and nearly all are fixable without a developer.
Can I fix SEO issues myself without a developer?
Yes. Most SEO issues, like meta tags, redirects, image compression, indexing, and content, can be fixed in your CMS or WordPress settings without code. Schema markup is the main exception, but no-code plugins let you add valid structured data without editing theme files.
Does schema markup help fix SEO issues?
Schema markup doesn’t boost rankings directly, but it fixes a real visibility issue: without valid structured data your pages can’t show rich results like star ratings, prices, or FAQs. Adding correct JSON-LD schema improves how your listing looks and lifts click-through rate.